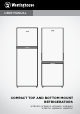
USER MANUAL COMPACT TOP AND BOTTOM MOUNT REFRIGERATORS WTB2300, WTB2500, WTB2800, WTB3400, WTB3700, WBB3400, WBB3700
CONGRATULATIONS CONTENTS Congratulations and thank you for choosing our refrigerator. We are sure you will find your new appliance a pleasure to use. Before you use the appliance, we recommend that you read through the entire user manual, which provides the description of the appliance and its functions. Important safety information ........................................................
IMPORTANT SAFETY INSTRUCTIONS Please read the user manual carefully and store in a handy place for later reference. Pass the user manual on to new owners of the refrigerator. TIPS & INFORMATION IMPORTANT Important – check for any damages or marks If you find the refrigerator is damaged or marked, you must report it within 7 days if you wish to claim for damage/marks under the manufacturers warranty. This does not affect your statutory rights.
GENERAL WARNINGS Read the following carefully to avoid damage or injury. It is important to use your refrigerator safely. Check these safety points before using your refrigerator. • The appliance must be plugged into its own dedicated 220-240V, 50Hz AC electrical outlet. • The plug must be accessible when the refrigerator is in position. • It is essential the powerpoint is properly earthed to ground. Consult a qualified electrician if you are unsure.
INSTALLATION Clean the refrigerator thoroughly according to instructions and wipe away any dust that has accumulated during shipping. Check that the floor is level. If it is not, adjust the stabilising foot so that the refrigerator is level and stable. We recommend that the refrigerator be turned on and left to run for two to three hours before placing any food inside it. This will allow you to check that it is operating properly and there is adequate cool air in the freezer.
TOP FREEZER FEATURES WTB2300, WTB2500, WTB2800, WTB3400, WTB3700 1 3 22 4 5 6 21 7 20 8 9 2 19 18 10 11 17 12 16 13 14 15 The details of the refrigerator feature: 1 Freezer Door 13 Humidity Slide 2 Food Door 14 Crisper 3 Twist Ice and Serve 15 Adjustable Feet 4 Ice Storage Bin 16 Bottle Door Bins 5 Temperature Control (Freezer) 17 6 Freezer Shelf 18 Door Bins 7 Chiller Compartment 19 Egg Tray 8 Light Switch 20 Slide Rails 9 Multiflow 21 Freezer Door Bins 10 Refrigerato
BOTTOM FREEZER FEATURES WBB3400, WBB3700 4 24 23 1 22 5 21 6 20 19 7 17 18 2 8 16 9 15 10 11 13 3 12 14 The details of the refrigerator feature: 1 Food Door 13 Freezer Drawer (Mid) 2 Door Handles (Pocket Handle) 14 Freezer Drawer (Bottom) 3 Freezer Door 15 Meat Drawer 4 Deodoriser Cover 16 Bottle Door Bins 5 Refrigerator Light 17 6 Adjustable Glass Shelves 18 Temperature Control (Freezer) 7 Multiflow 19 Slide Rails 8 Crisper 20 Door Bins 9 Humidity Slide 21 Egg Tray
TEMPERATURE CONTROL Temperature control Top mount models Set the temperature by using the slide temperature controls, refer to the relevant instruction for Bottom mount freezer or Top mount freezer models shown in this section. When you first turn on the refrigerator, set both the refrigerator and freezer temperature control to MID.
FEATURES This section tells you how to make the most of the many useful features of the refrigerator and how to clean them. You can adjust the refrigerator bins to meet different storage needs. Door storage bins The refrigerator has door storage bins. You can adjust the refrigerator bins to meet different storage needs. All the door bins are completely removable for cleaning. If you want to remove or adjust a bin, lift and tilt to remove.
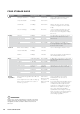
FOOD STORAGE GUIDE CATEGORY PRODUCT REFRIGERATOR FREEZER STORAGE TIPS Meat Sausages and Mince 1-2 Days 2-3 Months Keep cold meat at the back of the refrigerator where it is coldest. Chops and Steak 3-4 Days 4-6 Months Cold Meats 3-5 Days 4-6 Months Plastic can cause meat to sweat if stored in refrigerator for more than a day. Cuts for roasting 3-5 Days 12 Months Cuts for roasting can take up to 48 hours to defrost properly. Transfer frozen cuts to the refrigerator 2 days before use.
NOISES Appliance noise Your new refrigerator may make sounds that your old one didn’t make. Because the sounds are new to you, you might be concerned about them. Most of the new sounds are normal. Hard surfaces, like the floor, walls and cabinets, can make the sounds seem louder than they actually are. The following describes the kinds of sounds and what may be making them.
TROUBLESHOOTING Appliance does not operate at desired temperature In a modern frost free refrigerator / freezer, cold air is circulated around the various compartments through air vents using a high efficiency fan. CONCERN WHAT TO DO Refrigerator is too warm. Ensure food is allowed to cool before placing inside the refrigerator. Ensure the appliance is set up as per instructions on page 11. Ensure that contents are not obstructing the cooling vents.
Refrigerator operation CONCERN WHAT TO DO When your appliance is not operating Check that the power cord is plugged into the power outlet properly and that the outlet is switched on. Try running another appliance from the same power outlet. If no power is coming out from the outlet, you may have a blown fuse or tripped your household power supply circuit. Try adjusting the temperature control to a slightly colder position.
NOTES 14 NOTES
Warranty FOR SALES IN AUSTRALIA AND NEW ZEALAND APPLIANCE: REFRIGERATION This document sets out the terms and conditions of the product warranties for Electrolux Appliances. It is an important document. Please keep it with your proof of purchase documents in a safe place for future reference should you require service for your Appliance. 1.
For more information on all Westinghouse appliances, or for dimension and installation information, call into your retailer, phone or email our customer care team or visit our website: AUSTRALIA phone: 1300 363 640 fax: 1800 350 067 email: customercare@electrolux.com.au web: westinghouse.com.au NEW ZEALAND phone: 0800 436 245 fax: 0800 225 088 email: customercare@electrolux.co.nz web: westinghouse.co.