
User Manual


22 USING YOUR OVEN
3. Enter the time of day to finish cooking by pressing
or
symbols while the indicator symbol
is flashing.
4. After 5 seconds from the last change, the
indicator symbol
will stop flashing and the current
time of day will be displayed.
Setting the delayed start cooking time
1. Program the and as described
in the relevant sections. Once both the
and have been set, the and
indicators will stop flashing and the current
time of day will be displayed.
NOTE: Do not forget to add pre-heating time if necessary.
To check or cancel settings
1. To check your settings, press until the
indicator symbol flashes next to the mode
( , etc) that you want to display.
After 5 seconds from the last change, the indicator
will stop flashing and the time of day will be
displayed.
2. To cancel “delayed start”, press
until the
indicator symbol flashes next to . Press and
hold and symbols together until the current time
of day is displayed.
3. To cancel a setting, press
until the indicator
symbol flashes next to the setting to be cancelled.
Press and hold and symbols together until the
setting is cleared.
On completion of cooking
When the set time has elapsed, the oven will turn off,
the timer will beep and the and/or
indicators will flash.
1. Turn the
and controls to the
off position.
2. Press
or symbols or to stop the clock
from beeping.
Switching the clock display ON and OFF
1. Press together and symbols for 3 seconds to
switch off the display.
2. Press together
and symbols for 3 seconds to
switch the clock display on again.
NOTE: If a timer mode is set, then it is not possible to
switch the display off.
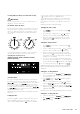
Operating the Electronic Clock
(WVEP615, WVEP627, WVEP617)
Before the appliance can be used, the time must be set.
When power is supplied to the oven the clock icon will
be displayed. Along with the clock symbol the ‘12’ will be
flashing. This indicates that ‘hour’ portion of the time is
ready to be changed.
Toggle the temp selector
or , then touch when
you have the right hour.
The minutes will flash and can be set in the same manner.
5 seconds after the last change, the clock display will stop
flashing, confirming that the time has been set.
NOTE: The clock has a 24 hour display.
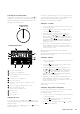
Select the oven function
Turn the oven function selector clockwise to select the
desired oven function.
NOTE: each oven function has a default temperature
which can then be adjusted as outlined below.
This knob cannot be
turned anticlockwise
from off position
USING YOUR OVEN (CONTINUED)