PRO SERIES ELECTRIC MEAT GRINDER and SAUSAGE STUFFER #8 MODEL NO. 08-0801-W #12 MODEL NO. 08-1201-W #22 MODEL NO. 08-2201-W #32 MODEL NO. 08-3201-W Due to constant factory improvements, the product pictured might differ slightly from the product received.
WARNING! NEVER operate Grinder without the Tray/Safety Guard secured in place. To avoid serious or fatal injury, NEVER reach into any Grinder inlet. ALWAYS use the Stomper to push meat into the Grinder Head. Read & fully understand all instructions & warnings prior to use.
IMPORTANT SAFETY RULES WARNING! READ AND FULLY UNDERSTAND ALL INSTRUCTIONS AND WARNINGS PRIOR TO USING THIS UNIT. YOUR SAFETY IS MOST IMPORTANT! FAILURE TO COMPLY WITH PROCEDURES AND SAFEGUARDS MAY RESULT IN SERIOUS INJURY OR PROPERTY DAMAGE. REMEMBER: YOUR PERSONAL SAFETY IS YOUR RESPONSIBILITY! 1. DO NOT use the Grinder without the Tray/Safety Guard secured into place. 2. ALWAYS DISCONNECT Grinder from power source before servicing, changing accessories or cleaning the unit. 3.
COMPONENT LIST DIAGRAM NUMBER PART DESCRIPTION #08 08-0801-W #12 08-1201-W #22 08-2201-W #32 08-3201-W 1 Front Ring Nut 08-0842 08-1242 08-2242 08-3242 2 4.
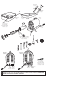
#8 & #12 Stomper 12 #22 & #32 Stomper 11 #8 & #12 Tray #22 & #32 Tray Motor Cover 20 Safety Guard included with #22 & #32 Model Grinders only Power Cord 8 10 3 4 6 5 7 9 NOTE: #8 & #12 Grinders have a flat washer style Auger Bearing 1 18 16 19 14 15 #22 & #32 Grinders Flat-head Screwdriver included with #22 & #32 Model Grinders only for the Safety Guard O I #8 & #12 Grinders 13 2 17 On/Off Circuit Power Breaker Switch Circuit Breaker On/Off/Reverse Power Switch WARNING! Before
UNPACKING INSTRUCTIONS . Remove all parts from packaging material and check to be sure there are no missing parts. . Retain packaging material for storage of the Grinder and Grinder parts when not in use. GROUNDING INSTRUCTIONS GROUNDING This appliance must be grounded while in use to protect the operator from electrical shock. The appliance is equipped with a 3-conductor cord and a 3-prong grounding type plug to fit the proper grounding-type receptacle.
CLEANING INSTRUCTIONS WARNING! Before cleaning, assembling or disassembling the Grinder, make sure the Grinder Motor is OFF and the PLUG IS REMOVED FROM THE OUTLET/POWER SOURCE! 1. Remove the Head Assembly from the Grinder Motor. 2. Disassemble the Head Assembly. 3. Remove the Safety Guard from the Tray, as instructed in the “Safety Guard Instructions”. Safety Guards only come with #22 and #32 Model Grinders. 4. Wash all parts that have come in contact with meat in hot soapy water.
GRINDER ASSEMBLY INSTRUCTIONS WARNING! Before cleaning, assembling or disassembling the Grinder, make sure the Grinder Motor is OFF and the PLUG IS REMOVED FROM THE OUTLET/POWER SOURCE! 1. Insert the Head into the Gear Housing with the Feed Chute facing straight up. You will need to line up the slot in the Head with Feed Chute the Pin inside the Gear Housing. Be sure the Head is seated fully into the Gear Housing (Figure 1). Head Slot in Head FIGURE 1 2.
7. Insert the neck of the Tray into the Feed Chute (Figure 3). Tray 8. NEVER operate Grinder without the Tray secured in place (Figure 3). FIGURE 3 Neck REFER TO “GRINDING INSTRUCTIONS” Feed Chute Head WARNING! See Safety Guard Instructions Prior Operation! WARNING! NEVER operate Grinder without the Tray/Safety Guard secured in place. To avoid serious or fatal injury, NEVER reach into any Grinder inlet. ALWAYS use the Stomper to push meat into the Grinder Head.
GRINDING INSTRUCTIONS WARNING! Before cleaning, assembling or disassembling the Grinder, make sure the Grinder Motor is OFF and the PLUG IS REMOVED FROM THE OUTLET/POWER SOURCE! 1. Follow the “Grinder Assembly Instructions” to fully assemble the Grinder including the Tray. NOTE: It is best to grind the meat using the coarse, 7 mm Grinding Plate first. If a finer grind of meat is desired, run the coarse ground meat through the Grinder a second time using the fine, 4.5 mm Grinding Plate. 2.
STANDARD STUFFER ASSEMBLY INSTRUCTIONS WARNING! Before cleaning, assembling or disassembling the Grinder, make sure the Grinder Motor is OFF and the PLUG IS REMOVED FROM THE OUTLET/POWER SOURCE! 1. Insert the Head into the Gear Housing with the feed chute of the Head facing straight Feed up. You will need to line up the slot in the Chute Head with the Pin inside the Gear Housing. Be sure the Head is seated fully into the Gear Head Housing (Figure 5). Slot in Head FIGURE 5 2.
HIGH-SPEED STUFFER ASSEMBLY INSTRUCTIONS WARNING! Before cleaning, assembling or disassembling the Grinder, make sure the Grinder Motor is OFF and the PLUG IS REMOVED FROM THE OUTLET/POWER SOURCE! NOTE: The High-Speed Stuffing System is designed for use with the 10 mm Funnel ONLY. DO NOT attempt to use the HighFeed Speed Plastic Auger with any other Funnels. Chute SERIOUS DAMAGE to the Grinder Head and other components may occur.
7. Insert the neck of the Tray into the Feed Chute (Figure 10). Tray 8. NEVER operate Grinder without the Tray secured in place (Figure 10). Neck REFER TO “STUFFING INSTRUCTIONS” Feed Chute Head WARNING! See Safety Guard Instructions Prior Operation! WARNING! NEVER operate Grinder without the Tray/Safety Guard secured in place. To avoid serious or fatal injury, NEVER reach into any Grinder inlet. ALWAYS use the Stomper to push meat into the Grinder Head.
STUFFING INSTRUCTIONS WARNING! Before cleaning, assembling or disassembling the Grinder, make sure the Grinder Motor is OFF and the PLUG IS REMOVED FROM THE OUTLET/POWER SOURCE! 1. After grinding the meat following the “Grinding Instructions”, mix the ground meat with the sausage seasonings. 2. Follow the “Stuffer Assembly Instructions” or the “High-Speed Stuffer Assembly Instructions” to fully assemble the Grinder as a Stuffer including the Tray.
8. Hold the casing in place with one hand while feeding the sausage mixture through the Grinder. As the meat fills the casing, gently lay it on a clean, dry surface. NOTE: When using natural casings, use a wet surface. 9. Do not fill the last 3”-4” (7.5-10 cm) of casing. After the entire length of casing has been stuffed, twist the open end to close, then tie off the ends of the casing tightly to close. Twist into links. 10. Whenever stuffing sausage, fill the casing slowly to avoid air pockets.
CIRCUIT BREAKER INSTRUCTIONS FIGURE 13 This Grinder is equipped with a Circuit Breaker as a safety precaution. If the Grinder stops running follow these steps to remedy: 2. Check the Grinder to see if there is a jam in the Grinder Head. If there is, the jam needs to be cleared of the obstruction as outlined in “Grinding Tips”. O I 1. Turn the Grinder to the “Off” position. 2. Press the Circuit Breaker Reset Button (Figure 13). Circuit Breaker Reset Button 3.
SAFETY GUARD INSTRUCTIONS (Only equipped on#22 & #32 Grinders) WARNING! Before cleaning, assembling or disassembling the Grinder, make sure the Grinder Motor is OFF and the PLUG IS REMOVED FROM THE OUTLET/POWER SOURCE! FIGURE 14 The #22 and #32 Grinders are equipped with a Safety Guard. This Safety Guard is here to prevent injury to the user. The only reason that the Safety Guard should be removed is for cleaning purposes, then it should be IMMEDIATELY REPLACED.
FOOD SAFETY There are basic rules to follow when handling food. They are COOK, SEPARATE, CLEAN, and CHILL. COOK It’s crucial to cook food to a safe internal temperature to destroy bacteria that is present. The safety of hamburgers and other foods made with ground meat has been receiving a lot of attention lately, and with good reason. When meat is ground, the bacteria present on the surface is mixed o o o throughout the ground mixture.
SAUSAGE INFORMATION MEAT SELECTION FOR SAUSAGE MAKING Sausage making has evolved over many years and generations, and as a result there are countless types of sausage you can make using the basic ingredients of meat, fat and a few carefully blended spices. Following are a few simple guidelines that will help you make the best tasting sausage possible. Any type of meat can be used for making sausage: pork, beef, bison, moose and caribou, even antelope make great sausage.
WESTON WARRANTY INFORMATION SAVE THIS WARRANTY INFORMATION FOR YOUR RECORDS! Weston Products LLC warrants to the ORIGINAL RETAIL PURCHASER of this product that if operated in accordance with the printed instruction accompanying it, then for a period of 2 years from the date of purchase, the product shall be free from defects in material and workmanship.
PRO SERIES MOLINO DE CARNE ELÉCTRICO y RELLENADOR DE SALCHICHAS #8 MODELO NO. 08-0801-W #12 MODELO NO. 08-1201-W #22 MODELO NO. 08-2201-W #32 MODELO NO. 08-3201-W Molino eléctrico de grado comercial para carne Debido a constantes mejoras en la fábrica, el producto que se muestra puede ser ligeramente diferente del producto en esta caja.
INSTRUCCIONES EN ESPAÑOL ¡ADVERTENCIA! NUNCA opere el molino sin la bandeja/guarda de seguridad fija en su lugar. Para evitar lesiones serias o fatales, NUNCA ingrese a ninguna entrada en el molino. Utilice SIEMPRE el pisón para empujar los alimentos dentro del cabezal del molino. Lea y entienda por completo todas las instrucciones y advertencias antes de usarlo.
¡ADVERTENCIA! LEA Y ENTIENDA COMPLETAMENTE TODAS LAS INSTRUCCIONES Y ADVERTENCIAS ANTES DE UTILIZAR ESTA UNIDAD. ¡SU SEGURIDAD ES LO MÁS IMPORTANTE! NO SEGUIR LOS PROCEDIMIENTOS Y PRECAUCIONES PUEDE PROVOCAR LESIONES GRAVES Y DAÑOS MATERIALES. RECUERDE: ¡SU SEGURIDAD PERSONAL ES RESPONSABILIDAD DE USTED! 1. NO use el molino sin la bandeja/guarda de seguridad asegurada en su lugar. 2. SIEMPRE DESCONECTE el molino de la fuente de corriente antes de darle mantenimiento, cambiarle accesorios o limpiarla. 3.
INSTRUCCIONES EN ESPAÑOL LISTA DE COMPONENTES DIAGRAMA NÚMERO 1 2 3 4 5 6 7 8 9 10 11 12 13 14 15 16 17 18 19 20 PARTE DESCRIPCIÓN #08 08-0801-W Tuerca del anillo frontal Placa del molino de 4.
12 #22 & #32 Pisón 11 #8 & #12 Charola #22 & #32 Charola Cubierta del motor 20 Guarda de seguridad incluida con molinos Modelos #22 Y #32 únicamente Cable de corriente 8 10 3 4 6 5 7 9 NOTA: Los molinos #8 & #12 tienen un cojinete del tornillo sin fin de tipo arandela plana 1 18 16 19 Los molinos #8 & #12 13 14 INSTRUCCIONES EN ESPAÑOL #8 & #12 Pisón 2 17 15 O I Los molinos #22 & #32 Encendido/Apagado Interruptor de encendido y apagado Cortador de circuitos ¡ADVERTENCIA! Destorn
INSTRUCCIONES EN ESPAÑOL INSTRUCCIONES PARA EL DESEMPAQUE . Retire todas las partes del material de empaque y verifique que no falte ninguna. . Conserve el material de empaque para almacenar el molino y las partes del molino cuando no esté en uso. INSTRUCCIONES PARA HACER TIERRA ATERRIZADO Este aparato debe estar aterrizado para proteger al operario de choques eléctricos.
¡ADVERTENCIA! ¡Antes de limpiar, ensamblar o desarmar el molino, cerciórese de que el motor del molino esté APAGADO y que LA CLAVIJA ESTÉ RETIRADA DEL TOMACORRIENTE O FUENTE DE ENERGÍA! 1. Retire el cabezal del motor del molino. 2. Desarme el conjunto del cabezal. INSTRUCCIONES EN ESPAÑOL INSTRUCCIONES DE LIMPIEZA 3. Retire la guarda de seguridad de la bandeja, como se indica en las “Instrucciones de la guarda de seguridad”. Las guardas de seguridad sólo vienen con los molinos Modelo #22 y #32. 4.
INSTRUCCIONES EN ESPAÑOL INSTRUCCIONES DE ENSAMBLE DEL MOLINO ¡ADVERTENCIA! ¡Antes de limpiar, ensamblar o desarmar el molino, cerciórese de que el motor del molino esté APAGADO y que LA CLAVIJA ESTÉ RETIRADA DEL TOMACORRIENTE O FUENTE DE ENERGÍA! 1. Inserte el cabezal en el gabinete de engranajes con la tolva de alimentación hacia arriba. Necesitará alinear la ranura en el cabezal con el pasador dentro del gabinete de engranajes.
7. Inserte el cuello de la bandeja en la tolva de alimentación (Figura 3). 8. NUNCA opere el molino sin haber asegurado la bandeja en su lugar (Figura 3). Charola FIGURA 3 Cuello Tolva de alimentación Cabezal REMÍTASE A LAS “INSTRUCCIONES DE MOLIDO” ¡ADVERTENCIA! ¡Ver las instrucciones de la guarda de seguridad antes de la operación! ¡ADVERTENCIA! WARNING! NUNCA opere el molino sin la bandeja/guarda de seguridad fija en su lugar.
INSTRUCCIONES EN ESPAÑOL INSTRUCCIONES PARA MOLER ¡ADVERTENCIA! ¡Antes de limpiar, ensamblar o desarmar el molino, cerciórese de que el motor del molino esté APAGADO y que LA CLAVIJA ESTÉ RETIRADA DEL TOMACORRIENTE O FUENTE DE ENERGÍA! 1. Siga las “Instrucciones de ensamble del molino” para ensamblar completamente el molino incluida la charola. NOTA: Es mejor moler la carne utilizando primero la placa del molino gruesa de 7 mm.
8. Lleve el molino a la posición “FWD” (adelante). Con cuidado, comience a introducir cubos de carne en la tolva de alimentación. UTILICE ÚNICAMENTE EL PISÓN PARA EMPUJAR LA COMIDA DENTRO DEL CABEZAL, NO UTILICE SUS DEDOS NI NINGÚN OTRO OBJETO. ¡CALIENTE HOT DO NO T TTOQUE! OUCH! NO LO INSTRUCCIONES EN ESPAÑOL 7. Asegúrese de que el molino se encuentra en la posición “OFF” (apagado). Conecte el molino al suministro de corriente.
INSTRUCCIONES EN ESPAÑOL RELLENADOR ESTÁNDAR INSTRUCCIONES DE ENSAMBLADO ¡ADVERTENCIA! ¡Antes de limpiar, ensamblar o desarmar el molino, cerciórese de que el motor del molino esté APAGADO y que LA CLAVIJA ESTÉ RETIRADA DEL TOMACORRIENTE O FUENTE DE ENERGÍA! 1. Inserte el cabezal en el gabinete de engranajes con la tolva de alimentación del cabezal hacia arriba. Necesitará alinear la ranura en el cabezal con el pasador dentro del gabinete de engranajes.
6. Instale la tuerca del anillo frontal, NO APRIETE DEMASIADO. Gire la tuerca del anillo frontal hasta que haga contacto con la brida, gire otro 1/4 de vuelta para apretarla en su lugar. 7. Inserte el cuello de la bandeja en la tolva de alimentación (Figura 7). 8. NUNCA opere el molino sin haber asegurado la bandeja en su lugar (Figura 7). REMÍTASE A LAS “INSTRUCCIONES E RELLENADO” -33- Charola FIGURA 7 Cuello Tolva de alimentación Cabezal INSTRUCCIONES EN ESPAÑOL 5.
INSTRUCCIONES EN ESPAÑOL RELLENADOR DE ALTA VELOCIDAD INSTRUCCIONES DE ENSAMBLADO ¡ADVERTENCIA! ¡Antes de limpiar, ensamblar o desarmar el molino, cerciórese de que el motor del molino esté APAGADO y que LA CLAVIJA ESTÉ RETIRADA DEL TOMACORRIENTE O FUENTE DE ENERGÍA! NOTA: El sistema de rellenado de alta velocidad está diseñado para utilizarlo ÚNICAMENTE con el embudo de 10 mm. NO trate de utilizar el tornillo sinfín plástico de alta velocidad con ningún otro embudo.
Charola 7. Inserte el cuello de la bandeja en la tolva de alimentación (Figura 10). Cuello Tolva de alimentación 8. NUNCA opere el molino sin haber asegurado la bandeja en su lugar (Figura 10). REMÍTASE A RELLENADO” LAS “INSTRUCCIONES Cabezal DE ¡ADVERTENCIA! ¡Ver las instrucciones de la guarda Instrucciones antes de la operación! ¡ADVERTENCIA! WARNING! NUNCA opere el molino sin la bandeja/guarda de seguridad fija en su lugar.
INSTRUCCIONES EN ESPAÑOL INSTRUCCIONES DE RELLENADO ¡ADVERTENCIA! ¡Antes de limpiar, ensamblar o desarmar el molino, cerciórese de que el motor del molino esté APAGADO y que LA CLAVIJA ESTÉ RETIRADA DEL TOMACORRIENTE O FUENTE DE ENERGÍA! 1. Después de moler la carne siguiendo las "Instrucciones de molido", mezcle la carne molida con los condimentos para salchichas. ¡ADVERTENCIA! WARNING! NUNCA opere el molino sin la bandeja/guarda de seguridad fija en su lugar. 2.
INSTRUCCIONES EN ESPAÑOL 7. Lleve el molino a la posición “FWD” (adelante). Con cuidado, comience a introducir cubos de carne en la tolva de alimentación. UTILICE ÚNICAMENTE EL PISÓN PARA EMPUJAR LA COMIDA DENTRO DEL CABEZAL, NO UTILICE SUS DEDOS NI NINGÚN OTRO OBJETO. 8. Sostenga la funda en su lugar con una mano mientras alimenta la mezcla de salchichas a través del molino. A medida que la carne llena la funda, colóquela suavemente sobre una superficie limpia y seca.
FIGURA 13 Este molino está equipado con un cortador de circuitos como medida de precaución. Si el molino deja de funcionar, siga estos pasos para solucionarlo: 1. Ponga el molino en la posición “Off” (apagado). 2. Revise el molino para ver si hay una obstrucción en el cabezal del molino. Si la hay, es necesario retirar la obstrucción como se describe en los “Consejos para el molido”. 2. Presione el botón de reinicio del cortador Botón de de circuitos (Figura 13).
(Únicamente para los molinos #22 y #32) ¡ADVERTENCIA! ¡Antes de limpiar, ensamblar o desarmar el molino, cerciórese de que el motor del molino esté APAGADO y que LA CLAVIJA ESTÉ RETIRADA DEL TOMACORRIENTE O FUENTE DE ENERGÍA! Los molinos #22 y #32 están equipados con una guarda de seguridad. Esta guarda de seguridad está diseñada para evitar lesiones al usuario. La única razón por la cual debe removerse la guarda de seguridad es para propósitos de limpieza, y DEBE VOLVERSE A COLOCAR INMEDIATAMENTE.
INSTRUCCIONES EN ESPAÑOL SEGURIDAD DE LOS ALIMENTOS Existen reglas básicas que se deben seguir al manipular alimentos. Estas son COCER, SEPARAR, LIMPAR Y CONGELAR. COCER Es crucial cocer los alimentos a una temperatura interna segura para destruir las bacterias presentes. La seguridad de las hamburguesas y otros alimentos hechos con carne molida ha estado bajo mucha atención últimamente, y con justa razón. Al moler la carne, las bacterias presentes en la superficie se mezclan con toda la mezcla molida.
INSTRUCCIONES EN ESPAÑOL INFORMACIÓN DE LA SALCHICHA SELECCIÓN DE CARNE PARA HACER SALCHICHAS La elaboración de salchichas ha evolucionado a lo largo de muchos años y generaciones, y como resultado, hay un sinnúmero de tipos de salchichas que puede hacer usando los ingredientes básicos como carne, grasa y algunas especias cuidadosamente combinadas. A continuación se presentan algunos lineamientos sencillos que le ayudarán a elaborar salchichas con el mejor sabor posible.
INFORMACIÓN DE GARANTÍA WESTON ¡GUARDE ESTA INFORMACIÓN DE GARANTÍA PARA SUS REGISTROS! Weston Products LLC garantiza al COMPRADOR AL DETALLE ORIGINAL de este producto que si funciona en cumplimiento con las instrucciones impresas adjuntas, entonces por un período de 2 años desde la fecha de compra, el producto se considerará libre de defectos respecto del material y mano de obra.
PRO SERIES HACHOIR POUR VIANDE ÉLECTRIQUE ET REMPLISSEUR DE SAUCISSES MODÈLE Nº 8 08-0801-W MODÈLE Nº 12 08-1201-W MODÈLE Nº 22 08-2201-W MODÈLE Nº 32 08-3201-W Électrique et remplisseur de saucisse Dans la mesure où nos produits sont systématiquement améliorés à l'usine, les illustrations pressentes peuvent légèrement différer de l'appareil que vous venez d'acheter.
INSTRUCTIONS EN FRANÇAIS AVERTISSEMENT! NE JAMAIS utiliser le hachoir sans le dispositif de sécurité/ plateau en place. Pour éviter les blessures graves, voire mortelles, NE JAMAIS METTRE LES MAINS dans l'entrée du hachoir. TOUJOURS utiliser le poussoir d'aliments pour pousser la viande dans la tête du hachoir. Lire et bien comprendre toutes les instructions ainsi que les messages d'avertissement avant l'utiliser l'appareil.
AVERTISSEMENT! LIRE ET BIEN COMPRENDRE TOUTES LES INSTRUCTIONS ET TOUS LES AVERTISSEMENTS AVANT DE SE SERVIR DE CETTE UNITÉ. VOTRE SÉCURITÉ EST CE QUI COMPTE LE PLUS! SI CES PROCÉDURES ET CONSIGNES DE SÉCURITÉ NE SONT PAS RESPECTÉES, DE GRAVES BLESSURES ET DES DOMMAGES MATÉRIELS PEUVENT EN RÉSULTER. RAPPELEZ-VOUS: VOUS ÊTES RESPONSABLE DE VOTRE SÉCURITÉ! 1. NE PAS utiliser le hachoir sans le dispositif de protection/plateau. 2.
INSTRUCTIONS EN FRANÇAIS LISTE DES PIÈCES Nº SCHÉMA DESCRIPTION PIÈCE 08 08-0801-W 12 08-1201-W 22 08-2201-W 32 08-3201-W 1 Écrou annulaire avant 08-0842 08-1242 08-2242 08-3242 2 plaque de hachage 4,5 mm 29-0804 29-1204 29-2204 29-3204 3 plaque de hachage 7 mm 29-0807 29-1207 29-2207 29-3207 4 Couteau de broyage 29-0850 29-1250 29-2250 29-3250 5 Goupille de vis sans fin 08-0846 08-1246 08-2246 08-3246 6 Vis sans fin 08-0802-U 08-1202 08-2202-N 08-3202-N 7 Rouleme
12 Nº 22 et nº 32 Poussoir 11 Nº 22 et nº 32 Plateau Nº 8 et nº 12 Plateau Couvercle moteur 20 Dispositif de sécurité inclus avec Hachoirs modèles nº 22 et nº 32 uniquement Cordon d'alimentation 8 10 3 4 6 5 7 9 REMARQUE: Hachoirs nº 8 et nº 12 dispose d'une rondelle de style plate Roulement de vis sans fin 1 18 16 19 Hachoirs nº 8 et nº 12 13 14 17 15 O I Hachoirs nº 22 et nº 32 Disjoncteur Commutateur de marche/arrêt et marche arrière Commutateur Disjoncteur de marche/arrêt arrêt
INSTRUCTIONS EN FRANÇAIS INSTRUCTIONS DE NETTOYAGE AVERTISSEMENT! Avant de procéder au nettoyage, au montage ou au démontage de l'appareil, s'assurer que l'appareil est HORS TENSION et que la FICHE A ÉTÉ RETIRÉE DE LA PRISE/SOURCE D'ALIMENTATION! 1. Retirer l'ensemble tête du moteur du hachoir. 2. Démonter l'ensemble de tête. 3. Retirer le dispositif de sécurité du plateau, tel que stipulé dans la section Instructions relatives au dispositif de sécurité.
AVERTISSEMENT! Avant de procéder au nettoyage, au montage ou au démontage de l'appareil, s'assurer que l'appareil est HORS TENSION et que la FICHE A ÉTÉ RETIRÉE DE LA PRISE/SOURCE D'ALIMENTATION! 1. Insérer la tête dans le boîtier d'engrenage avec la chute des aliments Chute faisant face toute droite. Il faut aligner la fente de la tête avec la goupille à l'intérieur des aliments du boîtier d'engrenages. S'assurer que la tête est correctement logée dans le boîtier Tête d'engrenages (Figure 1).
INSTRUCTIONS EN FRANÇAIS 6. Installer l'écrou annulaire avant. NE PAS SERRER AVEC EXCÈS. Tourner l'écrou annulaire avant jusqu'à ce qu'il entre en contact avec la plaque de hachage, et faire un autre 1/4 de tour pour bloquer. 7. Insérer le col du plateau dans la chute d’aliments (Figure 3). Plateau FIGURE 3 Cou Chute des aliments Tête 8. NE JAMAIS utiliser le hachoir sans le plateau bien fixé (Figure 3).
AVERTISSEMENT! Avant de procéder au nettoyage, au montage ou au démontage de l'appareil, s'assurer que l'appareil est HORS TENSION et que la FICHE A ÉTÉ RETIRÉE DE LA PRISE/SOURCE D'ALIMENTATION! 1. Procéder selon les Instructions de montage du hachoir pour assembler le hachoir y compris le plateau. REMARQUE: Il est recommandé de commencer par hacher la viande en morceaux grossiers avec la plaque de hachage de 7 mm.
INSTRUCTIONS EN FRANÇAIS 7. S'assurer que le hachoir est en position d'arrêt (OFF). Raccorder le hachoir à la source d'alimentation. 8. Mettre le hachoir en positon d'avancement (FWD). Placer soigneusement des cubes de viande dans la chute d'aliments. POUR POUSSER LA VIANDE DANS LA TÊTE, UTILISER UNIQUEMENT LE POUSSOIR D'ALIMENTS. NE PAS UTILISER LES DOIGTS OU UN AUTRE OBJET. ATTENTION! Il est important de respecter toutes les consignes de sécurité concernant les aliments qui sont stipulées dans le manuel.
AVERTISSEMENT! Avant de procéder au nettoyage, au montage ou au démontage de l'appareil, s'assurer que l'appareil est HORS TENSION et que la FICHE A ÉTÉ RETIRÉE DE LA PRISE/SOURCE D'ALIMENTATION! 1. Insérer la tête dans le boîtier d'engrenage avec la chute d'aliment de la tête faisant face toute droite. Il faut aligner la fente de la tête avec la goupille à l'intérieur du boîtier d'engrenages. S'assurer que la tête est correctement logée dans le boîtier d'engrenages (Figure 5).
INSTRUCTIONS EN FRANÇAIS 6. Installer l'écrou annulaire avant. NE PAS SERRER AVEC EXCÈS. Tourner l'écrou annulaire avant jusqu'à ce qu'il entre en contact avec le support, et faire un autre 1/4 de tour pour bloquer. Plateau FIGURE 7 Cou 7. Insérer le col du plateau dans la chute d’aliments (Figure 7). 8. NE JAMAIS utiliser le hachoir sans le plateau bien fixé (Figure 7).
AVERTISSEMENT! Avant de procéder au nettoyage, au montage ou au démontage de l'appareil, s'assurer que l'appareil est HORS TENSION et que la FICHE A ÉTÉ RETIRÉE DE LA PRISE/SOURCE D'ALIMENTATION! REMARQUE: Le système de bourrage à vitesse élevée a été conçu pour être utilisé avec l'entonnoir de 10 mm UNIQUEMENT. Chute NE PAS utiliser la vis sans fin en plastique des aliments à vitesse élevée avec d'autres entonnoirs. La tête du hachoir et les autres composants Tête subiront de sérieux dommages.
INSTRUCTIONS EN FRANÇAIS 5. Passer l'entonnoir de bourrage de 10 mm par le support et par l'écrou annulaire avant. 6. Installer l'écrou annulaire avant mais NE PAS LE SERRER EXCESSIVEMENT. Tourner l'écrou annulaire avant jusqu'à ce qu'il entre en contact avec le support, et faire un autre 1/4 de tour pour bloquer. 7. Insérer le col du plateau dans la chute d’aliments (Figure 10). Plateau FIGURE 10 Cou Chute des aliments Tête 8. NE JAMAIS utiliser le hachoir sans le plateau bien fixé (Figure 10).
AVERTISSEMENT! Avant de procéder au nettoyage, au montage ou au démontage de l'appareil, s'assurer que l'appareil est HORS TENSION et que la FICHE A ÉTÉ RETIRÉE DE LA PRISE/SOURCE D'ALIMENTATION! 1. Après avoir haché la viande en suivant les Instructions pour hacher la viande, mélanger la viande hachée avec les assaisonnements de saucisses. AVERTISSEMENT! WARNING! NE JAMAIS utiliser le hachoir sans le plateau/dispositif de sécurité installés.
INSTRUCTIONS EN FRANÇAIS 7. Mettre le hachoir en positon d'avancement (FWD). Placer soigneusement la viande dans la chute d'aliments. POUR POUSSER LA VIANDE DANS LA TÊTE, UTILISER UNIQUEMENT LE POUSSOIR D'ALIMENTS. NE PAS UTILISER LES DOIGTS OU UN AUTRE OBJET. 8. Tenir l’enveloppe en place d’une main tout en alimentant le mélange de saucisses dans le hachoir. À mesure que la farce remplit l’enveloppe, l’étaler sur une surface propre et sèche.
INSTRUCTIONS EN FRANÇAIS INSTRUCTIONS RELATIVES AU DISJONCTEUR O I FIGURE 13 Par mesure de sécurité, ce hachoir est équipé d'un disjoncteur. Si le hachoir cesse de fonctionner, procéder comme suit pour remédier au problème. 1. Mettre le hachoir en position d'Arrêt (OFF). 2. Inspecter le hachoir afin de déterminer s'il y a un bourrage coincé dans la tête. Si c'est le cas, il faut éliminer l'obstruction selon les instructions de la section Conseils pour hacher la viande. 2.
INSTRUCTIONS EN FRANÇAIS INSTRUCTIONS RELATIVES AU DISPOSTIF DE SÉCURITÉ (Uniquement équipé sur les hachoirs modèles nº 22 et nº 32) AVERTISSEMENT! Avant de procéder au nettoyage, au montage ou au démontage de l'appareil, s'assurer que l'appareil est HORS TENSION et que la FICHE A ÉTÉ RETIRÉE DE LA PRISE/SOURCE D'ALIMENTATION! Les hachoirs, modèles nº 22 et nº 32 sont équipés d'un dispositif de sécurité.
INSTRUCTIONS EN FRANÇAIS SÉCURITÉ ALIMENTAIRE Il y a des règles fondamentales à suivre lors de la manipulation d’aliments. Elles sont CUIRE, SÉPARER, NETTOYER, et REFROIDIR RAPIDEMENT. CUIRE Il est crucial de cuire les aliments à une température interne sûre pour détruire les bactéries qui sont présentes. La sécurité des hamburgers et autres aliments faits avec de la viande hachée a reçu dernièrement beaucoup d’attention, et pour une bonne raison.
INSTRUCTIONS EN FRANÇAIS INFORMATIONS SUR LES SAUCISSES CHOIX DE VIANDE POUR LA FABRICATION DE SAUCISSE La fabrication de saucisse s’est développée au cours des nombreuses années et générations, et il en résulte qu’un nombre incalculable de type de saucisses peuvent être fabriquées en utilisant les ingrédients de base de la viande, matière grasse et quelques épices soigneusement mélangées.
INFORMATION SUR LA GARANTIE CONSERVEZ CETTE INFORMATION SUR LA GARANTIE POUR VOS DOSSIERS! Weston Products LLC garantit à l’ACHETEUR AU DÉTAIL D’ORIGINE de ce produit contre tout défaut en matériau et en main-d’œuvre pendant un (2) an a partir de la date d’achat à condition qu’il soit utilisé conformément aux directives imprimées qui y sont jointes.
ATTENTION! If any components of this unit are broken, do not operate properly, or for product returns, please contact Weston Products LLC Phone: 1-800-814-4895 (Outside the U.S. 440-638-3131) Mail: 20365 Progress Drive, Strongsville, Ohio 44149 E-Mail: CustomerService@WestonProducts.com Web Site: WestonProducts.com All Trademarks and Registered Trademarks are property of the respective companies. SAVE THESE INSTRUCTIONS! Refer to them often and use them to instruct others.