manual GRAIN & CORN MILL
TABLE OF CONTENTS / ÍNDICE / TABLE DES MATIÈRES 2 IMPORTANT SAFEGUARDS COMPONENT LIST IMPORTANT NOTE PRIOR TO USE ASSEMBLY INSTRUCTIONS GRINDING INSTRUCTIONS ADJUSTING THE GRIND TIPS WARRANTY INFORMATION 3 4 5 5-6 7 7 7 8 SALVAGUARDIAS IMPORTANTES LISTA DE COMPONENTES NOTA IMPORTANTE ANTES DEL USO INSTRUCCIONES DE ENSAMBLADO INSTRUCCIONES PARA MOLER ADJUSTE DEL MOLIDO CONSEJOS PARA UNA OPERACIÓN FÁCIL INFORMACIÓN DE GARANTÍA WESTON 10 11 12 12-13 14 14 14 16 PRÉCAUTIONS IMPORTANTES DESCIPTION DE LA PIÈ
When using electrical appliances, basic safety precautions should always be followed to reduce the risk of fire, electric shock, and/or injury to persons, including the following: 1. KEEP FINGERS CLEAR of the Auger and Grinding Plate at all times. NEVER reach into any Mill inlet. 2. KEEP CHILDREN AWAY. NEVER LEAVE THE MILL UNATTENDED. 3. CHECK FOR DAMAGED PARTS. Before using the Mill, check that all parts are operating properly, and perform the intended functions.
ENGLISH INSTRUCTIONS U T 1d 1a R 1c 1b 4 1d 2b 2c 2a Main Body 3 5 Foot COMPONENT LIST DIAGRAM NUMBER 1 1A 1B 1C 1D 2 2A 2B 2C 3 4 5 6 Clamp Thumbscrew PART DESCRIPTION SHIELD ASSEMBLY GRINDING PLATE PRESSURE SCREW WING NUT SHIELD ROTATING THUMBSCREW WITH BOLT (2) AUGER ASSEMBLY AUGER ADJUSTABLE GRINDING PLATE RETAINER CAP PROTECTOR PAD HOPPER HANDLE THUMBSCREW WITH CAP WASHER If any components of this unit are broken, the unit does not operate properly or you need a replacement instruction
A protective coating is applied to this unit prior to shipment. This coating protects the unit in shipment and during it’s shelf life. It is very important to thoroughly clean the unit before using it, especially around the edges or areas that have been soldered or welded. Completely disassemble and thoroughly clean all parts with hot water, dish detergent and a soft cloth. Rinse with clean water and dry thoroughly. DO NOT use any harsh or abrasive brushes, chemicals or detergents.
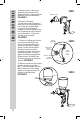
ENGLISH INSTRUCTIONS FIGURE C 5. Align the knob on the Auger Assembly with the hole in the Shield Assembly. Place the Shield Assembly onto the Main Body. Shield Assembly FIGURE C 6. Rotate the Rotating Thumbscrews (one is located on each side of the Shield Assembly) into the slots in the Main Body. Loosen the Thumbscrews if needed. to slide the Washers and the Thumbscrews behind the slot on the Main Body. Tighten the Thumbscrews to secure. FIGURE D 7.
FIGURE F 1. Fill the Hopper with the material you intend to grind. 2. Position a bowl or plate under the Mill to catch the material as it is being ground. FIGURE F 3. Slowly turn the Handle clockwise. ADJUSTING THE GRIND Depending on the type of material that is being ground and your personal preferences, you may need to adjust the Grinding Plate Pressure Screw to achieve your desired results (Figure G).
ONE-YEAR LIMITED WARRANTY This warranty applies to products purchased and used in the U.S. and Canada. This is the only express warranty for this product and is in lieu of any other warranty or condition. This product is warranted to be free from defects in material and workmanship for a period of one (1) year from the date of original purchase. During this period, your exclusive remedy is repair or replacement of this product or any component found to be defective, at our option.
manual MOLINO PARA GRANOS Y MAÍZ
INSTRUCCIONES EN ESPAÑOL SALVAGUARDIAS IMPORTANTES Cuando utilice artefactos eléctricos, siempre deben seguirse precauciones de seguridad básicas a fin de reducir el riesgo de incendio, descarga eléctrica, y/o lesiones a personas, incluyendo las siguientes: 1. MANTENGA LOS DEDOS LEJOS del tornillo sinfín y de la placa de molido en todo momento. NUNCA ingrese a ninguna abertura del molino. 2. MANTÉNGALO ALEJADO DE LOS NIÑOS. NUNCA DEJE EL MOLINO SIN SUPERVISIÓN. 3. REVISE SI TIENE PARTES DAÑADAS.
T 1d 1a 1b R 1c 4 1d 2b 2c 2a Cuerpo principal 6 3 5 INSTRUCCIONES EN ESPAÑOL U Pata LISTA DE COMPONENTES NÚMERO DE DIAGRAMA 1 1A 1B 1C 1D 2 2A 2B 2C 3 4 5 6 Pinza Tornillo de mano DESCRIPCIÓN DE LA PIEZA CONJUNTO DE LA PANTALLA TORNILLO DE PRESIÓN DE LA PLACA DE MOLIDO TUERCA DE MARIPOSA PANTALLA TORNILLO DE MANO GIRATORIO CON PERNO (2) CONJUNTO DEL TORNILLO SINFÍN TORNILLO SINFÍN PLACA DE MOLIDO AJUSTABLE TAPA DEL RETENEDOR ALMOHADILLA DE LA PANTALLA TOLVA MANGO TORNILLO DE MANO CON ARANDE
INSTRUCCIONES EN ESPAÑOL NOTA IMPORTANTE ANTES DEL USO Antes del envío, se aplica un recubrimiento protector a esta unidad. Este recubrimiento protege la unidad durante el envío y la vida útil del producto. Es muy importante limpiar la unidad con cuidado antes de usarla, especialmente en los bordes y las áreas que han sido estañadas o soldadas. Desarme completamente todas las piezas y límpielas cuidadosamente con agua caliente, detergente para vajilla y un paño suave.
Conjunto de la pantalla FIGURA C 6. Gire los tornillos de mano giratorios (se encuentran uno a cada lado del conjunto de la pantalla) dentro de las ranuras en el cuerpo principal. Afloje los tornillos de mano si es necesario para deslizar las arandelas y los tornillos de mano detrás de la ranura sobre el cuerpo principal. Apriete los tornillos de mano para asegurar. FIGURA D 7. Siga las instrucciones para el “Ajuste del molino” que se describen en este manual.
INSTRUCCIONES EN ESPAÑOL INSTRUCCIONES PARA MOLER 1. Llene la tolva con el material que vaya a moler. 2. Coloque un cuenco o un plato bajo el molino para recibir el material a medida que se muele. FIGURA F 3. Gire lentamente el mango en el sentido de las manecillas del reloj.
Grupo HB PS, S.A. de C.V. Monte Elbruz No. 124 – 401 Col. Polanco V Sección, Miguel Hidalgo Ciudad de México, C.P. 11560 GARANTÍA PARA PRODUCTOS COMPRADOS EN MÉXICO PRODUCTO: MARCA: MODELO: Grupo HB PS, S.A. de C.V. cuenta con Centros de Servicio autorizados.
manuel MOULIN POUR GRAINS ET MAÏZ
INSTRUCTIONS EN FRANÇAIS PRÉCAUTIONS IMPORTANTES Pour utiliser un appareil électroménager, vous devez toujours prendre des mesures élémentaires de sécurité pour réduire le risque d'incendie, d'électrocution et/ou de blessure corporelle, en particulier les mesures suivantes: 1. TOUJOURS TENIR LES DOIGTS À L’ÉCART de la vis sans fin et de la plaque de broyage. NE JAMAIS METTRE LES MAINS dans l’entrée du moulin. 2. TENIR LES ENFANTS À L’ÉCART. NE JAMAIS LAISSER LE MOULIN SANS SURVEILLANCE. 3.
T 1d 1a R 1c 1b 4 1d 2b 2c 2a Corps principal 3 DESCRIPTION DE LA PIÈCE NUMÉRO DE SCHÉMA 1 1A 1B 1C 1D 2 2A 2B 2C 3 4 5 6 5 INSTRUCTIONS EN FRANÇAIS U Pied Pince Vis moletée DESCRIPTION DE LA PIÉCE ENSEMBLE PROTECTEUR VIS DE PRESSION DE LA PLAQUE DE BROYAGE ÉCROU À AILETTE CRÉPINE VIS MOLETÉE TOURNANT AVEC BOULON (2) VIS SANS FIN VIS SANS FIN PLAQUE DE BROYAGE RÉGLABLE BOUCHON DE RETENUE TAMPON PROTECTEUR BOL POIGNÉE VIS MOLETÉE AVEC RONDELLE À CAPUCHON N’hésitez pas à visiter notre site We
INSTRUCTIONS EN FRANÇAIS REMARQUE IMPORTANTE À LIRE AVANT UTILISATION Un revêtement protecteur est appliqué à l’appareil avant son expédition. Le revêtement protège l’appareil lors de l’expédition et pendant sa durée de conservation. Il est très important de nettoyer soigneusement l’appareil avant de l’utiliser, en particulier autour des arêtes ou des zones soudées ou brasées.
FIGURE C Ensemble protecteur FIGURE C 6. Tourner les vis moletées tournant (une sur chaque côté de l’ensemble protecteur) dans les fentes du corps principal. Desserrer les vis moletées, si nécessaire pour déplacer les rondelles et les vis moletées derrière la fente sur le corps principal. Serrer les vis moletées pour fixer l’ensemble. FIGURE D 7. Procéder selon les instructions de la section Réglage pour moudre dans ce manuel. Desserrer l’écrou à oreilles sur la vis de pression de la plaque de broyage.
INSTRUCTIONS EN FRANÇAIS INSTRUCTIONS POUR MOUDRE 1.Remplir le bol des produits alimentaires à broyer. 2. Placer un récipient ou un plat sous le moulin pour attraper les produits à mesure qu’ils sont moulus/broyés. FIGURE F FIGURE F 3. Tourner lentement la manivelle dans le sens horaire.
GARANTIE LIMITÉE D’UN AN Cette garantie s’applique aux produits achetés et utilisés aux États-Unis et au Canada. Il s’agit de l’unique garantie explicite pour ce produit et elle remplace toute autre garantie ou condition. Ce produit est garanti comme étant exempt de tout vice matériel ou de main-d’œuvre pendant une période d’un (1) an à partir de la date d’achat initiale.
ATTENTION! PLEASE INSPECT THIS PACKAGE THOROUGHLY FOR MISSING PARTS OR ANY PRODUCT DAMAGE. IF YOUR PRODUCT CONTAINS SHIPPING DAMAGE, PLEASE CONTACT RETAILER FOR ASSISTANCE. For all other questions regarding product usage, missing parts, product damage, difficulty or warranty activation, please contact the Weston Brands Customer Service Team: 8:00 am to 5:00 pm ET, Monday thru Friday Customer.Service@WestonBrands.com U.S. Residents Customer Service Line: 1-800-814-4895 (Outside U.S.