
Use and Care Guide


ENGLISH INSTRUCTIONS
6
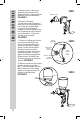
FIGURE C
Shield Assembly
Rotating
Thumbscrew
Hopper
Shield
Assembly
View
from top
Grinding Plate
Pressure
Screw
5. Align the knob on the Auger
Assembly with the hole in the
Shield Assembly. Place the Shield
Assembly onto the Main Body.
FIGURE C
6. Rotate the Rotating
Thumbscrews (one is located on
each side of the Shield Assembly)
into the slots in the Main Body.
Loosen the Thumbscrews if
needed. to slide the Washers and
the Thumbscrews behind the slot
on the Main Body. Tighten the
Thumbscrews to secure.
FIGURE D
7. Follow the “Adjusting the Grind”
instructions as outlined in this
manual. Loosen the Wing Nut
on the Grinding Plate Pressure
Screw. Set the Grinding Plate
Pressure Screw by turning it
clockwise to tighten and counter-
clockwise to loosen. Securely
tighten the Wing Nut against the
Shield once the Grinding Plate
Pressure Screw is in the position
desired. FIGURE D
8. Align the notches on the Hopper
with the notches on the Main
Body. Slide the Hopper onto the
Main body and turn the Hopper
slightly to the right to secure the
Hopper to the Main Body.
FIGURE E
FIGURE D
Rotating
Thumbscrew
Wing Nut
FIGURE E
Align
Notches