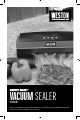
VACUUM SEALER 65-1001-W DUE TO CONSTANT FACTORY IMPROVEMENTS, THE PRODUCT PICTURED MIGHT DIFFER SLIGHTLY FROM THE PRODUCT IN THIS BOX.
TABLE OF CONTENTS / ÍNDICE / TABLE DES MATIÈRES 2 GENERAL SAFETY RULES COMPONENT LIST PROTECTIVE TAPE VACUUM CHAMBER SEAL OUTLET INSTRUCTIONS THERMAL OVERLOAD PROTECTOR CLEANING INSTRUCTIONS CONTROL PANEL VACUUM SEALER CANISTERS INITIAL TESTING OF THE BAG SEAL PREPARING VAC BAGS FROM A ROLL VACUUM OPERATION VACUUM PACKAGING GUIDELINES STORAGE LIFESPAN GUIDELINES TROUBLESHOOTING STORAGE FOOD SAFETY WARRANTY 3 4 6 6 7 7 7 8 9 10 11 12 13 14 15 16 17 18 REGLAS IMPORTANTES DE SEGURIDAD LISTA DE COMPONENTES C
READ AND FULLY UNDERSTAND ALL INSTRUCTIONS AND WARNINGS PRIOR TO USING THIS UNIT. YOUR SAFETY IS MOST IMPORTANT! FAILURE TO COMPLY WITH PROCEDURES AND SAFE GUARDS MAY RESULT IN SERIOUS INJURY OR PROPERTY DAMAGE. REMEMBER: YOUR PERSONAL SAFETY IS YOUR RESPONSIBILITY! When using electrical appliances, basic safety precautions should always be followed to reduce the risk of fire, electric shock, and/or injury to persons, including the following 1.
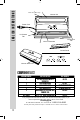
ENGLISH INSTRUCTIONS 1 Under Seal Bar Tape 3 Vacuum Lid Power Cord Accessory 2 Lid Closure Tab Base 4 Vacuum Chamber Lid Closure Tab 5 Control Panel Accessory Vacuum Hose Port COMPONENT LIST DIAGRAM NUMBER 1 2 3 4 5 NOT SHOWN PART DESCRIPTION SEAL BAR HEATING ELEMENT & VACUUM LID SEAL BAR INSULATOR SEAL BAR TAPE (TAN) OVAL CHAMBER SEAL MAINTENANCE KIT: SEAL BAR TAPE, CHAMBER SEAL (10) 8” X 12” QUART VACUUM BAGS PART NUMBER 08-1128 08-1025 SEE MAINTENANCE KIT SEE MAINTENANCE KIT 08-2403 30-0302
sure b
ENGLISH INSTRUCTIONS PROTECTIVE TAPE There is one factory installed strip of Seal Bar Tape on the Vacuum Sealer. DO NOT REMOVE THE TAPE! FIGURE 1 SEAL BAR TAPE DO NOT REMOVE! OVAL VACUUM CHAMBER SEAL DO NOT REMOVE! The Seal Bar Heating Element is covered with Seal Bar Tape to protect vacuum bags during sealing (Figure 1). DO NOT remove the Seal Bar Tape. VACUUM CHAMBER SEAL There is a factory-installed Oval Chamber Seal on the Vacuum Sealer (FIGURE 2).
To reduce the risk of electrical shock, this plug must fit fully into the outlet. If the blades do not fit into the outlet, try turning the plug around. If the plug still does not fit into the outlet, contact a qualified electrician. DO NOT attempt to modify the plug in any way. THERMAL OVERLOAD PROTECTOR The Vacuum Sealer will automatically shut down if it overheats. If this occurs, turn the unit off and open the Vacuum Lid. Resume normal operation after the unit cools or about 20 minutes.
ENGLISH INSTRUCTIONS CONTROL PANEL POWER LIGHT: The Power Light will remain illuminated when the Vacuum Sealer is connected to the power supply. NORMAL / EXTENDED SWITCH: The Normal or Extended Switch is used for adjusting the seal time when vacuum sealing thicker bags or bags with moisture. VACUUM & SEAL BUTTON: The Vacuum & Seal Button starts the Vacuum Pump, which engages the air evacuation process and engages the Seal Bar Heating Element. SEAL BUTTON: This button will start the Seal Bar at any time.
Before using the Vacuum Sealer, familiarize yourself with the bag sealing functions. A vacuum bag is sealed when the Seal Bar Heating Element is activated and heats the bag to its melting point, which then permanently welds the bag layers together, sealing the bag shut. NOTE: THIS BAG SEALER IS INTENDED TO BE USED ONLY WITH VACUUM BAGS. FOR BEST RESULTS USE ONLY VACUUM BAGS.
ENGLISH INSTRUCTIONS INITIAL TESTING OF THE BAG SEAL 1. ALWAYS allow the sealing bar to cool for approximately 20 seconds between bags. Leave the Vacuum Lid OPEN between uses, this allows the Heating Element to cool more quickly between bags. 2. To open the Vacuum Lid, press down on the corners of the Vacuum Lid to unlock the Lid Closure Tabs then lift the Vacuum Lid. 3.
1. Attach the Vacuum Sealer to the power supply. 2. Press the ON/OFF Button on the Control Panel to turn the Vacuum Sealer “ON”. The ON/OFF Button on the display will illuminate and the Internal Cooling Fan will run. 3. Press both of the Lid Release Buttons on each side of the Vacuum Sealer to release the lid lock, then lift the Vacuum Lid to open. 4. Cut the vacuum bag to the length you want from a roll. 5. Place one open end of the bag onto the Vacuum Chamber Seal and slightly into the Vacuum Chamber.
ENGLISH INSTRUCTIONS VACUUM OPERATION BEFORE ATTEMPTING VACUUM PACKAGING BE SURE THAT THE VACUUM SEALER IS SET UP IN ACCORDANCE WITH ALL OF THE SAFETY PRECAUTIONS LISTED IN THIS BOOKLET. 1. To open the Vacuum Lid, press down on the corners of the Vacuum Lid to unlock the Lid Closure Tabs then lift the Vacuum Lid. 2. Place the items to be vacuum sealed into a vacuum bag. Allow at least 2” (5 cm) at the open end of the bag in order to create enough seal space.
Powdery Items: When vacuum sealing powdery items, like flour, it is best to keep them in their original packaging before putting them into the vacuum bags. Sharp or Pointed Items: When vacuum sealing sharp or pointy items, it is best to cushion the edges so they do not puncture the bag during the vacuum process. YEAST & BACTERIA For best results in extending the life of foods, it is important to vacuum package foods that are fresh.
ENGLISH INSTRUCTIONS STORAGE LIFESPAN GUIDELINES . IMPORTANT NOTE: Vacuum packaging is NOT a substitute for refrigeration. Vacuum packed perishable foods still require refrigeration. . NEVER thaw frozen foods at room temperature. Thaw frozen foods in a refrigerator or microwave oven. . In general, the colder the temperature at which foods are stored, the longer the shelf life. . Handle vacuum sealer bags with care. Avoid damaging them. A damaged bag will not hold a seal. .
Q: MY VACUUM SEALER SHUT OFF AND WILL NOT START AGAIN. 1. The Thermal Overload Protector may have been activated. In this case, allow the Vacuum Sealer to cool by opening the Vacuum Lid for approximately 20 minutes. Be sure to leave the Vacuum Lid open between bag sealing. Q: THE SEALING BAR MELTS THROUGH THE BAG. 1. The Vacuum Sealer is only intended to be used with vacuum sealing bags. Vacuum Bags should be used. DO NOT USE HOUSEHOLD BAGS with the Vacuum Sealer. 2.
ENGLISH INSTRUCTIONS STORAGE 1. Remove the Power Cord from the power supply. 2. Pivot the Compartment Lever over to open the Power Cord Storage Compartment (FIGURE 7 ). 3. Loop the Power Cord up to about 3 1/2” (8.9 cm) long segments. 4. Place the Plug end of the Power Cord in the Power Cord Storage Compartment first. Insert the looped portion of the Power Cord into the Compartment next. 5. Pivot the Compartment Lever over the Compartment to keep the Power Cord in place. 6.
COOK It’s crucial to cook food to a safe internal temperature to destroy bacteria that is present. The safety of hamburgers and other foods made with ground meat has been receiving a lot of attention lately, and with good reason. When meat is ground, the bacteria present on the surface is mixed throughout the ground mixture. If this ground meat is not cooked to at least o o o o 160 F to 165 F (71 C to 74 C), bacteria will not be destroyed and there’s a good chance you will get sick.
WESTON WARRANTY INFORMATION SAVE THIS WARRANTY INFORMATION FOR YOUR RECORDS! Weston Brands LLC warrants to the ORIGINAL RETAIL PURCHASER of this product that if operated in accordance with the printed instruction accompanying it, then for a period of 1 year from the date of purchase, the product shall be free from defects in material and workmanship.
SELLADOR A VACIO 65-1001-W DEBIDO A CONSTANTES MEJORAS EN LA FÁBRICA, EL PRODUCTO QUE SE MUESTRA PUEDE SER LIGERAMENTE DIFERENTE DEL PRODUCTO EN ESTA CAJA.
INSTRUCCIONES EN ESPAÑOL PRÉCAUTIONS IMPORTANTES LEA Y ENTIENDA COMPLETAMENTE TODAS LAS INSTRUCCIONES Y ADVERTENCIAS ANTES DE UTILIZAR ESTA UNIDAD. ¡SU SEGURIDAD ES LO MÁS IMPORTANTE! NO SEGUIR LOS PROCEDIMIENTOS Y PRECAUCIONES PUEDE PROVOCAR LESIONES GRAVES Y DAÑOS MATERIALES.
3 Tapa de vacío Cable de alimentación Accessory 2 Pestillo de cierre de la tapa Base 4 Cámara de vacío Pestillo de cierre de la tapa 5 INSTRUCCIONES EN ESPAÑOL 1 Barra selladora con cinta debajo Panel de control Vacuum Only/ Accessory Puerto para la manguera de vacío LISTA DE COMPONENTES NÚMERO DE DIAGRAMA 1 2 3 4 5 NE SE MUESTRAN DESCRIPCIÓN DE LA PIEZA ELEMENTO DE CALOR DE LA BARRA SELLADORA Y TAPA DE VACÍO AISLANTE DE LA BARRA SELLADORA CINTA DE LA BARRA SELLADORA (COLOR MARRÓN) CÁMARA DE VA
INSTRUCCIONES EN ESPAÑOL CINTA PROTECTORA Hay una tira de Cinta en la barra selladora instalada de fábrica en la Selladora al vacío. ¡NO QUITE LA CINTA! FIGURE 1 Barra selladora CINTA ¡NO LA QUITE! SELLO OVALADO DE LA CÁMARA DE VACÍO ¡NO LO QUITE! El Elemento de calor de la barra selladora está cubierto con Cinta de la barra selladora para proteger las bolsas de vacío durante el sellado (Figura 1). NO quite la Cinta de la barra selladora.
Para reducir el riesgo de choque eléctrico, esta clavija debe estar bien metida en el tomacorriente. Si las patas no entran en el tomacorriente, dele vuelta a la clavija. Si aun así no entran en el tomacorriente, consulte con un electricista calificado. NO trate de modificar la clavija de ninguna manera. PROTECTOR DE SOBRECARGA TÉRMICA La Selladora al vacío se apagará automáticamente si se recalienta. Si esto ocurre, apague la unidad y abra la Tapa de la selladora.
INSTRUCCIONES EN ESPAÑOL PANEL DE CONTROL LUZ DE ENCENDIDO: la Luz de encendido permanecerá encendida cuando la Selladora al vacío se encuentre conectada al suministro de energía. CONMUTADOR NORMAL/EXTENDIDO el Conmutador normal o extendido se utiliza para ajustar el tiempo de sellado al sellar al vacío bolsas más gruesas o bolsas con humedad.
Antes de utilizar la Selladora al vacío, familiarícese con las funciones de sellado de bolsas. Una bolsa de vacío se sella cuando se activa el Elemento de calor de la barra selladora y calienta la bolsa hasta su punto de fusión, que luego une para siempre las capas de la bolsa, sellando la bolsa para cerrarla. NOTA: ESTA SELLADORA DE BOLSAS ESTÁ DESTINADA A SER UTILIZADA SOLO CON BOLSAS DE VACÍO. PARA OBTENER MEJORES RESULTADOS, SOLO UTILICE BOLSAS DE VACÍO.
INSTRUCCIONES EN ESPAÑOL PRUEBA INICIAL DEL SELLADO DE LA BOLSA 1. SIEMPRE deje que la barra de sellado se enfríe por aproximadamente 20 segundos entre bolsas. Deje la Tapa de vacío ABIERTA entre los usos, esto permite que el Elemento de calor se enfríe más rápidamente entre las bolsas. 2. Para abrir la Tapa de vacío, apriete las esquinas de la Tapa de vacío para abrir los Pestillos de cierre de la tapa y luego levante la Tapa de vacío. 3.
1. Conecte la Selladora al vacío al suministro de energía. 2. Presione el Botón de ON/OFF (ENCENDIDO/APAGADO) en el Panel de control para “ENCENDER” la Selladora al vacío. Se encenderá el Botón de ON/ OFF (ENCENDIDO/APAGADO) en la pantalla. 3. Presione ambos Botones de liberación de la tapa a los lados de la Selladora al vacío para liberar el cierre de la tapa, luego levante la Tapa de vacío para abrirla. 4. Corte la bolsa de vacío del largo que quiera de un rollo. 5.
INSTRUCCIONES EN ESPAÑOL FUNCIONAMIENTO EN VACÍO ANTES DE INTENTAR REALIZAR EL ENVASADO AL VACÍO, ASEGÚRESE DE QUE LA SELLADORA AL VACÍO SE ENCUENTRE INSTALADA DE ACUERDO CON TODAS LAS PRECAUCIONES DE SEGURIDAD ENUMERADAS EN ESTE FOLLETO. FIGURA 5 Puertos de vacío 1. Para abrir la Tapa de vacío, apriete las esquinas de la Tapa de vacío para abrir los Pestillos de cierre de la tapa y luego levante la Tapa de vacío. Pestillos 2.
Artículos con polvo: Cuando envase artículos con polvo al vacío, cómo harina, es mejor conservarlos en su empaque original antes de ponerlos en bolsas de vacío. Artículos filosos o puntiagudos: Cuando se sellen artículos filosos o puntiagudos, es mejor cubrir sus bordes para que no perforen la bolsa durante el proceso de vacío. LEVADURA Y BACTERIAS Para obtener mejores resultados al prolongar la vida de los alimentos, es mejor empacar al vacío los alimentos frescos.
INSTRUCCIONES EN ESPAÑOL PAUTAS SOBRE LA VIDA EN ALMACENAMIENTO · NOTA IMPORTANTE: El envasado al vacío NO sustituye la refrigeración. Los alimentos perecederos envasados al vacío requieren refrigeración. · NUNCA descongele los alimentos congelados a temperatura ambiente. Descongele los alimentos congelados en el refrigerador o en el microondas. · En general, en cuanto más fría sea la temperatura en que los alimentos se almacenan, estos durarán más. · Maneje con cuidado las bolsas al vacío.
C: MI SELLADORA AL VACÍO SE APAGÓ Y NO SE SE PUEDE VOLVER A ENCENDER. 1.0 Se pudo haber activado el Protector de sobrecarga térmica. En este caso, deje que la Selladora al vacío se enfríe abriendo la Tapa de vacío por aproximadamente 20 minutos. Asegúrese de dejar la Tapa de vacío abierta entre el sellado de las bolsas. C: LA BARRA SELLADORA FUNDE A TRAVÉS DE LA BOLSA. 1. La Selladora al vacío solo está destinada a ser utilizada con bolsas de sellado al vacío. Se deben usar bolsas de vacío.
INSTRUCCIONES EN ESPAÑOL ALMACENAMIENTO 1. Quite el cable de alimentación del suministro de energía. 2. Gire la Palanca del compartimento hacia arriba para abrir el Compartimento de almacenamiento del cable de alimentación (FIGURA 7). 3. Enrosque el Cable de alimentación en unos segmentos de hasta 3 1/2 pulgadas (8,9 cm) de largo. 4. Primero coloque el extremo del Enchufe del Cable de alimentación en el Compartimento de almacenamiento del cable de alimentación.
Hay que seguir ciertas reglas básicas al manejar alimentos. Las reglas son COCINAR, SEPARAR, LIMPIAR y ENFRIAR. COCINAR Es muy importante cocinar los alimentos a una temperatura interna que destruya cualquier bacteria que esté presente. Últimamente se ha puesto mucha atención en la higiene de las hamburguesas y otros alimentos elaborados con carne molida y con razón. Cuando se muele la carne, las bacterias presentes en la superficie se revuelven en toda la mezcla de la carne molida.
INFORMACIÓN DE GARANTÍA WESTON ¡GUARDE ESTA INFORMACIÓN DE GARANTÍA PARA SUS REGISTROS! Weston Brands LLC garantiza al COMPRADOR AL DETALLE ORIGINAL de este producto que si funciona en cumplimiento con las instrucciones impresas adjuntas, entonces por un período de 1 año desde la fecha de compra, el producto se considerará libre de defectos respecto del material y mano de obra.
SCELLEUSE SOUS VIDE 65-1001-W PARCE QUE NOS PRODUITS BÉNÈFICIENT DE PERFECTIONNEMENTS CONSTANTS APPORTÉS EN USINE, LES ILLUSTRATIONS PRÉSENTES PEUVENT ÊTRE LÉGÈREMENT DIFFÉRENTES DU PRODUIT REÇU.
INSTRUCTIONS EN FRANÇAIS SALVAGUARDIAS IMPORTANTES LIRE ET COMPRENDRE COMPLÈTEMENT TOUTES LES DIRECTIVES ET AVERTISSEMENTS AVANT D’UTILISER CE PRODUIT. LE PLUS IMPORTANT EST VOTRE SÉCURITÉ! LE DÉFAUT D’OBSERVER LES PROCÉDURES ET MISES EN GARDE PEUT ENTRAINER DES BLESSURES GRAVES OU DES DOMMAGES MATÉRIELS.
3 Couvercle à vide Cordon d’alimentation Accessory 2 Languette de fermeture du couvercle Languette de fermeture du couvercle Socle Chambre à vide 4 5 INSTRUCTIONS EN FRANÇAIS 1 Sous le ruban de la barre scellante Panneau de commande Vacuum Only/ Accessory Orifice pour tuyau à vide DESCRIPTION DE LA PIÈCE NUMÉRO DE SCHÉMA 1 2 3 4 5 NON REPRÉSENTÉS DESCRIPTION DE LA PIÉCE ÉLÉMENT CHAUFFANT DE LA BARRE SCELLANTE ISOLATEUR LA BARRE SCELLANTE RUBAN DE LA BARRE SCELLANTE JOINT OVALE DE LA CHAMBRE À
INSTRUCTIONS EN FRANÇAIS RUBAN PROTECTEUR Une bande du ruban de la barre scellante a été installée à l’usine sur la scelleuse sous vide. NE PAS RETIRER LE RUBAN! FIGURE 1 RUBAN DE LA BARRE SCELLANTE NE PAS RETIRER! NE PAS RETIRER LES JOINTS DE LA CHAMBRE SOUS VIDE DE FORME OVALE! L’élément chauffant de la barre scellante est recouvert d’un ruban pour protéger les sacs sous vide pendant l’opération (FIGURE 1). NE PAS retirer le ruban de la barre scellante.
La fiche doit entrer complètement dans une prise de courant. Si la fiche ne rentre pas, tourner-la dans l’autre sens et essayer de nouveau. Si elle ne rentre toujours pas entièrement, contactez un électricien qualifié pour inspecter et/ou mettre à jour les prises de courants dans votre maison. Ne pas modifier la fiche de quelque façon que ce soit pour la faire rentrer dans une prise de courant incompatible.
INSTRUCTIONS EN FRANÇAIS PANNEAU DE COMMANDE VOYANT D’ALIMENTATION : Ce voyant reste allumé lorsque la scelleuse sous vide est branchée à l’alimentation électrique. COMMUTATEUR NORMAL/EXTENDED (NORMAL/PROLONGÉ) : Le commutateur Normal ou Extended (Normal ou Prolongé) est utilisé pour ajuster le temps de scellement lors du scellement sous vide de sacs plus épais ou contenant de l’humidité.
Avant d’utiliser la scelleuse sous vide, se familiariser avec les fonctions de scellement de sacs. Un sac à vide est scellé lorsque l’élément chauffant de la barre scellante est activé et chauffe le sac à son point de fusion qui colle définitivement les couches du sac ensemble permettant d’étanchéiser le sac. REMARQUE: CETTE SCELLEUSE DOIT UNIQUEMENT ÊTRE UTILISÉE AVEC DES SACS SOUS VIDE. POUR OBTENIR DE MEILLEURS RÉSULTATS, UTILISER UNIQUEMENT DES SACS SOUS VIDE WESTON.
INSTRUCTIONS EN FRANÇAIS FONCTIONNEMENT SOUS VIDE AVANT DE TENTER L’EMBALLAGE SOUS VIDE, S’ASSURER QUE LA SCELLEUSE SOUS VIDE EST INSTALLÉE CONFORMÉMENT À TOUTES LES PRÉCAUTIONS DE SÉCURITÉ MENTIONNÉES DANS CETTE BROCHURE. 1. Pour ouvrir le couvercle à vide, appuyer sur les coins du couvercle afin de déverrouiller ses languettes de fermeture, puis le soulever. 2. Placer les produits à sceller sous vide dans un sac sous vide.
Article en poudre: Pour emballer les articles en poudre, tels la farine, il est préférable de les laisser dans leur emballage d’origine avant de les mettre dans le sac sous vide. La poudre fine risque en effet d’être aspirée dans la pompe à vide à 2 pistons, causant suffisamment de dégâts pour raccourcir la durée de vie utile de la scelleuse sous vide. Les articles en poudre risquent également de nuire au scellement du sac.
INSTRUCTIONS EN FRANÇAIS TEST INITIAL DU SCELLEMENT D’UN SAC 1. TOUJOURS laisser la barre scellante refroidir pendant environ 20 secondes entre les sacs. Laisser le couvercle à vide OUVERT entre les emplois pour permettre à l’élément chauffant de se refroidir plus rapidement entre les sacs. 2. Pour ouvrir le couvercle à vide, appuyer sur les coins du couvercle afin de déverrouiller ses languettes de fermeture, puis le soulever. 3.
1. Brancher la scelleuse sous vide à l’alimentation électrique. 2. Appuyer sur le bouton ON/OFF (Marche/Arrêt) situé sur le panneau de commande pour allumer la scelleuse sous vide. Le bouton ON/OFF (Marche/Arrêt) situé sur l’affichage s’allume. 3. Appuyer sur les boutons de dégagement du couvercle situés de chaque côté de la scelleuse sous vide pour libérer le verrou du couvercle, puis soulever le couvercle à vide pour l’ouvrir. 4. Couper le sac sous vide du rouleau à la longueur souhaitée. 5.
INSTRUCTIONS EN FRANÇAIS GUIDE DE CONSERVATION DES ALIMENTS EMBALLÉS . REMARQUE IMPORTANTE : L’emballage sous vide ne remplace PAS la réfrigération. Les denrées périssables emballées sous vide doivent quand même être réfrigérées. . NE JAMAIS décongeler des aliments à la température ambiante. Décongeler les aliments au réfrigérateur ou au micro-ondes. . En règle générale, plus froide est la température, et plus longue sera la durée de conservation des aliments. . Manipuler les sacs sous vide avec soin.
Q : MA SCELLEUSE SOUS VIDE S’ÉTEINT ET NE REDÉMARRE PAS. 1.0 La protection contre les surcharges thermiques peut avoir été activée. Dans ce cas, laisser la scelleuse refroidir en ouvrant le couvercle à vide pendant environ 20 minutes. Veiller à laisser le couvercle à vide ouvert entre les scellements de sacs. Q: Q: LA BARRE DE SCELLEMENT FOND LES COUCHES DU SAC. 1. La scelleuse sous vide doit uniquement être utilisée avec des sacs de scellement sous vide.
INSTRUCTIONS EN FRANÇAIS STOCKAGE 1. Retirer le cordon d’alimentation de l’alimentation électrique. 2. Faire pivoter le levier du compartiment pour ouvrir le compartiment de rangement du cordon d’alimentation (FIGURE 7). 3. Enrouler le cordon d’alimentation en segments d’environ 8,9 cm (3,5 po) de long maximum. 4. Placer d’abord l’extrémité du cordon contenant la fiche dans le compartiment de rangement du cordon d’alimentation. Insérer ensuite la partie enroulée du cordon dans le compartiment. 5.
Il y a des règles fondamentales à suivre lors de la manipulation d’aliments. Elles sont CUIRE, SÉPARER, NETTOYER, et REFROIDIR RAPIDEMENT. CUIRE Il est crucial de cuire les aliments à une température interne sûre pour détruire les bactéries qui sont présentes. La sécurité des hamburgers et autres aliments faits avec de la viande hachée a reçu dernièrement beaucoup d’attention, et pour une bonne raison.
INFORMATION SUR LA GARANTIE CONSERVEZ CETTE INFORMATION SUR LA GARANTIE POUR VOS DOSSIERS! Weston Brands LLC garantit à l’ACHETEUR AU DÉTAIL D’ORIGINE de ce produit contre tout défaut en matériau et en main-d’œuvre pendant un (1) an a partir de la date d’achat à condition qu’il soit utilisé conformément aux directives imprimées qui y sont jointes.
NOTES 51
ATTENTION! PLEASE INSPECT THIS PACKAGE THOROUGHLY FOR MISSING PARTS OR ANY PRODUCT DAMAGE. IF YOUR PRODUCT CONTAINS SHIPPING DAMAGE, PLEASE CONTACT RETAILER FOR ASSISTANCE. For all other questions regarding product usage, missing parts, product damage, difficulty or warranty activation, please contact the Weston Brands Customer Service Team: 8:00 am to 5:00 pm ET, Monday thru Friday CustomerService@WestonSupply.com U.S. Residents Customer Service Line: 1-800-814-4895 (Outside U.S.