
Use and Care Guide


ENGLISH INSTRUCTIONS
10
1. ALWAYS allow the sealing bar to cool for approximately 20 seconds
between bags. Leave the Vacuum Lid OPEN between uses, this allows the
Heating Element to cool more quickly between bags.
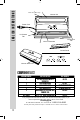
2. To open the Vacuum Lid, press down on the corners of the Vacuum Lid to
unlock the Lid Closure Tabs then lift the Vacuum Lid.
3. Place one end of the bag slightly into the Vacuum Chamber, leaving about
2” (5 cm) of the empty part of the bag beyond the inside edge of the Seal Bar
Insulator.
4. Be sure not to cover the Vacuum Ports with the bag. Covering the Vacuum
Ports prevents the proper vacuuming of air from the bag.
5. Close the Vacuum Lid and press down while pushing in on the two Lid Closure
Tabs to lock the machine.
6. Press the Start Button engaging the Vacuum Pump (the Vacuum Pump must
be on for the Seal Bar to heat up). Press the Seal Button immediately after the
Vacuum Pump starts.
7. Remove the bag and inspect the seal. The seal should appear smooth and
consistent all the way across the bag. The seal SHOULD NOT melt through the
bag at any point. Be sure there are no creases or wrinkles that may allow air to
leak into the bag. A properly sealed bag will not pull apart, the bag must be cut
open.
NOTE: Do not form side seals on the bags, the sides are already sealed.
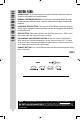
INITIAL TESTING OF THE BAG SEAL
NOTE: The Vacuum Sealer is ONLY intended to be used with VACUUM BAGS. For
best results, only use the recommended vacuum bags with an embossed or mesh lining.
DO NOT USE HOUSEHOLD BAGS! Any other uses of the Vacuum Sealer, other
than the uses described in this booklet, could potentially damage the appliance and void
the warranty!