TM REV 410 Owner’s Manual & “Limited” Warranty
Technology Specifications: Thank You for purchasing this Wet Sounds product. Wet Sounds marine audio products represent the ultimate in high performance standards. The Revolution Series is specifically engineered to withstand the rigorous marine environment. Utilizing the state of the art acoustic engineering and three dimensional computer aided design, our “Revolution Technology” represents the most advanced technologies available for wakeboard tower speaker systems.
at loud volumes. The Revolution series has been designed from the ground up to provide stunning output while eliminating certain frequencies that give that “ringing” or harsh sound associated with loud volumes. This allows the Revolution speakers to provide maximum output while still providing world class sound quality without the listener fatigue usually associated with high volumes.
Installation: REV 410 FC TC3-F Fixed Clamp Pipe Version Installation (pipe tower)
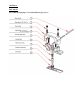
Step 1: Attach Male Connector (7) from clamp base to Female Connector (8) Step 2: Push connector into center hole of speaker as you place clamp base onto the speaker housing. Please make sure the grommet (9) is seated properly. Step 3: Attach two LONG Allen Bolts (4) through the clamp base and tighten into the housing. Please make sure these are tight. It is also recommend to use a Blue Loctite on these bolts.
Installation: REV 410 SC “Patent Pending” TC3-S Swivel Clamp Version Installation
Pipe Tower Mount Version using the TC3-S Step 1: Attach Male Connector (10) from clamp base to Female Connector (11) Step 2: Push connector into center hole of speaker as you place clamp base onto the speaker housing. Insert 4 bare wires down into this hole as well. These wires are only used if you are adding the LED speaker rings. (please see LED speaker install instructions for LED install) Please make sure the grommet (12) is seated properly.
Step 6: Slide the wire jacket (13) down the wire and Butt Connect the speaker wire coming from the tower to the speaker wire plug (4). Red is positive and black is negative. If you have added the LED accessory, this speaker wire plug (4) will have 6 conductors. Please refer to the LED install instructions. Step 7: Attach Clamp Top (2) to clamp bottom (3) using the two Allen Bolts (2) There are various length bolts included. There is 3 sizes.
Cast Mount Tower Version using the TC3-S clamp for quick disconnect and swivel function. Step 1: Attach Male Connector (10) from clamp base to Female Connector (11) Step 2: Push connector into center hole of speaker as you place clamp base onto the speaker housing. Insert 4 bare wires down into this hole as well. These wires are only used if you are adding the LED speaker rings. (please see LED speaker install instructions for LED install) Please make sure the grommet (12) is seated properly.
“Limited Warranty” What This Warranty Covers This is a "Limited" warranty. This warranty covers any defects in materials and workmanship and warranty only applies to the original purchaser and is not transferable. This warranty is also only valid if the original purchase was made from an authorized Wet Sounds™ dealer. How Long Coverage Last This warranty runs for one year from the date of the purchase. It is recommended to REGISTER your warranty online within 45 days of your purchase at www.wetsounds.
What Wet Sounds™, Inc. Will Do Wet Sounds, Inc will repair any part of your product that proves to be defective in materials or workmanship. In the event repair is not possible, Wet Sounds, Inc will replace the product in question. If it is deemed necessary Wet Sounds, Inc. will either replace the entire product with a refurbished unit or it will be replaced with a model that is similar in price if that model is no longer available.