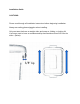
Installation Guide CAUTIONS: Please read through all installation instructions before beginning installation. Always use safety glasses/goggles when installing. Only use totes that have a straight sides and snap-on, folding, or locking lid. Your totes need to have an unobstructed lip that extends at least 3/8” from the sides. (Below).
DO NOT use any totes with sides that are rounded or bowed, or that have interference along the sides underneath the lip.
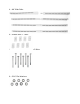
4 – 88” Slide Rails: 8 – Sliding Strut “T” Nuts: 8 – 5/16” – 18 UNC x 3¼” Grade 5 Bolts: 8 – 5/16” Flat Washers:
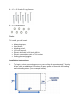
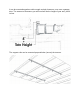
8 – ¼” x 3” Grade 5 Lag Screws: 8 – ¼” Flat Washers: Tools: To install, you will need: • • • • • • • Measuring tape, Stud finder, Marking pencil, 1/2 inch wrench, Electric drill with a 1/8 inch drill bit Electric screwdriver with a 7/16 socket Safety glasses/goggles Installation Instructions: 1. To begin, select a mounting area on your ceiling of approximately 7 feet by 8 feet, with an additional 24 inches of open space on one side for loading and unloading totes. (See example below).
It can be mounted anywhere with enough vertical clearance, even over a garage door. The amount of clearance you will need will be the height of your tote, plus 4 inches.
Or parallel (along) the trusses: It’s even possible to offset the support rails so that your slide rails are at an angle, creating an infinite number of ways to organize and access your totes.
2. Locate your overhead support structure to hold the weight of the rack and your totes. Use your stud finder to locate the position and direction of all trusses or joists within the mounting area you selected and mark them with your pencil. CAUTION: Only mount the rack onto a wooden structure. DO NOT attempt to mount onto any metal structure, drywall or any material that may need a molly or anchor. 3.
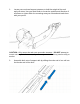
Tap the ends of the rails into place with a hammer or by carefully tapping them on the ground. Decide which direction you will want to slide your tote bins in and out. The support rails must be perpendicular to the direction you want to slide your totes. Make sure you have about 24 inches of empty ceiling on the open end that you will use to load your totes into the rack. Use the 4 lag screws with ¼” flat washers to secure each of the support rails to the ceiling joists/trusses.
The lag screws should be equally spaced as possible along the support rail, with the first and last screws no more than 6 inches from the end. 4. Measure and mark where each of the end lag screws will be placed before pre-drilling both holes with a 1/8 inch drill bit. Have someone assist you by holding the opposite end of the support rail as you drive in the first lag screw. Drive the second lag screw in at the other end of your support rail, then pre-drill and drive in the two in the middle.
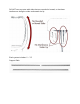
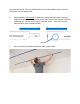
screws at each end. Then pre-drill and drive in the two middle screws, just like you did for the first support rail. 6. Now assemble all four sets of slide rails. Using the same gentle tapping method as before, insert the male end of each rail into the female end of its matching rail. Do not insert into the end with a slot. Insert into the end with the notch (see example below). Notch 7. Next, measure the distance between your support rails.
Place that measurement in the middle of your slide rail and make sure there an equal number of slots on either side. Install 2 sets of bolts, washers and strut “T” nuts roughly the same distance apart as your support rails. Width of Support Rails Place each bolt with the washer through the bottom of the slide rail and loosely hand-tighten it into the strut “T” nut.
At this point, we suggest installing the hardware into all four slide rails using the same spacing. 8. Once the bolts are attached, mount the first slide rail to the support rails by twisting the strut “T” nuts 90 degrees and pushing them up into the support rails. Now turn them clockwise 90 degrees and let the strut “T” nut rest in the support rail.
9. Before tightening the bolt, measure from the wall or from the end of the support rail and move the slide rail so that both ends are perpendicular to the support rails. Tighten the bolts to secure the slide rail in place. Be cautious that you don’t bend or distort the slide rail when tightening. 10. Before mounting your second slide rail, determine how far apart the slide rails should be by measuring your tote at the position shown, just below the lip. 11.
12. Check that your rails are parallel and the correct distance apart by sliding a tote between them. Without any play from side to side, your tote should be able to slide back and forth easily. 13. Repeat these steps for the next 2 slide rails. Check that all the bolts are tight without distorting the rails and confirm that your rails are properly spaced so that your totes fit snugly. Now you’re ready to start using your new rack.