
User's Manual


Power Save
Date/Time
1.
To change Date & Time, enter
MENU and press the UP,DN,L or R
buttons to navigate to the DATE &
TIME icon and press OK.
2.
Press the UP or DN navigation
button to go up or down in
sequence. Press L or R to move to
the next digit.
3.
When the Time & Date are set,
press OK to save and press OK
again to go back to the MENU.
page 6
After 30 seconds without any
buttons being pushed, the LCD
will turn off and camera enters
into Power Save or Ready Mode.
1.
The LCD screen can be awakened
by pressing the Power button
briefly.
Note: The LCD will not “wake up” when
camera is writing to memory.
2.
UP
OK
L
R
DN
UP
OK
L
R
DN
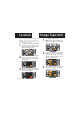
ACTIVE TIME
LOCATION TRIGGER
DELAY
PIR SENSITIVITY
FLEXTIME
+
™
+
DATE & TIME
30
PLAY BACK
IMAGE TYPE
VIEW ASSIST
DATE & TIME
30
UP
OK
L
R
DN
_ _ :__
__/__/__
TIME/DATE
AM
MONTH DAY YEAR
PM
BACK
1
11 01 12
2 00
UP
OK
L
R
DN
__:__
__/__/__
TIME/DATE
AM
MONTH DAY YEAR
PM
BACK
1
11 01 12
200