
User's Manual


page 7
Location
1.
To change Location, enter MENU
and press the UP,DN,L or R
buttons to navigate to the LOCA-
TION icon and press OK.
2.
Press the UP or DN navigation
button to go up or down in
sequence. Press L or R to move to
the next digit.
3.
When the Location is set, press
OK to save and press OK again to
go back to the MENU.
UP
OK
L
R
DN
BACK
ACTIVE TIME
LOCATION TRIGGER
DELAY
PIR SENSITIVITY
FLEXTIME
+
™
+
DATE & TIME
30
PLAY BACK
IMAGE TYPE
VIEW ASSIST
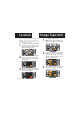
LOCATION
UP
OK
L
R
DN
BACK
LOCATION
_ _ ______
A B
UP
OK
L
R
DN
BACK
LOCATION
____ ____
ABCD
Image Type:Still
1.
To change Image Type, enter
MENU and press the UP,DN,L or R
buttons to navigate to the Image
Type icon and press OK.
2.
Press the L, R button to select STILL
and press OK. Then select the Resolu-
tion and press OK. Select the
Exposure and press OK. Then select
the aspect and press OK.
3.
When the Image Type is set, press
OK to save and press OK again to
go back to the MENU.
UP
OK
L
R
DN
BACK
ACTIVE TIME
LOCATION TRIGGER
DELAY
PIR SENSITIVITY
FLEXTIME
+
™
+
DATE & TIME
30
PLAY BACK
IMAGE TYPE
VIEW ASSIST
IMAGE TYPE
UP
OK
L
R
DN
BACK
STILL VIDEO
HI MED LOW
REGULAR WIDE ANGLE
RESOLUTION
HI MED LOW EXP CONTROL
IMAGE TYPE
Save the location of the area the camera was
installed. This is for your reference and is
optional. If you do not wish to name your
location skip to the next step.
UP
OK
L
R
DN
BACK
STILL VIDEO
HI MED LOW
REGULAR WIDE ANGLE
RESOLUTION
HI MED LOW EXP CONTROL
IMAGE TYPE