LOT NUMBER: DATE PURCHASED: / / Santa Fe Kitchen Cart with Wine Rack Stock # SFKCWWR-T ADULT ASSEMBLY REQUIRED If you have any questions regarding assembly or if parts are missing, DO NOT return this item to the store where it was purchased. Please call our customer service number and have your instructions and parts list ready to provide the model name, part name or factory number: 866-942-5362 Pacific Standard Time: 8:30 a.m. - 4:30 p.m.
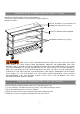
MAXIMUM RECOMMENDED WEIGHT LOADS MANUFACTURER: Whalen Furniture Manufacturing CATALOG: Santa Fe Kitchen Cart with Wine Rack (SFKCWWR-T) MADE IN CHINA FITS UP TO MOST 45" FLAT PANEL TVs MAXIMUM LOAD 100 lb. (45.3 kg) PLACE TV BEHIND THE STOPPER MAXIMUM LOAD 50 lb. (22.6 kg) THIS UNIT IS NOT INTENDED FOR USE WITH CRT TVS. USE ONLY WITH FLAT PANEL TVS AND AUDIO/VIDEO EQUIPMENT MEETING RECOMMENDED SIZE AND WEIGHT LIMITS. NEVER USE WITH LARGER/HEAVIER THAN RECOMMENDED FLAT PANEL TVS OR EQUIPMENT.
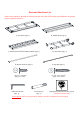
Parts and Hardware List Please read completely through the instructions and verify that all listed parts and hardware are present before beginning assembly. A- Top Panel (Qty. 1) B- Middle Shelf (Qty. 2) C- Bottom Shelf with Wine Bottle Holder (Qty. 1) E- Bottom Stretcher (Qty. 1) F- Stop Rail (Qty. 1) (1) 1/4" x 3/4" Bolt (Qty. 8+1 extra) 4 mm Hex Wrench (Qty. 1) D- Side Frame (Qty. 2) (2) 1/4" x 1-1/2" Bolt (Qty. 14+1 extra) Touch-up Pen (Qty.
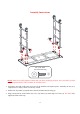
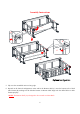
Assembly Instructions D D 1 1 1 1 A 1/4" x 3/4" Bolt (8 used in this step) ① NOTE: Please do not fully tighten all bolts until you finish assembling all parts. Once assembled, go back and fully tighten all bolts. This will make the assembly easier. 1. Unpack the unit and confirm that you have all the hardware and required parts. Assembly the unit on a carpeted floor or empty carton to avoid any scratch. 2. Position the Top Panel (A) upside down with the threaded inserts facing up. 3.
Assembly Instructions 2 E D 2 D A 1/4" x 1-1/2" Bolt (2 used in this step) ② 4. Attach the Bottom Stretcher (E) between the bottom rails of both Side Frames (D) with two 1-1/2” Bolts (2). Tighten the bolts with the enclosed hex wrench. As shown.
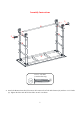
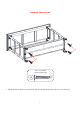
Assembly Instructions D C D D C D D C C D OR D C D 5. Flip over the assembled unit at its long edge. 6. Depend on the desired configuration, insert and fit the Bottom Shelf (C) onto the bottom rails of both Side Frames (D) making sure the threaded inserts on Bottom Shelf align with the drilled holes on Side Frames properly. NOTE: The Bottom Shelf (C) is designed to be reversed as a Wine Rack.
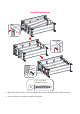
Assembly Instructions D C 2 D 2 1/4" x 1-1/2" Bolt (4 used in this step) ② 7. Fasten the Bottom Shelf (C) to the bottom rails of both Side Frames (D) with four 1-1/2" Bolts (2).
Assembly Instructions D B B D D B D D B B B D D B B B 2 D D 1/4" x 1-1/2" Bolt (8 used in this step) ② 8. Repeat the same procedure to attach the Middle Shelves (B) to the middle rails of Side Frames (D). 9. Ask for assistance to stand the assembled unit upright.
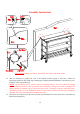
Assembly Instructions F F A F A NOTE: You must install the Strip Stopper to prevent the TV from tipping when placing your flat panel television directly on the top panel. 10. Remove the paper backing from the Stop Rail (F), then properly align the Stop Rail with the top edge of the stopper template on Top Panel (A). Press down on the Stop Rail to help adhesion. 11. Carefully remove the stopper template from the Top Panel (A).
Assembly Instructions Tools required: Phillips screwdriver, power drill, 3/8” drill bit and rubber mallet. 12. Ask for assistance to position the unit at the desired location against a wall. Now, follow the instructions printed on the plastic bag containing the Tipping Restraint Hardware to attach the tip-over restraints to the unit and the wall. NOTE: Young children can be seriously injured by tipping furniture.
Care and Maintenance Use a soft, clean cloth that will not scratch the surface when dusting. Use of furniture polish is not necessary. Should you choose to use polish, test first in an inconspicuous area. Using solvents of any kind on your furniture may damage your furniture’s finish. Never use water to clean your furniture as it may cause damage to the finish. Always use coasters under beverage glasses and flowerpots. Liquid spills should be removed immediately.
LOTE NÚMERO: FECHA DE COMPRA: / /_____ Carro para cocina Santa Fe con raca para botellas de vino Serie # SFKCWWR-T ENSAMBLE REQUERIDO POR ADULTO Si tienen alguna pregunta acerca del ensamble o si alguna parte está faltante, no retorne este producto a la tienda que lo compró. Por favor llame a nuestro departamento de ayuda al cliente teniendo su instructivo y lista de partes para proveer el modelo, nombre de parte o el número de fábrica: 866-942-5362 Hora Estándar del Pacífico: 8:30 a.m. - 4:30 p.m.
MÁXIMAS CARGAS RECOMENDADAS FABRICANTE: Whalen Furniture Manufacturing CATALOGO: Carro para cocina Santa Fe con raca para botellas de vino (SFKCWWR-T) HECHO EN CHINA PARA LA MAYORÍA DE TELEVISIONES PANTALLA PLANA DE 45" CARGA MÁXIMA 100 lb. (45.3 kg) PONER LA TV DETRÁS DEL TOPE CARGA MÁXIMA 50 lb. (22.6 kg) ESTA UNIDAD NO DEBE UTILIZARSE CON TELEVISIONES CRT O DE TUBO. UTILIZARSE ÚNICAMENTE CON TELEVISIONES DE PANTALLA PLANA Y EQUIPO DE AUDIO/VIDEO QUE TENGA LA MEDIDA/PESO RECOMENDADO.
Lista de Partes y Artículos de Ferretería Por favor lea completamente las instrucciones y verifique que estén todas las partes antes de iniciar el ensamblado. A- Panel superior (Cant. 1) B- Repisa media (Cant. 2) C- Repisa inferior con raca para botella (Cant. 1) D- Marco lateral (Cant. 2) E- Soporte inferior (Cant. 1) F- Riel tope (Cant. 1) (1) Tornillo de 1/4" x 3/4" (Cant. 8+1 extra) Llave hexagonal 4 mm (Cant. 1) (2) Tornillo de 1/4" x 1-1/2" (Cant. 14+1 extra) Plumón de retoque (Cant.
Instrucciones de ensamble D D 1 1 1 1 A Tornillo de 1/4" x 3/4" (8 usados en este paso) ① NOTA: Por favor, no apriete completamente todos los pernos hasta que termine el montaje de todas las piezas. Una vez montado, volver atrás y apriete completamente todos los pernos. Esto hará que el montaje sea más fácil. 1. Desempaque la unidad y confirmar que tiene todo el herraje y las piezas necesarias. Ensamble la unidad en un lugar o de la caja de cartón vacía para evitar cualquier rasguño. 2.
Instrucciones de ensamble 2 E D 2 D A Tornillo de 1/4" x 1-1/2" (2 usados en este paso) ② 4. Coloque el soporte inferior (E) entre los rieles inferiores de ambos marcos laterales (D) mediante dos tornillos de 1-1/2" (2). Apriete los tornillos con la llave hexagonal incluida. Como se muestra.
Instrucciones de ensamble D C D D C D D C C D OR D C D 5. Girar y colocar la unidad sobre su borde largo. 6. Dependiendo de la configuración deseada, insertar y colocar la repisa inferior (C) en los rieles inferiores de ambos marcos laterales (D) asegurándose de que los insertos roscados en la parte inferior de la repisa se alinean con los agujeros perforados en el marco lateral en forma correcta. NOTA: La repisa inferior (C) es diseñada para ser usada como raca para botellas de vino o normal.
Instrucciones de ensamble D C 2 D 2 Tornillo de 1/4" x 1-1/2" (4 usados en este paso) ② 7. Fijar la repisa inferior (C) a la parte baja de los riles de ambos marcos laterales (D) con cuatro tornillos de 1-1/2" (2).
Instrucciones de ensamble D B B D D B D D B B B D D B B B 2 D D Tornillo de 1/4" x 1-1/2" (8 usados en este paso) ② 8. Repita el mismo procedimiento para colocar las repisas medias (B) a los carriles centrales del marco lateral (D). 9. Pida ayuda para colocar la unidad ensamblada en posición vertical.
Instrucciones de ensamble F F A F A NOTA: Es necesario instalar el tapón acrílico para evitar que el televisor se caiga al poner su televisor de pantalla plana directamente en el panel superior. 10. Retire el papel protector del riel tope (F), y luego alinear correctamente el riel tope con el borde superior de la plantilla en el panel superior (A). Presione hacia abajo en el riel tope de ayudar a la adhesión. 11. Retire con cuidado la plantilla del tapón de acrílico del panel superior (A).
Instrucciones de ensamble Herramienta requerida: desarmador estrella, taladro, broca de 3/8” y mazo de goma. 12. Pide ayuda para colocar la unidad en la ubicación deseada contra una pared. Ahora, siga las instrucciones impresas en la bolsa de plástico que contiene el juego de restricción de movimiento para montar los sistemas de retención a la unidad y la pared. NOTA: Los niños pequeños pueden sufrir lesiones graves por vuelco de muebles.
Mantenimiento y Cuidados Use una toalla suave y limpia para evitar daños y rayaduras. Uso de cera para pulir muebles no es necesario. Si desea usar cera cheque en una area que no sea visible para checar su funcionamiento. Usar solventes de cualquier tipo puede dañar el acabado del mueble. Nunca use agua para limpiar la unidad, ya que le puede dañar el acabado. Siempre utilize protección para vasos cuando ponga sobre la unidad.