Pro Series Furnace Operation Manual Pro Press 100 Pro 100 Whip Mix Corporation • 361 Farmington Ave. • P.O. Box 17183 • Louisville, KY 40217-0183 USA 502-637-1451 • 800-626-5651 • Fax 502-634-4512 • www.whipmix.com 15946 Pro Series English.
Pro Series Furnace Operations Manual Warnings When operating the Pro 100, USE ONLY ARGON GAS. ATTACHING ANY FLAMMABLE OR NOXIOUS GAS IN THIS FURNACE COULD CAUSE EXPLOSION OR PERSONAL INJURY! DO NOT OPERATE THIS FURNACE WITH ANY OTHER POWER CORD. DO NOT OPERATE WITH AN EXTENSION CORD. OPERATING THIS FURNACE ON A CIRCUIT WITH OTHER FURNACES OR ELECTRICAL APPLIANCES THAT REQUIRE SIGNIFICANT POWER MAY CAUSE A CIRCUIT BREAKER TO TRIP.
Pro Series Furnace Operations Manual Table of Contents Chapter One — Getting Started Chapter Three — Change Program Menu External Component Locator...............................................4 Before Unpacking.................................................................5 Unpacking.............................................................................5 Press Regulator Set-Up........................................................5 Installing the Vacuum Pump..................................
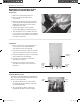
Pro Series Furnace Operations Manual External Component Locator Top Muffle Cover Press Regulator Lift Table Printer/Program Port Contrast/Volume Select Knob Back Cover Keyboard Power Switch Power Inlet/Pump Power Outlet Pump Fuses Vacuum Line Barb Manual Lift Override Screw 4 15946 Pro Series English.
Pro Series Furnace Operations Manual Chapter One — Getting Started You are undoubtedly eager to unpack, set up, and begin using your new furnace. Getting started will be much easier if you carefully review the information in this chapter and follow the steps as outlined. Before Unpacking • Save the carton and packing materials. These can be used again if there is ever a need to ship or return equipment.
Pro Series Furnace Operations Manual Quick-Cool Jet Installation for Pro 100 Furnaces with Air Cool Jet Preparation: 1. Remove the vacuum pump from its box. 2. Remove the brass hose barb from the accessory box. 3. Remove the muffler from the output end of the vacuum pump. (The input and output valves are identified by arrow indicators on the vacuum pump near inlet or outlet.) 4. Install the brass barb to output end of the vacuum pump. (Where the muffler used to be.) 5. There should be two hoses included.
Pro Series Furnace Operations Manual Power • • The furnace requires 115 Vac and 12 Amps of current in the United States and 220–240 Vac and 6.3 Amps of current in Europe and some parts of Asia. A special heavy-duty power cord has been supplied with your furnace. Turn the furnace on using the power switch. The display should light up with a message like the one shown in Figure 1, with the X’s replaced by numbers.
Pro Series Furnace Operations Manual Menu Selection Buttons Special Functions — press this button and turn the Select Knob to one of the following actions: The three menu selection buttons (Run Program, Change Program and Special Functions) will display different options. The menu options can be seen by turning the Select Knob. Run Program — Press the Run Program button to: • Select a program to run. • Review the program that is currently running.
Pro Series Furnace Operations Manual Information Entry DISPLAY — All information and user prompts will be shown on the display (two lines, sixteen characters each). NEXT — Press the Next button to proceed to the next step within a function or program. SELECT — Turn the Select Knob left or right to select options or to adjust parameters. LAST — Press this button to return to the preceding step within a function or program.
Pro Series Furnace Operations Manual Adjusting Speaker Volume This feature allows you to adjust the volume of the warning/alert speaker inside the furnace and the display contrast. 3. Turn the screw on the blue cube to adjust volume. This is a multi-turn potentiometer, so many revolutions of the screw may be necessary. Counter-clockwise will reduce the volume, clockwise will increase the volume. 1. Locate the door on the right side of the furnace. Remove the two thumbscrews and the door.
Pro Series Furnace Operations Manual Chapter Two — Special Functions To look at or change a feature, press the Special Menu Functions button. The display will read: The Special Functions menu allows you to set up the operating features of the furnace. This menu is reached by pressing the Special Functions button. Most Special Functions can be preformed while a program is running, however this is not recommended because changing the operating features could affect how the current program runs.
Pro Series Furnace Operations Manual Set Vacuum Level The factory setting for vacuum is 71 cm of mercury. The acceptable level is from 22 cm to 74–75 cm of mercury or 9.0 inches to 28.0 inches of mercury. The furnace uses an absolute vacuum sensor. With an absolute sensor, adjustments are not necessary at high altitudes. If the furnace does not pull a minimum vacuum of 10 inches within 20 seconds of calling for it, the program will be aborted and the furnace will display "Vacuum Error.
Pro Series Furnace Operations Manual Select Constant Vacuum A selection of no will allow the vacuum pump to turn off and on to maintain the set vacuum level. If intermittant vacuum is selected but the vacuum pump runs continuously during the program cycle, the vacuum level is set too high. The actual level is within 3% of the selected level, but the pump cannot reach the full selected level. This can be corrected by reducing the vacuum level. See page 11 for more detail.
Pro Series Furnace Operations Manual Porcelain Names Procedures: The first four types of programs are for normal porcelain firing cycles. These four types of programs have a unique feature, they can be named to aid in the identification of the programs to be run. Most technicians name the program groups for the porcelain brands that they use on a regular basis. For example: 1. Press the Special Functions button. 1. 2. 3. 4. 2. Turn the Select Knob until the display reads PORCELAIN NAMES. 3.
Pro Series Furnace Operations Manual Adjust Low-Fusing Porcelain Calibration (800° C/1470° F or below) 6. Turn the Select Knob to enter a temperature to adjust. If yes was selected in the previous step, this value will adjust the temperature downward. If no was selected, this value will adjust the temperature upward. 1. Press the Special Functions button. 2. Turn the Select Knob until display reads CAL LOW FUSING. LOW TEMP ADJ SELECT ITEM: CAL LOW FUSING 0C Figure 8 Figure 6 7.
Pro Series Furnace Operations Manual Adjust Press (Temp.) Calibration (Pro Press 100 only) 4. Turn the select knob to select either yes or no. Selecting yes will allow you to adjust for pressing overfires. Selecting no will allow adjusting for Pressing underfires. (This procedure will adjust the Pressing Program temperature on the Pro Press 100 only.) 1. Press the Special Functions button. 2. Turn the Select Knob until the display reads CAL Press TEMP. 5. Press the Next button.
Pro Series Furnace Operations Manual Testing Your Furnace The Pro 100 and Pro Press 100 are capable of performing several tests to aid in diagnosing the furnace should a problem occur. A technician may ask you to run one or more of these tests to aid in diagnosing the problem. The tests include a vacuum test, a muffle test, a motor up test, a motor down test, and a muffle hour reading. The muffle hour reading is incremented by 1 for each hour the muffle temperature is above 651° C. 5.
Pro Series Furnace Operations Manual Chapter Three — Change Program Menu The Change Program menu allows you to add, change, move, copy, print, or erase programmed firing cycles. This mode is reached by pressing the Change Program button. All of the features described here may be performed while a program is running. Program Number/ Name Description The next eight characters contain the name entered to describe this program.
Pro Series Furnace Operations Manual Add a Program Add a Program is used to enter a new program. This selection will describe how to enter each type of program as listed: Normal Porcelain Firing Cycle Program Pressing Program Sintering Firing Cycle Program In-Ceram® Firing Program Figure 16 (BOTH) 7. Your display will look similar to the one above. Notice that the program number, program type, and the program name just entered are the first line.
Pro Series Furnace Operations Manual 13. USE VACUUM - YES is displayed. The display will appear similar to the example. Turn the Select Knob to yes to use vacuum in your program or no if you do not wish to use vacuum in this program. Press the Next button to continue. If your selection in this step was no the display has returned to the ready select menu screen and you are finished adding this program. If your selection in this step was yes continue with the next step. 14. START VAC 0C is displayed.
Pro Series Furnace Operations Manual Special Porcelain Special Firing Cycle Program 7. ENTRY TEMP XXC is displayed. This is the temperature you want the muffle to be when the porcelain enters. Press the Next button. HOLD TIME Some porcelains require SLOW HEAT RISE special firing programs. COOLING SOAK The furnace allows TIME COOL ENTRY for programming with TIME TIME VACUUM special heat soaks, different vacuum cycles, and special cooling.The following procedure describes how to add a special program. 8.
Pro Series Furnace Operations Manual 17. USE VACUUM - YES is displayed. Turn the Select Knob to yes to use vacuum in your program, use no to not use vacuum in this program. Press the Next button. Turn the Select Knob to select During heat up, During hold time, During cooling. During Heat Up will release the vacuum at a specific temperature during the heat rise step. During Hold Time will release the vacuum after a specific time during the hold time step.
Pro Series Furnace Operations Manual Titanium Firing Cycle Program Porcelain on Titanium (Pro 100) (Pro 100 only) 10. SOAK TIME X:XX is displayed. Most operators measure the time it takes to purge to an inert condition and set the soak time to this amount. Press the Next button. HOLD TIME The Pro 100 includes INERT HEAT RISE hardware and a special COOLING SOAK TIME firing cycle for titanium ENTRY COOL TIME TIME to porcelain. 11. HEAT RATE XXC/M is displayed. (Turn the select knob to change the heat rate.
Pro Series Furnace Operations Manual 19. START VAC XXXC or START VAC X:XX will be displayed, depending on the previous selection. Press the Next button. Press the Next button. The program has been saved and the display will return to the Ready Select Menu screen. 20. VACUUM RELEASE – DURING HEAT UP is displayed. Turn the Select Knob to select During heat up, During hold time, or During cooling. During heat up will release the vacuum at a temperature during the heat rise step.
Pro Series Furnace Operations Manual 17. USE VACUUM - NO is displayed. Turn the Select Knob to yes to use vacuum in your program, no if you do not wish to use vacuum in this program. Selecting no will force the furnace to purge to an inert condition at the beginning of the program and maintain that inert condition for the remainder of the program. Selecting yes will force the furnace to sinter the old way, using vacuum throughout the program. 15. LOWER TABLE XXXC is displayed.
Pro Series Furnace Operations Manual Change a Program 3. CHANGE: 0 SYNS - OPAQUE is displayed. Turn the Select Knob to find the program to change. Press the Next button. Change a program is used to change an existing program. All program values will be displayed as they are currently in the program. It is possible to change these values when they are displayed. 4. Changes are made in the same manner as in the Add a Program section of this chapter.
Pro Series Furnace Operations Manual Erase a Program This feature allows you to erase a program from memory. The space occupied by any program erased will become available for adding a new program. 3. ERASE: is displayed. Turn the Select Knob to find the program you wish to erase. Press the Next button to continue. Procedure: 4. ERASE ??? NO is displayed. Turn the Select Knob to yes to erase this program or no to abort. Press the Next button to continue. 1. Press the Change Program button. 2.
Pro Series Furnace Operations Manual Chapter Four — Run Program Menu Note: You must burn the moisture out of the muffle before firing the first time. See the notation under “Change Idle Temperature” on page 10. Turn the Select Knob until the desired program is displayed. If the table has not been lowered, do so now. Press the Start Program button to begin this program. Continue through this chapter to learn all of the displays and features available while a program is running.
Pro Series Furnace Operations Manual By pressing the Next button, the current step will be aborted and the next step in the firing sequence will begin. The current temperature is followed by a C (Centigrade), or F (Fahrenheit). Following the temperature is a letter that indicates the status of the vacuum. Following are the various letters that may be shown. Skip Step can be repeated as many times as necessary.
Pro Series Furnace Operations Manual Running a Pressing Program (Pro Press 100 only) 2. After Pressing the Next button, the table will lower. Place the ring onto the firing table and press the Next button. 1. If the muffle temperature is below the entry temperature specified in the program, the table will raise to the closed position while the temperature rises. If the muffle temperature is above the entry temperature specified in the program, the table will remain down while the muffle cools.
Pro Series Furnace Operations Manual Running a Manual Glazing Program 5. The Hold Time will be displayed as shown below. Turn the Select Knob to select the time you wish to hold the porcelain at the final temperature. The Pro Series furnaces allow users to quickly create a glazing program. Procedure: 1. Press the Run Program button. HOLD TIME 2. Turn the Select Knob to program number 99. Program number 99 is the Manual Add Temperature Program. Figure 46 6. Press the Next button to continue.
Pro Series Furnace Operations Manual Chapter Five — Maintenance Cleaning The Furnace Only clean the table with Windex® or water and a towel. Using other cleaners will harm the anodized surface. Your new furnace has been painted with an epoxy based paint and may be cleaned by using a soft cloth and kitchen cleaners such as Fantastic® or Formula 409®. The front panel should be cleaned with a window cleaner such as Windex®. use windex® or water only.
Pro Series Furnace Operations Manual Follow these instructions to upgrade the furnace: 5. The display should read PASSWORD – 0. Turn the Select Knob to the right until the 0 has changed to 350. Press the Next button. 1. Locate the door on the right side of the furnace. Remove the two thumbscrews securing the door in place, and remove the door. PASSWORD Program Printer Port Door –0 Figure 49 6. The display will read LOAD SOFTWARE? NO. Turn the Select Knob in either direction to change the no to yes.
Pro Series Furnace Operations Manual Argon Gas Requirements and Installation (Pro 100 only) USE ONLY ARGON GAS IN THE PRO 100 FURNACE. ATTACHING ANY FLAMMABLE OR NOXIOUS GAS TO THIS FURNACE COULD CAUSE EXPLOSION OR PERSONAL INJURY! Do not attach the gas to the furnace yet. 3. Attach one end of the supplied hose to the low-pressure regulator. The best source of Argon is from your local bottled gas dealer. Usually the same dealer who furnishes Oxygen can also supple Argon.
Pro Series Furnace Operations Manual Replacing the Muffle 5. Remove the Press cylinder from the muffle assembly lid, as shown in Figure Muf. 1, with the 7/64" Allen wrench. Loosen the steel Allen bolts very carefully as they may strip the aluminum threads in the lid. UNPLUG THE UNIT FIRST! When replacing the muffle, be careful not to touch the muffle power terminal screws with your finger or without insulated tools.
Pro Series Furnace Operations Manual 10. Retrieve the new muffle assembly and inspect it for particles and cracks 16. Wrap the thermocouple bolt threads with 1/2" Teflon tape clockwise with the tip facing you at least three full (360 degree) revolutions. 11. Reinsert the O-ring and carefully place the muffle assembly onto the O-ring and casting. Some alignment may be needed. 17. Insert the thermocouple into the lid and slowly tighten. 12.
Pro Series Furnace Operations Manual 2. Muffle Burn In M. The furnace will prompt you to enter an SP CL TIME, press the Next button to skip. DO NOT FORGET TO PLACE THE FIRING TRAY ON THE LIFT TABLE! N. Turn the Select Knob to select a temperature of 1000C to lower the table. Press the Next button. A. Press the Change Programs button. B. Turn the Select Knob right to select ADD A PROGRAM. Press the Next button. 0 SPEC – BURN IN LOWER TABLE 1000C C. Select program 0. Press the Next button.
Pro Series Furnace Operations Manual Trouble Shooting Guide Vac Cal Error The Pro 100 and Pro Press 100 furnaces offer a number of self checks and warning messages that are designed to identify problems. Several of these are listed below: An error has been detected in the vacuum calibration. Recalibrate the vacuum temperature to correct this problem. No Vacuum The computer has detected a temperature reading higher than the maximum allowed. The furnace will automatically shut the heating elements off.
Pro Series Furnace Operations Manual Vacuum Test 1. Press the Up arrow button to raise the table fully up. You cannot start a vacuum test until the table is fully up. 2. Press the Special Functions button. 3. Turn the Select Knob counterclockwise to Test Furnace. Press the Next button. 5. Watch the numerical indicators as they rise. 6. The third value should stay at 99 and not change. Sometimes the value changes from 99 to 0 when the vacuum pump starts. This is normal and happens on some units. 7.
Pro Series Furnace Operations Manual Fuses • Inside the furnace there is a 5 Amp, 5 mm x 20 mm fuse in fuse clips. The furnace contains four fuses: • On the rear, just below and to the right of the power cord, there are two 12 Amp (115 Vac) or two 6 Amp (220 Vac), .25 x 1.25 inch ceramic fuses. • Inside the furnace, on the power board, there is a 1 Amp slow blow .25 x 1.25 inch fuse.
Pro Series Furnace Operations Manual Also Available from Whip Mix Replacement Parts Part Number Description 96004 Power Cord 115V 96008 Power Cord 230V 96001 Ceramic Plunger Rods Pkg of 2 96020 Investment Ringliner Pkg of 10 96085 Red Program Transfer Box 96147 Vacuum Valve Plunger 3 way 96070 Vacuum Valve Plunger 2 way 96026 Lift Limit Switch 96021 Lift Belt 96027 Lift Limit Switches on bracket 96025 Table 96216 Press Regulator 96012 Press Insert Trays 96013 Firing Tray with
Pro Series Furnace Operations Manual Pro Series Accessories High-Efficiency Vacuum Pump Silver Calibration Kit Pro Series’ Smart Box ProCheck Calibration Check Device 42 15946 Pro Series English.
Pro Series Furnace Operations Manual Fahrenheit to Centigrade Centigrade to Fahrenheit °F °C °F °C °F °C °F °C °C °F °C °F °C °F °C °F °C °F 100 110 120 130 140 150 160 170 180 190 200 210 220 230 240 250 260 270 280 290 300 310 320 330 38 43 49 54 60 66 71 77 82 88 93 99 104 110 116 121 127 132 138 143 149 154 160 166 171 177 182 188 193 199 204 210 216 221 227 232 238 243 249 254 260 266 271 277 282 288 293 299 304 310 316 321 327 630 640 650 660 670 680 690 700 710 720 730 743 750
IT 11223 05/08 15946 Pro Series English.