
Troubleshooting guide


35
Pro Series Furnace Operations Manual
ReplacingtheMufe
UNPLUG THE UNIT FIRST!
When replacing the muffle, be careful not to touch
themufepowerterminalscrewswithyour
finger or without insulated tools. There is a lot of
current at the terminals, so be very careful when replacing
the muffle! Make sure you unplug the unit before replacing
the muffle.
1. Unplug the unit! Give the muffle time to
cool before starting.
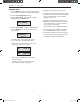
Figure Muf. 1
Press Cylinder
Removal
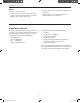
Figure Muf. 2
Figure Muf. 3
Thermocouple
2. Turn the furnace around until the back is facing you.
3. Using a #2 Phillips head screwdriver, remove the top
cover of the furnace that covers the muffle assembly.
4. Remove or disconnect the wires from their connectors
at the back of the furnace. Disconnect the Press
Cylinder hoses by pushing on the metal that surrounds
the hose at the connector and pulling on the hose
simultaneously.
5. Remove the Press cylinder from the muffle assembly lid,
as shown in Figure Muf. 1, with the
7
/
64
" Allen wrench.
Loosen the steel Allen bolts very carefully as they may
strip the aluminum threads in the lid.
• Inspecttheceramicrodandreplaceifcracked
or chipped.
6. Thermocouple removal — BE CAREFUL: THE
THERMOCOUPLE IS VERY SENSITIVE! Make sure
you first have a clean surface or paper towel to lay the
thermocouple on. Disconnect the thermocouple wire
from the connector at the back of the chassis. Then
using a
3
/
4
" wrench turn the bolt counterclockwise until
the thermocouple is free to be pulled out. Pull it carefully
up and out of the top of the muffle after unscrewing It.
DO NOT TOUCH THE THERMOCOUPLE WITH YOUR
BARE HAND OR LAY IT ON A SURFACE CONTAINING
ANY KIND OF CHEMICAL OR DUST! USE A PAPER
TOWEL OR A CLEAN SURFACE TO LAY IT ON.
7. Remove the four bolts that hold the muffle lid to
the casting using a #3 Phillips head screwdriver.
8. Slide the muffle assembly carefully up and out of
the casting then set it aside, as shown in the
Figure Muf. 2.
9. Remove and clean the top O-ring from the casting
(using a dry cloth). Visually inspect the casting and
O-ring groove for cracks or particles.
15946 Pro Series English.indd 35 5/9/08 2:51:14 PM