Electrical Requirements WARNING GROUNDING INSTRUCTIONS ■ Electrical Shock Hazard Plug into a grounded 3 prong outlet. Do not remove ground prong. Do not use an adapter. Do not use an extension cord. Failure to follow these instructions can result in death, fire, or electrical shock. Observe all governing codes and ordinances.
FEATURES Feature Guide This manual covers several models. Your model may have some or all of the items listed. Refer to this manual or the Product Help section of our website at www.whirlpool.com for more detailed instructions. WARNING Food Poisoning Hazard Do not let food sit in oven more than one hour before or after cooking. Doing so can result in food poisoning or sickness.
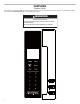
Keypad Feature Instructions Timer Set/Off Set Kitchen Timer 1. 2. 3. 4. 5. Touch TIMER keypad. Touch the number keypads to enter time up to 99 minutes and 59 seconds. For example, to set 12 minutes length time, touch TIMER keypad. Use the number keypads to enter 12:00. Touch Start. Add 30 Seconds In Manual cooking, touch the START keypad will start 30 seconds of cook time with full power MW cycle.
Keypad Feature Instructions Setup /Clock Activate Demo Mode Activate to practice using the control without actually turning on the magnetron. Touch SETUP/CLOCK to reach the Demo mode submenu, then follow the prompts to activate. The Clock or : will light up in the display. Repeat to deactivate. If the microwave oven has not been used for 5 min (no key press for 5min), the display will show “DEMO ON”. Setup /Clock Factory Reset User may set microwave oven back to default state.
Standby Mode When no functions are working, microwave oven will switch to Standby Power mode and dim the display brightness after 2 minutes. Touch any keypad or open/close the door, and the display will return to the normal brightness. Control Lock The Control Lock shuts down the control panel keypads to avoid unintended use of the microwave oven. The Control Lock will remain set after a power failure, if set before the power failure occurs.
Shielding Use small, flat pieces of aluminum foil to shield the thin pieces of irregularly shaped foods, bones, and foods such as chicken wings, leg tips, and fish tails. See the “Aluminum Foil and Metal” section first. Standing Time Food will continue to cook by the natural conduction of heat, even after the microwave cooking cycle ends. The length of standing time depends on the volume and density of the food. Cookware and Dinnerware Cookware and dinnerware must fit on the turntable.
Defrost Reheat n For optimal results, food should be 0°F (-18°C) or colder when defrosting. Times and cooking powers have been preset for reheating a number of food types. n Unwrap foods and remove lids (from fruit juice) before defrosting. Use the following chart as a guide. n Shallow packages will defrost more quickly than deep blocks. n Separate food pieces as soon as possible during or at the end of the cycle for more even defrosting.
Cook Item Food Category Quantity 1 Bacon Average thickness: Follow directions on package. For best results, place bacon on microwave-safe bacon rack. 1-6 slices Canned Vegetable Place in microwave-safe container. Cover with plastic wrap, and vent. Stir and let stand 2-3 minutes after cooking. 1, 2, 3 or 4 cups (250, 500, 750 mL or 1 L) Fresh Vegetable Place in microwave-safe container and add 2-4 tbs water. Cover with plastic wrap and vent. Stir and let stand 2-3 minutes after cooking.
MICROWAVE OVEN CARE General Cleaning IMPORTANT: Before cleaning, make sure all controls are off and the microwave oven is cool. Always follow label instructions on cleaning products. Soap, water, and a soft cloth or sponge are suggested first, unless otherwise noted. STAINLESS STEEL (on some models) NOTE: To avoid damage to stainless steel surfaces, do not use soap-filled scouring pads, abrasive cleaners, cooktop polishing creme, steel-wool pads, gritty washcloths, or abrasive paper towels.
MICROWAVE OVEN CARE Cavity Light is located at the top front of the microwave oven, under the cover and is replaceable. To replace the cavity light refer the following steps. 1. Using a Philips screwdriver to remove the 4 long wood screws from the trim kit. 5. Release the 4 locating pins from locating holes, take out the trim kit frame, and set aside. B C A A. Trim Kit Frame B. Locating pin (4) C. Locating hole (4) 6. 2. Slide the microwave oven out of the cabinet. Put the microwave on a stable desk.
TROUBLESHOOTING First try the solutions suggested here. If you need further assistance or more recommendations that may help you avoid a service call, refer to the warranty page in this manual, or visit producthelp.whirlpool.com. Contact us by mail with any questions or concerns at the address below: In the U.S.A.: Whirlpool Brand Home Appliances Customer eXperience Center 553 Benson Road Benton Harbor, MI 49022-2692 Please include a daytime phone number in your correspondence.