TABLE OF CONTENTS MICROWAVE HOOD COMBINATION SAFETY ...........................3 Electrical Requirements ...............................................................4 PARTS AND FEATURES................................................................5 Turntable ......................................................................................5 Cooking Rack...............................................................................5 MICROWAVE OVEN CONTROL.............................................
MICROWAVE HOOD COMBINATION SAFETY Your safety and the safety of others are very important. We have provided many important safety messages in this manual and on your appliance. Always read and obey all safety messages. This is the safety alert symbol. This symbol alerts you to potential hazards that can kill or hurt you and others. All safety messages will follow the safety alert symbol and either the word “DANGER” or “WARNING.
IMPORTANT SAFETY INSTRUCTIONS ■ ■ ■ ■ ■ ■ ■ Suitable for use above both gas and electric cooking equipment. Intended to be used above ranges with maximum width of 36" (91.44 cm). Clean Ventilating Hoods Frequently - Grease should not be allowed to accumulate on hood or filter. Do not use paper products when appliance is operated in the “PAN BROWN” mode (on models with this feature). Do not store any materials, other than manufacturer’s recommended accessories, in this oven when not in use.
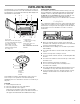
PARTS AND FEATURES This manual may cover several different models. The model you have purchased may have some or all of the features shown here. The appearance of your particular model may differ slightly from the illustrations in this manual. A B C D E Turning Off the Turntable The turntable can be turned off for manual cooking cycles only. This is helpful when cooking with plates that are larger than the turntable, or when cooking with 2 plates that are side by side.
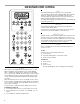
MICROWAVE OVEN CONTROL Start The START pad begins any function. If not touched within 5 seconds after touching a pad, “PRESS START” will scroll in the display as a reminder. If not touched within 2 minutes after touching a pad, the display will return to the time of day mode and the programmed function will be canceled. If cooking is interrupted by opening the door, touching START will resume the preset cycle. Cancel Off The CANCEL OFF pad stops most functions except for the Control Lock and Demo Mode.
Tones Tones are audible signals, indicating the following: One tone ■ Valid entry (short tone) Two tones ■ End of timer countdown ■ End of stage in multistage cooking ■ Control Lock active ■ Hidden feature has been entered or exited ■ Reminder, repeat each minute after the end-of-cycle tones Three tones ■ Invalid entry Four tones ■ End of cycle To Turn Off/On Valid Entry Tones: With the microwave oven in standby mode, touch and hold the number pad “1” for 3 seconds until 2 tones sound.
MICROWAVE OVEN USE A magnetron in the oven produces microwaves which reflect off the metal floor, walls and ceiling and pass through the turntable and appropriate cookware to the food. Microwaves are attracted to and absorbed by fat, sugar and water molecules in the food, causing them to move, producing friction and heat which cooks the food. ■ Do not lean on or allow children to swing on the microwave oven door. ■ Do not operate microwave oven when it is empty.
Cookware and Dinnerware Cookware and dinnerware must fit on the turntable. Always use oven mitts or pot holders when handling because any dish may become hot from heat transferred from the food. Do not use cookware and dinnerware with gold or silver trim. Use the following chart as a guide, then test before using. MATERIAL RECOMMENDATIONS Aluminum Foil, Metal See “Aluminum Foil and Metal” section. Browning Dish Bottom must be at least 3/16" (5 mm) above the turntable.
Microwave Cooking Power Many recipes for microwave cooking specify which cooking power to use by percent or name. For example, 70%=Medium-High. Use the following chart as a general guide for the suggested cooking power of specific foods. PERCENT/NAME USE 100%, High (default setting) Quick heating convenience foods and foods with high water content, such as soups, beverages and most vegetables. 90% Cooking small, tender pieces of meat, ground meat, poultry pieces and fish fillets. Heating cream soups.
Quick Touch Cooking The Quick Touch menu pads provide convenient access to preset cooking programs for common microwavable foods. Use the following chart as a guide. FOOD SERVING SIZE INSTRUCTIONS Popcorn* 1.75 oz (50 g) 3 oz (85 g) 3.5 oz (100 g) Pop only one package at a time. For bag sizes not listed in this section, follow directions on the package. Beverage 1 or 2, 8 oz (250 mL) cups Do not cover. The diameter of the cup’s opening will affect how the liquid heats.
Reheating Times and cooking power have been preset for reheating specific food types. Use the following chart as a guide. FOOD PAD QUANTITY/INSTRUCTIONS Casserole 1 1-4 cups (250 mL-1 L)/ Place in microwavable container, and cover with plastic wrap. Stir and let stand 2-3 minutes after reheating. Dinner Plate 2 1 serving (1 plate), 8-10 oz (227283 g)/ Place food on plate, cover with plastic wrap and vent.
Use the following chart as a guide. Warm Hold MEAT Beef: ground, steaks, roast, stew Lamb: stew and chops Pork: chops, ribs, roasts, sausage The narrow or fatty areas of irregular shaped cuts should be shielded with foil before defrosting. Do not defrost less than 1/4 lb (113 g) or two 4 oz (113 g) patties. Place all meats in microwavable baking dish. POULTRY Chicken: whole and cut up Cornish hens Place in microwavable baking dish, chicken breast side up.
MICROWAVE OVEN CARE General Cleaning IMPORTANT: Before cleaning, make sure all controls are off and the microwave oven is cool. Always follow label instructions on cleaning products. Soap, water and a soft cloth or sponge are suggested first unless otherwise noted. GREASE FILTERS Do not use ammonia or corrosive cleaning agents such as lyebased oven cleaners. ■ Hot water and mild detergent: Soak filters, then scrub and swish to remove embedded dirt and grease. Rinse well and shake to dry.
2. Tip the vent grille forward and down, then lift to remove. Replacing Filters The grease filters should be removed and cleaned at least once a month. Do not operate the microwave oven or exhaust fan without the grease filters in place. The charcoal filters cannot be washed and should be replaced every 6 to 12 months. See “General Cleaning” for cleaning instructions. See “Assistance or Service” to reorder filters. To Remove and Replace Grease Filters: 1.
3. Tip the vent grille forward and down, then lift out to remove. Replacing Microwave Oven Light The microwave oven light is a candelabra base bulb. It will automatically come on when the door is opened and when the microwave oven is operating. See “Assistance or Service” section to reorder. To Replace: 1. Unplug microwave oven or disconnect power. 2. Remove the 2 vent grille mounting screws located directly behind the top louver. A 4. Lift up the bulb cover. B C A A. Vent grille B. Top louver C.
TROUBLESHOOTING Try the solutions suggested here first in order to avoid the cost of an unnecessary service call. Nothing will operate ■ ■ Has a household fuse blown, or has the circuit breaker tripped? Replace the fuse or reset the circuit breaker. If the problem continues, call an electrician. Is the appliance wired properly? See Installation Instructions provided with your microwave oven. Turntable will not operate ■ Has the tape been removed from turntable hub? See “Turntable” section.
Tones are not sounding Are tones turned off? See “Tones” section. ■ Cooking times seem too long ■ Is the cooking power set properly? See “Microwave Cooking Power” section. ■ Are large amounts of food being heated? Larger amounts of food need longer cooking times. ■ Is the incoming voltage less than that specified in “Microwave Hood Combination Safety?” Have a qualified electrician check the electrical system in the home. Steam is coming from the vent grille Some steam is normal.
ASSISTANCE OR SERVICE Before calling for assistance or service, please check “Troubleshooting.” It may save you the cost of a service call. If you still need help, follow the instructions below. When calling, please know the purchase date and the complete model and serial number of your appliance. This information will help us to better respond to your request. If you need replacement parts If you need to order replacement parts, we recommend that you use only FSP® replacement parts.
WHIRLPOOL CORPORATION MAJOR APPLIANCE WARRANTY ONE YEAR LIMITED WARRANTY For one year from the date of purchase, when this major appliance is operated and maintained according to instructions attached to or furnished with the product, Whirlpool Corporation or Whirlpool Canada LP (hereafter “Whirlpool”) will pay for FSP® replacement parts and repair labor to correct defects in materials or workmanship. Service must be provided by a Whirlpool designated service company. ITEMS WHIRLPOOL WILL NOT PAY FOR 1.
NOTE This device complies with part 18 of the FCC Rules. 1, Before commissioning this oven please read this instruction manual and keep it carefully. 2, There must be more than 30cm high space necessary above the top surface of oven. 3, Do not repair the oven yourself, please consult an authorized expert. 4, The contents of feeding bottles and bay food jars are to be stirred or shaken and the temperature is to be checked before consumption, in order to avoid burns.