® MICROWAVE HOOD COMBINATION Use & Care Guide For questions about features, operation/performance parts, accessories or service, call: 1-800-253-1301. or visit our website at... www.whirlpool.com Table of Contents .......................................
TABLE OF CONTENTS MICROWAVE OVEN SAFETY........................................................3 Electrical Requirements ...............................................................5 PARTS AND FEATURES................................................................5 Turntable ......................................................................................5 Cooking Rack...............................................................................6 MICROWAVE OVEN CONTROL.............................
MICROWAVE OVEN SAFETY Your safety and the safety of others are very important. We have provided many important safety messages in this manual and on your appliance. Always read and obey all safety messages. This is the safety alert symbol. This symbol alerts you to potential hazards that can kill or hurt you and others. All safety messages will follow the safety alert symbol and either the word “DANGER” or “WARNING.
IMPORTANT SAFETY INSTRUCTIONS ■ ■ ■ ■ ■ Do not clean with metal scouring pads. Pieces can burn off the pad and touch electrical parts involving a risk of electric shock. Do not use paper products when appliance is operated in the “PAN BROWN” mode (on models with this feature). Do not store any materials, other than manufacturer’s recommended accessories, in this oven when not in use. Do not store anything directly on top of the microwave oven when the microwave oven is in operation.
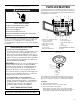
Electrical Requirements WARNING PARTS AND FEATURES This manual may cover several different models. The model you have purchased may have some or all of the features shown here. The appearance of your particular model may differ slightly from the illustrations in this manual. A B C E F D Electrical Shock Hazard Plug into a grounded 3 prong outlet. Do not remove ground prong. Do not use an adapter. Do not use an extension cord.
Turning Off the Turntable The turntable can be turned off (except during an auto function). This is helpful when cooking with plates that are larger than the turntable or when cooking with two 10¼" (26 cm) plates that are side by side. To Turn Off: Touch TURNTABLE ON-OFF. A “turntable off” icon will appear in the display. The turntable will turn back on automatically when cooking is over or CANCEL is touched. ■ Rack will become hot. Always use oven mitts or pot holders when handling.
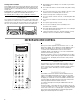
To Set: Easy Minute Feature The numerical pads 1-5 share function with the Easy Minute controls. When one of these controls is touched (while no function is operating), the oven will begin cooking at high power for 1-5 minutes, depending on which pad is touched. After cooking begins, the Easy Minute controls return to their normal numerical pad function. Cancel The CANCEL pad stops most functions except for the Timer, Child Lock and Demo Mode. The microwave oven will also turn off when the door is opened.
MICROWAVE OVEN USE A magnetron in the oven produces microwaves which reflect off the metal floor, walls and ceiling and pass through the turntable and appropriate cookware to the food. Microwaves are attracted to and absorbed by fat, sugar and water molecules in the food, causing them to move, producing friction and heat which cooks the food. ■ Do not lean on or allow children to swing on the oven door. ■ Do not operate microwave oven when it is empty.
MATERIAL RECOMMENDATIONS Paper Towels, Dinnerware, Napkins Use nonrecycled and those approved by the manufacturer for microwave oven use. Plastic Wraps, Bags, Covers, Dinnerware, Containers Use those approved by the manufacturer for microwave oven use. Pottery and Clay Follow manufacturer’s recommendations. Styrofoam* Do not use in oven. Straw, Wicker, Wooden Containers Do not use in oven. Wax Paper Acceptable for use. To Test Cookware or Dinnerware for Microwave Use: 1.
To Use the 6th SENSE™ System: Cooking To Use: 1. Touch COOK TIME. 2. Touch the number pads to set a length of time to cook. Touch COOK POWER to set a cooking power other than 100%. Touch the number pad(s) using the Cooking Power chart. 3. Touch START. The display will count down the cook time. When the cycle ends, “END” will appear in the display, 4 endof-cycle tones will sound, and then reminder tones will sound every minute for 15 minutes. 4.
4. Touch START. The display will count down the cook time. When the cycle ends, “END” will appear in the display, 4 endof-cycle tones will sound, and then reminder tones will sound every minute for 15 minutes. Reheating Times and cooking power have been preset for reheating specific foods. Use the following chart as a guide.
To Defrost manually: Defrosting The automatic Defrost control can be used or the microwave oven can be manually set to defrost. ■ Food should be 0°F (-18°C) or colder at defrosting for optimal results. ■ Unwrap foods and remove lids (from fruit juice) before defrosting. ■ Shallow packages will defrost more quickly than deep blocks. ■ Separate food pieces as soon as possible during or at the end of cycle for more even defrosting.
MICROWAVE OVEN CARE COOKING RACK General Cleaning IMPORTANT: Before cleaning, make sure all controls are off and the oven is cool. Always follow label instructions on cleaning products. Soap, water and a soft cloth or sponge are suggested first unless otherwise noted. Do not use abrasive cleansers or scrubbers. ■ Mild cleanser, water and washcloth ■ Do not place in dishwasher. RACK SUPPORTS GREASE FILTERS Do not operate the microwave oven without the grease filters in place.
GREASE FILTERS Replacing Oven Light To Remove and Replace Grease Filters: 1. Unplug oven or disconnect power. 2. Remove each of the grease filters by pushing the back of the filter up, grasping the tab, and sliding the filter to the back. Pull tab down until the filter drops out. 3. Replace grease filters by inserting the end without the tab into the frame. Swing other end up and slide into position. 4. Plug in oven or reconnect power. The oven light is a candelabra base bulb.
■ Is the turntable support operating properly? Remove turntable. Remove and replace turntable support. Replace turntable. Place 1 cup (250 mL) of water on the turntable, then restart oven. If it still is not working, call for service. See “Assistance or Service” section. Do not operate the oven without turntable and turntable support working properly. ■ Are the microwave oven door and sealing surfaces clean? Make sure these areas are clean. ■ Is the cordless phone frequency 2.4 GHz? Some 2.
WHIRLPOOL® MICROWAVE HOOD COMBINATION WARRANTY ONE-YEAR FULL WARRANTY For one year from the date of purchase, when this appliance is operated and maintained according to instructions attached to or furnished with the product, Whirlpool Corporation will pay for FSP® replacement parts and repair labor costs to correct defects in materials or workmanship. Service must be provided by a Whirlpool designated service company.