® MICROWAVE HOOD COMBINATION Use & Care Guide For questions about features, operation/performance parts, accessories or service, call: 1-800-253-1301. or visit our website at... www.whirlpool.com Table of Contents .......................................
TABLE OF CONTENTS MICROWAVE OVEN SAFETY........................................................3 Electrical Requirements ...............................................................5 PARTS AND FEATURES................................................................5 Turntable ......................................................................................5 Cooking Rack...............................................................................6 MICROWAVE OVEN CONTROL.............................
MICROWAVE OVEN SAFETY Your safety and the safety of others are very important. We have provided many important safety messages in this manual and on your appliance. Always read and obey all safety messages. This is the safety alert symbol. This symbol alerts you to potential hazards that can kill or hurt you and others. All safety messages will follow the safety alert symbol and either the word “DANGER” or “WARNING.
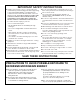
IMPORTANT SAFETY INSTRUCTIONS ■ ■ ■ ■ ■ Do not clean with metal scouring pads. Pieces can burn off the pad and touch electrical parts involving a risk of electric shock. Do not use paper products when appliance is operated in the “PAN BROWN” mode (on models with this feature). Do not store any materials, other than manufacturer’s recommended accessories, in this oven when not in use. Do not store anything directly on top of the microwave oven when the microwave oven is in operation.
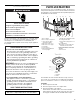
Electrical Requirements WARNING PARTS AND FEATURES This manual may cover several different models. The model you have purchased may have some or all of the features shown here. The appearance of your particular model may differ slightly from the illustrations in this manual. A B C D E G F Electrical Shock Hazard Plug into a grounded 3 prong outlet. Do not remove ground prong. Do not use an adapter. Do not use an extension cord.
Turning Off the Turntable The turntable can be turned off (except during an auto function). This is helpful when cooking with plates that are larger than the turntable or when cooking with two 10¼" (26 cm) plates that are side by side. To Turn Off: Touch TURNTABLE ON-OFF. A “turntable off” icon will appear in the display. The turntable will turn back on automatically when cooking is over or CANCEL is touched. Cooking Rack The cooking rack is ideal for two-level cooking.
Display When power is first supplied to the microwave oven, a “:” will blink on the display. Touch CANCEL to stop the blinking. If the “:” blinks on the display at any other time, a power failure has occurred. Touch CANCEL and reset the clock if needed. If “RETRY” blinks on the display for 1 second, an invalid value has been entered. Retry your entry. When the microwave oven is in use, the display shows cooking power, quantities, weights and/or prompts.
Timer Vent Fan The Timer can be set in minutes and seconds, up to 99 minutes 99 seconds and counts down the set time. NOTE: The Timer does not start or stop the microwave oven. When the Timer is in use, the microwave oven can also operate. To see the countdown for 5 seconds when the microwave oven is in use, touch TIMER SET-OFF. The vent fan has 4 speeds ranging from 4 (fastest) to 1 (slowest). Zero (0) is off.
MICROWAVE OVEN USE A magnetron in the oven produces microwaves which reflect off the metal floor, walls and ceiling and pass through the turntable and appropriate cookware to the food. Microwaves are attracted to and absorbed by fat, sugar and water molecules in the food, causing them to move, producing friction and heat which cooks the food. ■ Do not lean on or allow children to swing on the oven door. ■ Do not operate microwave oven when it is empty.
Cookware and Dinnerware Cookware and dinnerware must fit on the turntable. Always use oven mitts or pot holders when handling because any dish may become hot from heat transferred from the food. Do not use cookware and dinnerware with gold or silver trim. Use the following chart as a guide, then test before using. MATERIAL RECOMMENDATIONS Aluminum Foil, Metal See “Aluminum Foil and Metal” section. Browning Dish Bottom must be at least ³⁄₁₆ in. (5 mm) above the turntable.
PERCENT/ NAME NUMBER USE 70%, Medium-High 7 Reheating a single serving of food. Cooking fish fillets. 60% 6 ® 50%, Medium 5 Cooking sensitive foods such as cheese and egg dishes, pudding and custards. Cooking non-stirrable casseroles, such as lasagna. Cooking ham, whole poultry, whole fish and pot roasts. Simmering stews. 40% 4 Heating bread, rolls and pastries. 30%, MediumLow, Defrost 3 Defrosting bread, fish, meats, poultry and precooked foods.
Preset Cooking Times and cooking power have been preset for certain microwavable foods. Use the following chart as a guide. FOOD CODE QUANTITY/INSTRUCTION Canned Vegetables 1 1-4 cups (250 mL-1 L) Fresh Vegetables* 2 1-4 cups (250 mL-1 L)/ Add 1 tbsp (15 mL) water per cup veg. Cover with plastic and ventilate. Frozen Vegetables* 3 1-4 cups (250 mL-1 L)/ Add 1 tbsp (15 mL) water per cup veg. Cover with plastic and ventilate. Rice* 4 0.
Reheating Defrosting Times and cooking power have been preset for reheating specific foods. Use the following chart as a guide. The automatic Defrost control can be used or the microwave oven can be manually set to defrost. ■ Food should be 0°F (-18°C) or colder at defrosting for optimal results. FOOD CODE QUANTITY/INSTRUCTION Pizza Slice 1 1-3 slices, 5 oz (142 g) each Casserole 2 1-4 cups (250 mL-1 L) Soup* 3 1-4 cups (250 mL-1 L)/ Cover with plastic and ventilate.
3. Touch 3. 4. Touch START. The display will count down the defrost time. When the cycle ends, “END” will appear in the display, 4 endof-cycle tones will sound, and then reminder tones will sound every minute for 15 minutes. 5. Touch CANCEL or open the door to clear the display and/or stop reminder tones. Kids Menu The Kids Menu function is preset with cooking times and cook powers for several typical children’s menu items that are cooked in the microwave oven. Use the following chart as a guide.
Steamer Vessel Warm Hold Use the steamer vessel, (provided with the microwave oven) with the Steam Cook feature to steam foods. WARNING Food Poisoning Hazard A B Do not let food sit in oven more than one hour before or after cooking. C Doing so can result in food poisoning or sickness. A. Cooking cover B. Colander C. Dish See “General Cleaning” section for additional information. ■ The steamer vessel will become hot. Always use oven mitts or pot holders when handling.
MICROWAVE OVEN CARE OVEN DOOR EXTERIOR General Cleaning IMPORTANT: Before cleaning, make sure all controls are off and the oven is cool. Always follow label instructions on cleaning products. Soap, water and a soft cloth or sponge are suggested first unless otherwise noted. ■ Apply glass cleaner to soft cloth or sponge, not directly on panel. STEAMER VESSEL GREASE FILTERS Do not operate the microwave oven without the grease filters in place. Soak grease filters in hot water and mild detergent.
Replacing Filters Replacing Cooktop Light The grease filters should be removed and cleaned at least once a month. Do not operate the microwave oven or vent fan without the grease filters in place. The charcoal odor filter cannot be cleaned and should be replaced every 6 to 12 months. See “General Cleaning” for cleaning instructions. See “Assistance or Service” to reorder filters. The cooktop light is a candelabra base bulb. See “Assistance or Service” section to reorder. To Replace: 1.
TROUBLESHOOTING Try the solutions suggested here first in order to avoid the cost of an unnecessary service call. Nothing will operate ■ Has a household fuse blown or has the circuit breaker tripped? Replace the fuse or reset the circuit. ■ Is the appliance wired properly? See Installation Instructions. Display shows messages ■ Is the display showing “:”? There has been a power failure or the clock time has been turned off. See “Display” section to clear display.
ASSISTANCE OR SERVICE Before calling for assistance or service, please check “Troubleshooting.” It may save you the cost of a service call. If you still need help, follow the instructions below. When calling, please know the purchase date and the complete model and serial number of your appliance. This information will help us to better respond to your request. If you need replacement parts If you need to order replacement parts, we recommend that you use only FSP® replacement parts.
WHIRLPOOL® MICROWAVE HOOD COMBINATION WARRANTY ONE-YEAR FULL WARRANTY For one year from the date of purchase, when this appliance is operated and maintained according to instructions attached to or furnished with the product, Whirlpool Corporation will pay for FSP® replacement parts and repair labor costs to correct defects in materials or workmanship. Service must be provided by a Whirlpool designated service company.