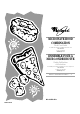
® MICROWAVE HOOD COMBINATION Use & Care Guide In Canada, for assistance, installation and service, call: 1-800-807-6777 or visit our website at www.whirlpool.ca ENSEMBLE FOUR À MICRO-ONDES/HOTTE Guide d’utilisation et d’entretien Au Canada, pour assistance, installation ou service composez le 1-800-807-6777 ou visitez notre site web à www.whirlpool.ca Table of Contents/Table des matières ........
TABLE OF CONTENTS TABLE DES MATIÈRES MICROWAVE HOOD COMBINATION SAFETY ...........................3 Electrical Requirements ...............................................................4 PARTS AND FEATURES................................................................5 Turntable ......................................................................................5 Cooking Rack...............................................................................5 MICROWAVE OVEN CONTROL........................
MICROWAVE HOOD COMBINATION SAFETY
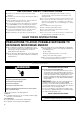
,03257$17 6$)(7< ,16758&7,216 ■ ■ ■ ■ ■ ■ ■ Suitable for use above both gas and electric cooking equipment. Intended to be used above ranges with maximum width of 36" (91.44 cm). Clean Ventilating Hoods Frequently - Grease should not be allowed to accumulate on hood or filter. Do not use paper products when appliance is operated in the “PAN BROWN” mode (on models with this feature). Do not store any materials, other than manufacturer’s recommended accessories, in this oven when not in use.
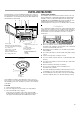
PARTS AND FEATURES This manual may cover several different models. The model you have purchased may have some or all of the features shown here. The appearance of your particular model may differ slightly from the illustrations in this manual. A B C D E Turning Off the Turntable The turntable can be turned off for manual cooking cycles only. This is helpful when cooking with plates that are larger than the turntable, or when cooking with 2 plates that are side by side.
MICROWAVE OVEN CONTROL The speed of the scrolling text may be adjusted, if necessary. To Adjust Scroll Speed: 1. Touch and hold CLOCK for 3 seconds until 2 tones sound. 2. Touch number pad “1” for SLOW, “2” for NORMAL or “3” for FAST. 3. Touch START to complete the adjustment. The display language may be changed. To Change Language: 1. Touch and hold number pad “0” for 3 seconds until 2 tones sound. 2. Touch number pad “1” for ENGLISH or “2” for FRENCH. 3. Touch START to set the language.
Tones Tones are audible signals, indicating the following: One tone ■ Valid entry (short tone) ■ End of timer countdown Two tones ■ End of stage in multistage cooking ■ Control Lock active ■ Hidden feature has been entered or exited ■ Reminder, repeat each minute after the end-of-cycle tones Three tones ■ Invalid entry Four tones ■ End of cycle To Turn Off/On Valid Entry Tones: With the microwave oven in standby mode, touch and hold the number pad “1” for 3 seconds until 2 tones sound.
MICROWAVE OVEN USE A magnetron in the oven produces microwaves which reflect off the metal floor, walls and ceiling and pass through the turntable and appropriate cookware to the food. Microwaves are attracted to and absorbed by fat, sugar and water molecules in the food, causing them to move, producing friction and heat which cooks the food. ■ Do not lean on or allow children to swing on the microwave oven door. ■ Do not operate microwave oven when it is empty.
Cookware and Dinnerware Cookware and dinnerware must fit on the turntable. Always use oven mitts or pot holders when handling because any dish may become hot from heat transferred from the food. Do not use cookware and dinnerware with gold or silver trim. Use the following chart as a guide, then test before using. MATERIAL RECOMMENDATIONS Aluminum Foil, Metal See “Aluminum Foil and Metal” section. Browning Dish Bottom must be at least 3/16" (5 mm) above the turntable.
Manual Cooking To Use: 1. Place food on the turntable, and close the door. 2. Touch COOK TIME, then enter a length of time to cook. If cooking with 100% power, skip Step 3. 3. Touch COOK POWER, then enter the desired power level using the appropriate number pad or Touch COOK POWER repeatedly to select the desired power level. See “Microwave Cooking Power” chart. 4. Touch START. The display will count down the cook time.
BAKED POTATO The Baked Potato program senses and bakes 1-4 medium pieces/potatoes, about 10-13 oz (283-369 g) each. ■ Pierce each potato several times with a fork. ■ Place a single potato on the turntable, off to the side (not centered). Place 2, 3 or 4 potatoes on the turntable around the edges, about 1" (2.5 cm) apart. ■ Let potato(es) stand 5 minutes after baking. To Use Baked Potato: 1. Place potato(es) on the turntable, and close the door. 2. Touch BAKED POTATO. The cycle will start automatically.
Preset Cooking Times and cooking power have been preset for certain microwavable foods. Use the following chart as a guide. Reheating Times and cooking power have been preset for reheating specific food types. Use the following chart as a guide. FOOD PAD QUANTITY/INSTRUCTIONS FOOD PAD QUANTITY/INSTRUCTIONS Bacon* 1 1-6 slices, average thickness/ Follow directions on the package. Pizza Slice (refrigerated) 1 Canned Vegetables 2 1-4 cups (250 mL-1 L)/ Place in microwave-safe container.
Two or More Plates Two plates may be heated side by side, or 1 dish larger than the turntable, plus 2 plates on the cooking rack. For best results, halfway through heating, turn the plates (or larger dish) halfway around, and switch plates between top and bottom (if heating more than 2 plates). See “Cooking Rack” section. 4. Enter the weight in pounds. Meats and Poultry can be set from 0.2 to 6.6 lb (90 g to 3 kg). Fish can be set from 0.2 to 4.4 lb (90 g to 2 kg).
MICROWAVE OVEN CARE General Cleaning IMPORTANT: Before cleaning, make sure all controls are off and the microwave oven is cool. Always follow label instructions on cleaning products. Soap, water and a soft cloth or sponge are suggested unless otherwise noted.
Replacing Filters Replacing Cooktop Light The grease filters should be removed and cleaned at least once a month. Do not operate the microwave oven or exhaust fan without the grease filters in place. The charcoal filters cannot be washed and should be replaced every 6 to 12 months. See “General Cleaning” for cleaning instructions. See “Assistance or Service” to reorder filters. The cooktop light is a candelabra base bulb. See “Assistance or Service” section to reorder. To Replace: 1.
4. Lift up the bulb cover. 5. Replace light. Close bulb cover. 6. Reattach vent grille. Replace the mounting screws. 7. Plug in microwave oven or reconnect power. A A. Bulb cover TROUBLESHOOTING Try the solutions suggested here first in order to avoid the cost of an unnecessary service call. Nothing will operate ■ Has a household fuse blown, or has a circuit breaker tripped? Replace the fuse or reset the circuit breaker. If the problem continues, call an electrician.
Steam is coming from the vent grille ■ Some steam is normal. Fan running slower than usual ■ Has the microwave oven been stored in a cold area? The fan will run slower until the microwave oven warms up to normal room temperature. Cooking times seem too long ■ Is the cooking power set properly? See “Microwave Cooking Power” section. ■ Are large amounts of food being heated? Larger amounts of food need longer cooking times.
WHIRLPOOL CORPORATION MAJOR APPLIANCE WARRANTY ONE YEAR LIMITED WARRANTY For one year from the date of purchase, when this major appliance is operated and maintained according to instructions attached to or furnished with the product, Whirlpool Corporation or Whirlpool Canada LP (hereafter “Whirlpool”) will pay for Factory Specified Parts and repair labor to correct defects in materials or workmanship. Service must be provided by a Whirlpool designated service company.
SÉCURITÉ DE L’ENSEMBLE FOUR À MICRO-ONDES/HOTTE 9RWUH VpFXULWp HW FHOOH GHV DXWUHV HVW WUqV LPSRUWDQWH Nous donnons de nombreux messages de sécurité importants dans ce manuel et sur votre appareil ménager. Assurez-vous de toujours lire tous les messages de sécurité et de vous y conformer. Voici le symbole d’alerte de sécurité. Ce symbole d’alerte de sécurité vous signale les dangers potentiels de décès et de blessures graves à vous et à d’autres.
,03257$17(6 ,16758&7,216 '( 6e&85,7e ■ Les liquides tels que l’eau, le café ou le thé peuvent trop chauffer – au-delà du point d’ébullition – sans sembler bouillir. Il n’y a pas toujours des bulles ou une ébullition lorsqu’on retire le récipient du four à microondes. À CAUSE DE CECI, DES LIQUIDES TRÈS CHAUDS POURRAIENT DÉBORDER LORSQU’ON BOUGE LE RÉCIPIENT OU QUE L’ON UTILISE UNE CUILLÈRE OU UN AUTRE USTENSILE POUR LE REMUER.
Spécifications électriques ,16758&7,216 '( /,$,621 ¬ /$ 7(55( AVERTISSEMENT ■ 5LVTXH GH FKRF pOHFWULTXH %UDQFKHU VXU XQH SULVH j DOYpROHV UHOLpH j OD WHUUH 1H SDV HQOHYHU OD EURFKH GH OLDLVRQ j OD WHUUH 1H SDV XWLOLVHU XQ DGDSWDWHXU 1H SDV XWLOLVHU XQ FkEOH GH UDOORQJH /H QRQ UHVSHFW GH FHV LQVWUXFWLRQV SHXW FDXVHU XQ GpFqV XQ LQFHQGLH RX XQ FKRF pOHFWULTXH Observer les dispositions de tous les codes et règlements en vigueur.
Désactivation du plateau rotatif Le plateau rotatif peut être désactivé lors des programmes de cuisson manuelle uniquement. Ceci est utile lors de la cuisson dans des assiettes plus grandes que le plateau rotatif ou lors de la cuisson dans deux assiettes placées côte à côte. Désactivation : Appuyer sur TURNTABLE ON-OFF. Une icône de “plateau rotatif-arrêt” apparaît sur l’afficheur.
La vitesse de défilement du texte peut être réglée, si nécessaire. Signaux sonores Pour régler la vitesse de défilement : 1. Appuyer sur CLOCK (horloge) pendant 3 secondes jusqu'à l'émission de 2 signaux sonores. 2. Appuyer sur la touche numérique “1” pour une vitesse LENTE, “2” pour une vitesse NORMALE et “3” pour une vitesse RAPIDE. 3. Appuyer sur START pour enregistrer le réglage. La langue de l’affichage peut être modifiée.
Control Lock (verrouillage des commandes) Le verrouillage des commandes désactive les touches du tableau de commande pour empêcher l'utilisation involontaire du four à micro-ondes. Lorsque le tableau de commande est verrouillé, seules les touches du ventilateur d'évacuation et de la lampe fonctionnent. Si on appuie sur n'importe quelle autre touche, “LOCKED” (verrouillé) s'affiche et les signaux sonores d'entrée invalide sont émis.
Temps de repos Caractéristiques des aliments Lors de la cuisson au four à micro-ondes, la quantité, la taille, la forme, la température de début et la composition et la densité de l’aliment affectent les résultats de cuisson. Les aliments continueront à cuire par la conduction naturelle de la chaleur même lorsque le programme de micro-ondes sera terminé. La durée du temps de repos dépend du volume et de la densité de l’aliment.
Papier d’aluminium et métal Toujours utiliser des mitaines de four ou des maniques pour enlever des plats du four à micro-ondes. Le papier d’aluminium et certains métaux peuvent être utilisés dans le four à micro-ondes. Si ces articles ne sont pas bien utilisés, des arcs (un éclair bleu) peuvent survenir et causer des dommages au four à micro-ondes. POURCENTAGE/NOM UTILISATION 60 % Cuisson d’aliments sensibles tels que les mets à base d’oeufs et de fromage, pudding et crèmes anglaises.
POPCORN (maïs éclaté) Cuisson par étapes Le four à micro-ondes peut être réglé pour une cuisson manuelle à différentes puissances de cuisson pendant diverses durées, jusqu'à 3 étapes. Cuisson par étapes : 1. Placer les aliments sur le plateau rotatif et fermer la porte. 2. Appuyer sur COOK TIME (durée de cuisson), puis entrer la durée de cuisson pour la première étape. En cas de cuisson à la puissance maximale, passer directement à l'étape 4. 3.
Utilisation de la fonction Baked Potato (pomme de terre au four) : 1. Placer la(les) pomme(s) de terre sur le plateau rotatif et fermer la porte. 2. Appuyer sur BAKED POTATO. Le programme commence automatiquement. “SENSES 1-4 PIECES” (détecte 1 à 4 morceaux) apparaît brièvement sur l'afficheur, suivi de “SENSING” (détection).
4. Appuyer sur START (mise en marche). Le compte à rebours de la durée de cuisson s'affiche. À la fin du programme, “END” (fin) apparaît sur l'afficheur, et les signaux de fin de programme sont émis, suivis de signaux de rappel. 5. Appuyer sur CANCEL OFF (annulation/arrêt) ou ouvrir la porte pour effacer l'affichage et/ou arrêter les signaux de rappel. Cuisson préréglée Réchauffage Les durées et puissances de cuisson ont été préréglées pour le réchauffage de types d'aliment précis.
5. Appuyer sur START (mise en marche). L'afficheur procède à un compte à rebours de la durée de réchauffage. À la fin du programme, “END” (fin) apparaît sur l'afficheur, et les signaux de fin de programme sont émis, suivis de signaux de rappel. 6. Appuyer sur CANCEL OFF (annulation/arrêt) ou ouvrir la porte pour effacer l'affichage et/ou arrêter les signaux de rappel. Pour le réchauffage manuel : Suivre les instructions de la section “Cuisson manuelle”, et régler la puissance de cuisson à 70 %.
Warm Hold (garde au chaud) AVERTISSEMENT 5LVTXH G HPSRLVRQQHPHQW DOLPHQWDLUH 1H SDV ODLVVHU GHV DOLPHQWV GDQV XQ IRXU SOXV G XQH KHXUH DYDQW RX DSUqV OD FXLVVRQ Utilisation (pour un programme unique) : 1. Placer les aliments cuits et chauds sur le plateau rotatif et fermer la porte. 2. Appuyer sur WARM HOLD. 3. Appuyer sur START (mise en marche). “WARM” apparaît sur l'afficheur pendant tout le programme.
Acier inoxydable (sur certains modèles) Pour éviter d’endommager la porte du four à micro-ondes et l’extérieur, ne pas utiliser de tampons à récurer garnis de savon, nettoyants abrasifs, tampons en laine d’acier, chiffons de lavage rugueux ou certains essuie-tout. Frotter dans le sens du grain. ■ Nettoyant et poli pour acier inoxydable (non inclus) : Voir la section “Assistance ou service” pour soumettre une commande.
3. Faire légèrement glisser le filtre vers l’arrière, soulever l'extrémité avant et tirer le filtre. Remplacement de la lampe du four à micro-ondes La lampe du four à micro-ondes est une ampoule à culot candélabre. Elle s’allume automatiquement à l’ouverture de la porte et durant le fonctionnement du four à micro-ondes. Voir la section “Assistance ou service” pour passer une nouvelle commande. Remplacement : 4. Installer un nouveau filtre à charbon. 5. Réinstaller la grille d'évent et les vis de montage.
DÉPANNAGE Essayer les solutions suggérées ici d’abord afin d’éviter le coût d’une visite de service non nécessaire. Rien ne fonctionne ■ Un fusible est-il grillé ou le disjoncteur s’est-il déclenché? Remplacer le fusible ou réenclencher le disjoncteur. Si le problème persiste, appeler un électricien. ■ L’appareil est-il correctement raccordé? Voir les instructions d’installation fournies avec le four à micro-ondes.
Le ventilateur s'allume lors de l'utilisation de la table de cuisson ■ Ceci est normal. Le ventilateur s'allume automatiquement pour refroidir le four à micro-ondes si la température de la table de cuisson qui se trouve au-dessous devient trop chaude. Voir la section “Ventilateur d'évacuation”. Interférences avec la radio, un téléviseur ou un téléphone sans fil ■ Le four à micro-ondes est-il branché sur la même prise? Essayer une prise différente.
GARANTIE DES GROS APPAREILS MÉNAGERS WHIRLPOOL CORPORATION GARANTIE LIMITÉE DE UN AN Pendant un an à compter de la date d'achat, lorsque ce gros appareil ménager est utilisé et entretenu conformément aux instructions jointes à ou fournies avec le produit, Whirlpool Corporation ou Whirlpool Canada LP (ci-après désignées “Whirlpool”) paiera pour les pièces spécifiées par l'usine et la main-d'oeuvre pour corriger les vices de matériaux ou de fabrication.