
Instruction for Use


13
Technical information for the installer
•
After removing the oven from its packaging,
before making the connections place it on the
polystyrene foam base to protect it from
damage.
•
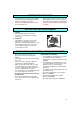
Do not attempt to lift the oven by the handle.
Lift at the sides as shown in the figure (see
arrow).
•
Check that the appliance has not been
damaged in transit.
•
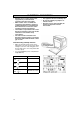
Oven dimensions and kitchen unit
dimensions are shown in the opposite figure.
•
Kitchen units in contact with the oven must
be heat resistant (80°C min).
•
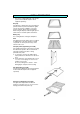
Connect the earth wire (
A
) of the cooktop to
the oven (
B
) as illustrated.
•
Connect clamps (
C
) of the cooktop to the
oven junction block (
D
) situated in the upper
section , following the colour code indicated
on the plate.
•
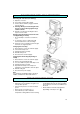
Install the oven in the housing, lifting it at the
sides, taking care not to trap the wires of the
electrical supply cable.
•
For correct ventilation, follow the ventilation
opening directions shown in the figure (at
least 500 x 80 mm or an equivalent area).
Also provide for at least 5 mm clearance
between the top of the oven and the lower
edge of the worktop.This space must not be
obstructed by cross rails or other structural
elements.
•
Carry out the electrical connections between
cooktop and oven (see chapter “Electrical
Connection”).
•
Secure the oven to the kitchen unit with
screws (
A
) as shown.
INSTALLATION