UseAndCare Table of Contents (complete) .. . . .. . . . .. . . . .. . . 2 A Note to You .. . . .. . . . . . . . . . . 2 Refrigerator Safety .. . . . . . 3 Parts and Features ....... 4 Before Using Your Refrigerator .. . . .. . . . . . . . . . . . . . 6 Using Your Refrigerator . . . . . . . . . .. . . . .. . . . 7 Caring for Your Refrigerator .. . . .. .. . .. . . . .. . 16 Food Storage Troubleshooting Guide . . . 19 .. . . .. . . . 20 Requesting Assistance or Service . . . . .. . . . .
Table of Contents Page 10 A Note to You.. .......................................................... Page 2 Safety ................................................... 3 Using the optional automatic ice maker .............. 11 ................................................... 4 Attaching the ice maker to a water supply .......... 12 6 Removing the base grille.. ................................... 14 ......................................... 7 Changing the light bulb ..........................
Refrigerator Your safety is important Safety to us. This guide contains statements under warning symbols. Please pay special attention to these symbols and follow any instructions given. Here is a brief explanation of the use of the warning symbol. IMPORTANT SAFETY INSTRUCTIONS Read all instructions before using the refrigerator. *Child entrapment and suffocation are not problems of the past. Junked or abandoned refrigerators are still dangerous . . .
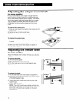
Parts and Features This section contains captioned illustrations of your appliance. Use them to become familiar with where all parts and features are located and what they look like. Page references are included for your convenience. NOTE: The model you have purchased may not match the illustration exactly. Style may have all or some of the parts and features This manual covers several models. shown and they 1 Control panel Y (P. 7) I Model and serial number label (on side wall) Base grille. (P.
Style 2 Ice cube trays -Freezer shelf (P. 10) I Utility compartment Easy-clean freezer bottom Control (P. 7) (P. 8) panel ’ Model and serial number label / (on side wall) Slide-out wire shelves (P. 8) , Meat drawer (P. 9) y Crisper (P. 9) , cover - Crispers (P. 9) Drop-in door(;n; Basq;r;; _ Leveling r‘oilers (behind ba(se grille) (P. 6) Style 3 Easy-clean freezer bottom Control (P. 7) panel. Model and serial number label (on side wall) Slide-out wire shelves (P.
Before Using Your Refrigerator It is important to prepare your refrigerator for use. This section tells you how to clean it, connect it to a power source, rnstall it, and level it. Cleaning Removing your packaging refrigerator materials Remove tape and any inside labels (except the model and serial number label) before using the refrigerator. Do not remove any permanent instruction labels inside your refrigerator. Do not remove the Tech Sheet fastened under the refrigerator at the front.
To obtain the best possible results from your refrigerator, it is important that you operate it properly. This section tells you how to set the controls, remove and adjust the features in your refrigerator, and how to save energy. Setting the controls Controls for the refrigerator and freezer are in the refrigerator. When you plug in the refrigerator for the first time: 1. Set the Refrigerator Control to 3 (Recommended Setting). Refrigerator Control settings range from 1 (warmest) to 5 (coldest). 2.
Removing (on some the drop-in door trim models) To remove the trim piece: 1. Remove all items from the shelf. 2. Pull straight up on the trim piece at each end. To replace the trim piece: 1. Locate each end of the trim piece above the trim pocket opening. 2. Push the trim piece straight down until it stops. 3. Replace items on the shelf. Removing To remove 1. Remove 2. Pull out 3. Lift trim the snap-on door trim the trim piece: all items from the shelf. on the inside tab at each end.
Removing (on some the meat drawer and cover models) Remove the meat drawer and cover for easier cleaning. To remove the meat drawer: 1. Slide meat drawer out to the stop. 2. Lift the front of the meat drawer. 3. Slide meat drawer out the rest of the way. 4. Replace in reverse order. To remove the cover: 1. Remove meat drawer. 2. Push cover back to release the rear of the cover from the shelf. 3. Tilt cover up at the front. 4. Pull cover forward and out.
Adjusting (on some the crisper cover models) For your convenience, one crisper is larger than the other, and your crisper cover has an adjustable track so you can switch positions of the crispers. This allows you to store celery and other longer items in a crisper. You can adjust the cover track with the cover in the refrigerator by removing the crispers and the cover insert. To remove the center track: 1. Push up cover insert from bottom, then slide out with both hands. 2.
Using the optional automatic If your refrigerator has an automatic ice maker, or if you plan to add one later (contact the dealer for ice maker kit number), here are a few things you should know. l The ON/OFF lever is a wire signal arm. DOWN to make ice automatically UP to shut off the ice maker IMPORTANT: Do not turn ice maker on until you connect it to the water supply. l If you remove the ice bin, raise the signal arm to shut off the ice maker.
Attaching the ice maker Read all directions carefully before to a water supply you begin. NOTE: Your appliance dealer has a kit available with a X-inch saddle type shut-off valve, a union, and copper tubing. Before purchasing, make sure a saddle type valve complies with your local plumbing codes. Do not use piercing type or %6-inch saddle valve which reduces water flow and clogs more easily. Cold Electrical Shock Hazard Disconnect electrical supply to refrigerator before installing.
5. Fasten shut-off valve to cold water pipe with pipe clamp. Be sure outlet end is solidly in the ‘h-inch drilled hole in the water pipe and that washer is under the pipe clamp. Tighten packing nut. Tighten the pipe clamp screws carefully and evenly so washer makes a watertight seal. Do not over-tighten or you may crush the copper tubing, especially if soft (coiled) copper tubing is used. Now you are ready to connect the copper tubing. 6.
Removing the base grille To remove the base grille: 1. Open the refrigerator door. 2. Grasp the grille with both hands. 3. Push down on the top edge of the grille to release the top clips. 4. Tilt the grille toward you to release the bottom clips. 5. Pull grille away from the refrigerator. NOTE: Do not remove the Tech Sheet fastened behind the grille. To replace the base grille: 1. Line up the edges of the grille with the outside edges of the cabinet. 2. Roll the grille toward you. 3.
Understanding the sounds you Your new refrigerator may make sounds that your old one didn’t. Because the sounds are new to you, you might be concerned about them. Don’t be. Most of the new sounds are normal. Hard surfaces like the floor, walls, and cabinets can make the sounds seem louder. The following describes the kinds of sounds that might be new to you, and what may be making them. Water Slight l hum, soft hiss You may hear the refrigerator’s moving air.
Caring for Your Refrigerator Your refrigerator is built to give you many years of dependable service. However, there are a few things you can do to help extend its product life. This section tells you how to clean your refrigerator and what to do when going on vacation, moving, or during a power outage. Cleaning your refrigerator Both the refrigerator and freezer sections defrost automatically. However, clean both about once a month to help prevent odors from building up. Wipe up spills right away.
HOW TO CLEAN PART WHAT TO USE Defrost pan Sponge or cloth with mild detergent and warm water l l l l l Condenser coils Vacuum cleaner with extended narrow attachment l l l Vacation Short and moving Remove base grille. Vacuum coils when dusty or dirty. Coils may need to be cleaned as often as every other month. Replace base grille. care vacations No need to shut off the refrigerator if you will be away for less than four weeks. 1. Use up any perishables. 2. Freeze other items. 3.
Power interruptions If electricity goes off, call the power company. Ask how long power will be off. 1. If service will be interrupted 24 hours or less, keep both doors closed. This helps foods stay frozen. 2. If service will be interrupted longer than 24 hours: (a) Remove all frozen food and store in a frozen food locker. OR (b) Place 2 Ibs. (907 g) of dry ice in freezer for every cubic foot (liter) of freezer space. This will keep food frozen for two to four days.
Food Storage Guide There is a correct way to package and store refngerated or frozen food. To keep food fresher, longer, take the time to study these recommended steps. Storing fresh food Butter or margarine Wrap or store food in the refrigerator in airtight and moisture-proof material. This prevents food odor and taste transfer throughout the refrigerator. For dated products, check code date to ensure freshness. Keep opened butter in covered dish or closed compartment.
Troubleshooting Performance problems often result from little things you can fix without tools. Please read through “Before calling for assistance . .” below before calling for service on your appliance. Before calling for assistance ... Listed in this chart are the most common problems consumers this and see if it can solve your problem. run into with their appliances.
Requesting Assistance Before calling for assistance or service, please check “Troubleshooting” service call. If you still need help, follow the instructions below. For assistance 1. If you need or service assistance* need service* ... ... Whirlpool has a nationwide network of authorized Whirlpool service companies. Whirlpool service technicians are trained to fulfill SERVICE the product warranty and provide afterwarranty service, anywhere in the United States.
Warranty WHIRLPOOL@ Refrigerator Warranty LENGTH OF WARRANTY WHIRLPOOL FULL ONE-YEAR WARRANTY From Date of Purchase FSP@ replacement parts and repair labor to correct defects in materials or workmanship. Service must be provided by an authorized Whirlpool service company. FULL FIVE-YEAR WARRANTY =rom Date of Purchase FSP replacement parts and repair labor to correct defects in materials or workmanship in the sealed refrigeration system. These parts are: 1. Compressor 2. Evaporator 3. Condenser 4.