
Use and Care Manual


General Cleaning
Perform: As needed
Time Required: 5 minutes.
Note: Do NOT use abrasive materials or chemical cleaners.
1. Clean cabinet surfaces with a soft cloth and warm soapy water.
2. Wipe dust from back of dispenser to improve efficiency.
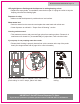
3. Remove drip tray assembly by sliding it forward. Remove cover. Place tray and cover in
dishwasher or wipe parts clean with a soft cloth and warm soapy water.
4. Reattach drip tray assembly.
Your Bottom Loading cooler has the following noise emitting functions:
Self-Cleaning pump noise:
1. When a cooler without a display is plugged in, the air pump for an ozone delivery starts to
work and lasts for 12 seconds. After start up. It will work every 4 hours for the same period
of time. Coolers with a display are programmed to have the ozone delivery pump work
every 4 hours starting from 12 o’clock.
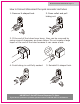
6. Turn the energy saving switches ON.
7. Allow the water to fill up the empty reservoirs.
8. Wait 10 minutes then turn the energy saving switches OFF and unplug the power cord.
9. Place a 2 gallon or larger bucket under the drain plug in the rear of the dispenser.
10. Remove the drain cap and the drain plug. Cold water will immediately flow into the bucket. After sev-
eral seconds, hot water will dispense.
Reminder - place the drain cap and the drain plug in a safe location so that they will not be lost.
11. Once the unit has been drained, replace the drain plug and the drain cap.
12. Remove the remaining water from the reservoir by dispensing from the cold tap into a pitcher.
13. Return the unit to its location, install a fresh water bottle, plug the power cord back into the grounded
wall outlet and turn the energy saving switches ON.
2. The water pump delivers water to the cold tank. Besides a low humming pump noise, the sound of water
running into the cold tank, can also be heard.
3. When the Hot Power Switch (see Parts and Features Section) is turned on, sounds of normal expansion
and contraction of metal parts may be heard as the water is heated.
4. The refrigeration compressor works when water needs to be cooled. It has a very low pitch humming noise
like that of your refrigerator.
5. In some cases, noise resulting from the installation on hard flooring is present. A noise-absorbing mat is
supplied to place under the cooler.
Sanitizing
Perform: Every 3 months or whenever an off-taste occurs.
Time Required: 30 minutes.
Note: Best done prior to loading a fresh bottle.
Step A: Remove Existing Water
1. Move the dispenser away from the wall and rotate it so that the drain plug is accesible.
2. Turn the power switches to OFF.
3. Unplug the power cord from the wall outlet.
4. Remove water bottle and probe from water bottle.
5. Place a 2 gallon or larger bucket under the drain plug in the rear of the dispenser.
6. Use a screw driver to remove screw holding drain tap and remove drain plug. Cold
water will immediately flow into the bucket. After several seconds, hot water will
dispense.
7. Reminder – place the drain cap and plug in a safe location so that they will not be lost.
8. Once the unit has been drained, replace the drain plug and the drain cap and secure
using the screw.
9. Remove the remaining water from the reservoir by dispensing from the cold tap into a
pitcher.
Step B: Sanitize Probe and Taps
1. In a clean container, make a sanitizing solution of 1.5 gallons of tap water and 1.5 tablespoons of unscented
household bleach composition(I.E.5.25% sodium hypochlorite) .
2. Wipe the probe and the area around all the taps with a soft cloth moistened with the sanitizing solution.
Step C: Sanitize Reservoirs
1. Remove the cap from a spare empty 5 gallon bottle.
Model # 8LIECH-SCSSFP5W: Page 12
IMPORTANT: Do NOT Return Dispenser To Store.
If you have a question or problem, please contact 1-844-494-4757 for assistance.