SELF-CLEANING ELECTRIC RANGES Use & Care Guide For questions about features, operation/performance, parts, accessories or service, call: 1-800-253-1301. or visit our website at... www.whirlpool.com Table of Contents .................................................
TABLE OF CONTENTS RANGE SAFETY .............................................................................3 The Anti-Tip Bracket ....................................................................3 PARTS AND FEATURES................................................................5 COOKTOP USE ..............................................................................6 Cooktop Controls.........................................................................6 Home Canning ...............................
RANGE SAFETY Your safety and the safety of others are very important. We have provided many important safety messages in this manual and on your appliance. Always read and obey all safety messages. This is the safety alert symbol. This symbol alerts you to potential hazards that can kill or hurt you and others. All safety messages will follow the safety alert symbol and either the word “DANGER” or “WARNING.
IMPORTANT SAFETY INSTRUCTIONS WARNING: To reduce the risk of fire, electrical shock, injury to persons, or damage when using the range, follow basic precautions, including the following: ■ WARNING: TO REDUCE THE RISK OF TIPPING OF THE RANGE, THE RANGE MUST BE SECURED BY PROPERLY INSTALLED ANTI-TIP DEVICES. TO CHECK IF THE DEVICES ARE INSTALLED PROPERLY, SLIDE RANGE FORWARD, LOOK FOR ANTI-TIP BRACKET SECURELY ATTACHED TO FLOOR OR WALL, AND SLIDE RANGE BACK SO REAR RANGE FOOT IS UNDER ANTI-TIP BRACKET.
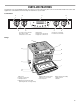
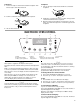
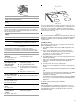
PARTS AND FEATURES This manual covers several different models. The range you have purchased may have some or all of the items listed. The locations and appearances of the features shown here may not match those of your model. Control Panel B A C D G H E F A. Surface locator indicator B. Cooktop on light C. Electronic oven control D. Oven light E. Right front control knob F. Right rear control knob G. Left rear control knob H. Left front control knob Range A F B G H I C J D E A.
COOKTOP USE Cooktop Controls WARNING Fire Hazard Turn off all controls when done cooking. Failure to do so can result in death or fire. Control knobs must be pushed in before turning them to a setting. The controls can be set anywhere between HI and LO. Use the following chart as a guide when setting heat levels. SETTING RECOMMENDED USE HI ■ To start foods cooking. ■ To bring liquids to a boil. Medium High Between HI & MEDIUM ■ To hold a rapid boil. ■ To quickly brown or sear meat.
To Remove: To Replace: 1. Push in the edge of coil element toward the receptacle. Then lift it enough to clear the burner bowl. 1. Line up openings in the burner bowl with the coil element receptacle. 2. Pull the coil element straight away from the receptacle. 2. Holding the coil element as level as possible, slowly push the coil element terminal into the receptacle. 3. When the terminal is pushed into the receptacle as far as it will go, push down the edge of the coil element opposite the receptacle.
Timer The Timer can be set in hours or minutes up to 99 hours and 59 minutes, and counts down the set time. The Timer can be used independently of any other oven function. It can also be set while another oven function is operating. NOTE: The Timer does not start or stop the oven. A minus sign means the oven will be cooler by the displayed amount. The absence of a minus sign means the oven will be warmer by the displayed amount. Use the following chart as a guide.
Oven Vent 5 4 3 2 1 A FOOD RACK POSITION(S)* Large roasts, turkeys, angel food, bundt cakes, quick breads, pies 1 or 2 Yeast breads, casseroles, meat and poultry 2 Cookies, biscuits, muffins, cakes 2 or 3 A. Oven vent BAKEWARE Hot air must be able to circulate around food to cook evenly, so allow 2" (5 cm) of space around bakeware and oven walls. Use the following chart as a guide. NUMBER OF PAN(S) POSITION ON RACK 1 Center of rack. 2 Side by side or slightly staggered.
Cook & Hold WARNING Food Poisoning Hazard When the Delay time has expired and the oven starts: The baking time will be displayed. “DELAY” will turn off, and “BAKE” and “HOLD” will remain lit. To cancel: Press CANCEL. All timed and untimed cooking functions will be canceled. The time of day will reappear in the display. Do not let food sit in oven more than one hour before or after cooking. Keep Warm Doing so can result in food poisoning or sickness.
To Broil: 1. Press BROIL. “BROIL” flashes, and “SEt” will appear in the display. 2. Press the “up” arrow pad to set HI Broil, or press the “down” arrow pad to set LO Broil. “HI” or “LO” will be displayed. Select HI Broil (550°F/288°C) for normal broiling or LO Broil (450°F/232°C) for low-temperature broiling. After 4 seconds, the oven will start. “BROIL” will remain lit. 3. Press CANCEL when finished broiling. BROILING CHART For best results, place food 3" (7.0 cm) or more from the broil element.
Prepare Oven: ■ Remove the broiler pan, grid, cookware and bakeware and, on some models, the temperature probe from the oven. ■ Remove oven racks to keep them shiny and easy to slide. See “General Cleaning” section for more information. ■ Remove any foil from the oven because it may burn or melt, damaging the oven. ■ Hand clean inside door edge and the 1½" (3.8 cm) area around the inside oven cavity frame, being certain not to move or bend the gasket.
General Cleaning IMPORTANT: Before cleaning, make sure all controls are off and the oven and cooktop are cool. Always follow label instructions on cleaning products. Soap, water and a soft cloth or sponge are suggested first unless otherwise noted. EXTERIOR PORCELAIN ENAMEL SURFACES Food spills containing acids, such as vinegar and tomato, should be cleaned as soon as the entire range is cool. These spills may affect the finish.
STORAGE DRAWER Storage Drawer Make sure drawer is cool and empty before cleaning. For more information, see “Storage Drawer” section. Cleaning Method: ■ Mild detergent Drawer Liner (on some models) Remove all stored items from drawer and lift out drawer liner. ■ Clean with mild detergent ■ All-Purpose Appliance Cleaner Part Number 31682 (not included): See “Assistance or Service” section to order. Oven Light The storage drawer can be removed. Before removing, make sure drawer is cool and empty.
Oven temperature too high or too low ■ ■ Does the oven temperature calibration need adjustment? See “Oven Temperature Control” section. On some models, does the cooling fan run during Bake, Broil or Clean? It is normal for the fan to automatically run when the oven is in use. This helps cool the electronic control. Oven indicator lights flash ■ Do the oven indicator lights flash? See the “Electronic Oven Control” section. If the indicator light(s) keeps flashing, call for service.
WHIRLPOOL CORPORATION MAJOR APPLIANCE WARRANTY LIMITED WARRANTY For one year from the date of purchase, when this major appliance is operated and maintained according to instructions attached to or furnished with the product, Whirlpool Corporation or Whirlpool Canada LP (hereafter “Whirlpool”) will pay for Factory Specified Parts and repair labor to correct defects in materials or workmanship. Service must be provided by a Whirlpool designated service company.