WHIRLPOOL CORPORATION Use And Care A Note to You.........................2 Washer Safety........................3 Parts and Features................ 5 Operating Your Washer........ 6 Starting your washer.......... 6 Stopping/restarting your washer........................7 Selecting a cycie and time ... 8 Using Rinse and Spin........ 9 Using Drain and Spin.........9 Understanding normai washer sounds................... 9 Understanding what happens in each cycle..... 10 Manual clean lint filter......
A Note to You Thank you for buying an ESTATE® appliance. ESTATE appliances give you all the functionality of name brand appliances at a value price. To ensure you enjoy many years of trouble-free operation, we have developed this Use and Care Guide. It is full of valuable information on how to operate and maintain your appliance properly and safely. Please read it carefully. Also, please complete and mail the Ownership Registration Card provided with your appliance.
Washer Safety Your safety is important to us. | This guide contains safety statements under warning symbols. Please pay special attention to these symbols and follow any instructions given. Here is a brief explana tion of the symbol. A WARNING This symbol will help alert you to such dangers as fire, electrical shock, burns, and personal injury.
WASHER SAFETY Understanding your responsibilities • store laundry aids and other materials in a cool, dry place where children cannot reach them (in a locked cabinet if pos sible). • Read and follow instructions on packages of detergent and laundry aids, especially warnings and precautions. • Do not wash or dry items that are soiled with vegetable or cooking oil. These items may contain some oil after laundering. Due to the remaining oil, the fabric may smoke or catch fire by itself.
Parts and Features The parts and features of your washer are illustrated on this page. Become familiar with all parts and features before using your washer. Load Size Selector (p. 6) Water Temperature Selector Cycle Control Knob (pp. 7-9) Consumer Assistance Center number 1-800-253-1301 Liquid chlorine bleach dispenser (P. 11) Model and serial number plate (under lid) Manual clean lint filter (bottom of agitator) (p.
Operating Your Washer To obtain the best washing results, you must operate your washer properly. This section gives you this important information. Page references are inciuded for more information. Starting your washer 1. Add measured detergent to the washer. Then place a sorted load of clothes in the washer. • Sort and load clothes as described on pages 13 and 14. • If desired, you may also add color safe bleach. 2.
OPERATING YOUR WASHER 6. Push in the Cycle Control Knob and turn it clockwise to the wash cycle you want. See pages 8 and 9. 7. Pull out the Cycle Control Knob to start the washer. 8. (OPTIONAL STEP) Add measured liquid fabric softener to the final rinse water. See page 11. Stopping/restarting your washer • To stop the washer at any time, push in the Cycle Control Knob. • To restart the washer, close the lid (if necessary) and pull out the Cycle Control Knob.
OPERATING YOUR WASHER Selecting a cycle and time This section iiiustrates and describes the wash cycles you can select with the Cycie Controi Knob. Use this information to help you make the best cycle selections for your wash loads. Each cycle is designed for different types of fabrics and soii leveis. The washer pauses briefiy throughout each cycle. These pauses are normal for washer operation. ' Refer to page 9 to learn more about the sounds you may hear during a wash cycie.
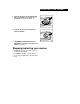
OPERATING YOUR WASHER Using Rinse and Spin When using extra detergent for heavily soiled clothes, or washing special-care items, you may find an extra rinse and spin is needed. 1. To add an additional rinse, push in the Cycle Control Knob and turn clockwise to any of the dots, as illustrated. 2. Pull out the Cycle Control Knob. The washer fills to selected load size, agitates, drains, and spins.
OPERATING YOUR WASHER Understanding what happens in each cycle When the Cycle Control Knob is set to a number and pulled out, the washer fills (to the selected load size) before agitation and timing start. The washer begins agitating immediately after filling; agitation occurs with the washer lid up or down. After agitation starts, the Cycle Controi Knob turns clockwise until it points to an OFF area and the cycie ends. WASH RINSE NOTE: The washer pauses briefly through out each cycle.
OPERATING YOUR WASHER Adding liquid chlorine bleach Use your washer’s liquid chlorine bleach dispenser to add bleach to the wash load. Always measure liquid chlorine bleach. Do not guess. Never use more than 1 cup (250 ml) for a full load. Use less with lower water level settings. Follow manufacturer’s directions for safe use. Use a cup with a pouring spout to avoid spilling. 1. Load the washer. 2. Pour measured chlorine bleach carefully into the dispenser.
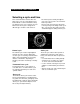
Caring for Your Washer Proper care of your washer can extend its life. This section explains how to care for your washer properly and safely. Cleaning your washer Exterior Interior Wipe up detergent, bleach, and other spills with a soft, damp cloth or sponge as they occur. Occa sionally wipe the outside of the washer to keep it looking like new. Clean interior with 1 cup (250 ml) of chlo rine bleach mixed with 2 cups (500 ml) of detergent. Run washer through a complete cycle using hot water.
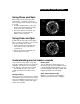
Laundry Tips This section reviews proper laundering techniques and gives you additional washing information. Preparing clothes for washing • Close zippers, snaps, and hooks to avoid snagging other items. Remove pins, buckles, and other hard objects to avoid scratching the washer interior. Remove non washable trim and ornaments. • Empty pockets and turn them inside out. • Turn down cuffs, brush away lint and dirt. • Turn synthetic knits inside out to avoid pilling.
LAUNDRY TIPS Loading suggestions For these suggested full-sized loads, set the Load Size Selector to the highest load size setting.
LAUNDRY TIPS Water guidelines Selecting water temperatures WASH WATER TEMPERATURE* SUGGESTED FABRICS COMMENTS HOT 130°F(54°C) or above • Work clothes • Sturdy whites/colorfast pastels • Diapers • Best cleaning for heavily soiled items • Removes oils, perspiration, greasy soils, and stains • Prevents graying or yellowing WARM 90-110°F (32-44°C) • Dark/noncolorfast colors • Permanent press items • Nylon, polyester, acrylics.
LAUNDRY TIPS Washing special-care items Most garments and household textiles have care labels with laundering instructions. Always follow care label directions when they are avaiiable. Below are general washing instruc tions for some special washables. ITEM CARE INSTRUCTIONS Blankets (electric or woolen) Pretreat spots and stains. Select water temperature, cycle, and time according to the type of blanket being washed. Two rinses may be necessary.
Removing Stains Stained, heavily soiled, or greasy items may need to be prewashed or soaked for best results. Soaking helps remove protein-type stains like blood, milk, or grass. Prewashing helps loosen soil before washing. Stain removal rules • Use warm water for soaking or prewashing stained laundry. Hot water can set stains. • Most stains are easier to remove when they are fresh. Old or set stains may not come out. Follow package directions for pretreatment products.
REMOVING STAINS STAIN TO REMOVE Deodorants and antiperspirants Light stain: Treat with liquid detergent or your regular laundry detergent. Wash in hottest water safe for fabric. Heavy stain: Place face down on towel and treat with a paste of ammo nia and color safe bleach. Let stand for 30 minutes. Wash in hottest water safe for fabric. Fat, grease, or oil Items soiled with vegetable or cooking oil should not be washed or dried. See vegetable/cooking oil Warning on page 3.
REMOVING STAINS STAIN TO REMOVE Meat juice, egg Scrape off excess with a dull knife. Soak in cold or warm water with enzyme presoak at least 30 minutes, or treat stains with a nonflammable fabric cleaner. Wash. Mildew Wash in hottest water safe for fabric. If stain remains, soak in warm water and a color safe bleach for 15 to 30 minutes. Rewash. (Old mildew stains are almost impossible to remove. Mildew fungus destroys or weakens fabrics.
Troubleshooting Most laundering problems are easily solved if you understand the cause. Check the foilowing list for common laundry problems and the next page for common washer problems. If you need further assistance, see page 22.
TROUBLESHOOTING Common washer problems Before calling for service, check these; Is the lid closed? Have you blown a household fuse or tripped a circuit breaker? Is the drain hose lower than the water level in the washer? It must be higher. Is the washer making noises (see page 9), or vibrating? Is the wash load properly distributed around the agitator? NOTE: Washer stops briefly during a wash cycle. These pauses are normal.
Requesting Assistance or Service Before calling for assistance or service, please check ‘Troubleshooting” on pages 20-21. It may save you the cost of a service call. If you still need help, follow the instructions below. 1. If you need assistance* ... Call the Whirlpool Consumer Assistance Center telephone number. Dial toll-free from anywhere in the U.S.A.: 1-800-253-1301 and talk with one of our trained consultants.
® Automatic Washer Warranty LENGTH OF WARRANTY WHIRLPOOL WILL PAY FOR FULL ONE-YEAR WARRANTY FSP® replacement parts and repair labor to correct defects in materials or workmanship. Service must be provided by an authorized Whirlpool service company. From Date of Purchase From Date of Purchase FSP replacement parts for any part of gearcase assembly if defective in materials or workmanship. The gearcase assembly is shown in the “Requesting Assistance or Service” section of this book.