Part No, 3369092 Rev. A IMPORTANT: Read and save these instructions. ’ IMPORTANT: , Installer: Leave Installation Instructions with the homeowner.
Proper electrical, drain and water supply lines must be available or must be installed as specified within shaded area. Plumbing and wiring should not cross in front of motor or dishwasher legs. See Electrical, Water and Drain requirements. Before you start... Proper installation is your responsibility. Make sure you have everything necessary for correct installation.
Water Requirements Now start... ove 4 screws. with dishwasher in kitchen. The hot water line to the dishwasher must provide between 15 - 120 psi water pressure. The hot water heater should be set to deliver 140°F water temperature to the dishwasher for best results. Use 3/8” O.D. copper tubing or l/2” plastic tubing minimum inlet line. Dishwasher inlet valve has 3/8” N.P.T.
- Alternate drain hose connection methods: Recommended drain hose connection methods: Floor Damage Tilt dishwasher backwards on wheels when moving across floor. Failure to do so may cause damage to floor covering. Drain hose to air gap to waste tee. Air-gap kit &Part No. A Rubber connector Drain hose to waste tee. Cut hose 3 Waste tee < If local plumbing codes permit, dishwasher drain hose may be connected directly to waste tee*.
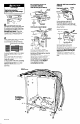
/equally To change door panel color spaceda, Product Damage Do Not solder within 6” of plastic water inlet valves. Failure to follow this instruction could result in product damage. water NOTE: The opposite side of the door color panel is a different color. inlet valve 14 n Open door approximatelv 3” and check’for equal spacing between inner door and tub sides. If necessary, loosen screws that fasten dishwasher to countertop and shift tub. Tighten screws. Personal Wear gloves and carefully.
This panel is narrower than access panel. 9 File or sand edges of goi”vdorn=’ Important: Run fingers along bottom of retainer to check thal retainer is lower than the lower door frame. n 7 bottom edge / wInset-t retainer over lower edge of door frame while holding wood door panel up, Figure 4 (For models so equipped) Cut door pa clear acces when door is in open position. Injury Hazard handle panels 1 n Push UP Ill with thumbs‘on each end of access panel top trim to unsnap trim.
If the dishwasher is not operating 1 properly.. . Check these points: l Is the door closed tightly and latched securely? l Has the cycle been set correctly to start the dishwasher? l Is the water turned on? l Has a house fuse blown or circuit breaker tripped? l Has electrical power been interrupted? Note: If the motor has stopped because of overload, it will automatically reset itself within a few minutes.