
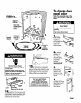
Specifications


reaufremints -
Electrical Shock Hazard
Electrical wiring, water supply line,
and drain line must not contact
any exposed terminals of the
dishwasher wiring.
Cabinet opening must completely
enclose sides, top and back of
dishwasher.
Failure to follow these instructions
can result in death, or electrical
shock.
Do Not run water or drain lines or
electrical wiring where they can
cross in front of or contact
dishwasher motor or legs.
Do Not install dishwasher over
carpeted flooring.
Do Not kink the power supply wire
between the dishwasher and
cabinet.
Protect dishwasher and wafer lines
leading to dishwasher against
freezing. Damage from freezing is
not covered by the warranty
Proper electrical, drain and water
supply lines must be available or
must be installed, as specified,
within the shaded area. See
“Electrical requirements,” “Water
requirements,” and “Drain
requirements” sections.
Garner
location -
2” (5.1 cm)
minimum
door to cabinet
or wall.
Cut openings -
Water line:
l/2” (1.3 cm)
or larger hole.
Drain line:
l-l /2” (3.8 cm)
or lar r hole.
f- Dirtc wrnng:
;;te(l .9 cm)
Y6”
(15.2 cm)
(15.26;$
7
wn;;;)
underside
of
countertop
&ZEe’
302797) ’
required for
#,i (lO.icm)
I
I
electrical
2-l/2”
I
wire hole II - ---A
I
Unshaded area must be
free of pipes, wires, and
drain hose. Electrical
outlet must be installed
in an adjacent cabinet,
if needed.
y24”-+
(61 cm)
opening width
Important: Observe all
governing codes and
ordinances.
It is recommended that the
electrical, drain and water supply
lines be located as close to the rear
wall as possible.
Check the location
where the
dishwasher will be installed. The
location must provide:
l
easy access to water, electricity
and drainage lines.
l
convenient loading - the best
location is to the left or right of the
kitchen sink.
l
square opening for proper
dishwasher operation and
appearance.
l
cabinet front that is perpendicular
to the floor.
l
protection so that the water inlet
valve and drain cannot freeze.
l
l/4” (0.64 cm) minimum clearance
between the motor and the
flooring to prevent the motor from
overheating.
For installations where the
dishwasher will be left unused and
subject to freezing temperatures,
see the “Storing Your Dishwasher” or
“Moving or winterizing your
dishwasher” section of the
dishwasher Use and Care Guide.
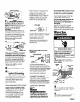
Parts su
lied
for insta ation:
Pp
l
2 drain hose clamps
l
2 No.-1 0 x l/2” Phillips-head screws
l
drain hose
Remove parts from bag. Check that
all parts were supplied.
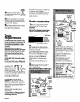
Tools and materials
required for
installation:
l
electric drill
l
Phillips screwdriver
l
2 adjustable wrenches
l
flat-blade screwdriver
l
measuring tape
l
pliers
l
pipe wrench
l
keyhole saw
l
90” elbow with 3/S” N.l?T. external
threads on one end. The size of the
other end must fit your water
supply line.
l
tubing cutter
l
pipe-joint compound
l
wire stripper and utility knife
l
5/l 6” and l/4” nut driver or hex
socket
. 3 twist-on wire connectors for
16-gauge wire
l
gloves
l
safety glasses
Page 3