
Clothes Dryer User Manual
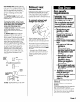


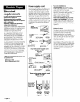


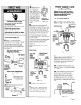


Table Of Contents
- before you start
- tools needed for installation
- parts owner must supply
- exhaust requirements
- exhaust vent connection
- gas dryer
- electric dryer
- electrical requirements
- electrical connection
- installation steps
- 1 - take tape off front corners
- 2 - remove literature and parts package
- 3 - remove the tape from the drum
- 4 - place cardboard corners on floor
- 5 - lay dryer down
- 6 - check the legs for diamond markings
- 7 - install leveling legs
- 8 - stand dryer up
- 9 - remove cardboard from under dryer
- 10 -level dryer
- 11 -to exhaust dryer
- 12 -plug dryer in
- 13 -insert user card and start dryer
- recessed area and closet installation instructions
- product dimensions
- moving the dryer to a new location
- if dryer does not operate
- if you need assistance

Recessed area and
closet installation
instructjrons
This dryer may be installed in a
recessed area or closet.
The installation spacing is the
minimum allowable. Additional
spacing should be considered for
ease of installation, servicing and
compliance with local codes and
ordinances.
If closet door is installed, the minimum
unobstructed air openings in the top
and bottom are required. Door must
have two centered openings as
illustrated. Both openings must
provide a minimum of 72 square
inches of unobstructed airflow as
shown. Louvered doors with
equivalent air openings are
acceptable.
Companion appliance spacing
should be considered.
For closet installation, to prevent large
amounts of lint and moisture from
accumulating, to maintain drying
efficiency, and to prevent exposure to
possible health hazards, dryers must
be exhausted outdoors.
Recessed non-exhausted installation
must use only the rear exhaust
position, and Exhaust Deflector Kit,
Part No. 3391278 (electric dryer only),
is required.
Shelf or cabinet is not permitted
above dryer when non-exhausted.
No other fuel-burning appliance may
be installed in the same closet.
Detailed space requirements for
recessed area and closet installations
can be found on the label on the
back panel of the dryer.
Recessed
front view
Side view
Front view 4
J”
Product dimensions
Back view
t
35"
.r
28” -
f
b
.
1"
ICI"+/
Side view
i
6”
T
-.f
3.318"
7
*
l
Additional clearances for wall, door
and floor moldings may be required or
if external exhaust elbow is used.
l
* Opening is minimum for closet door.
louvered door with equivalent air
opening is acceptable.
Page 11