
Installation


9
Level Washer
IMPORTANT: Level washer properly to reduce excess noise
and vibration.
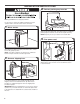
Move the washer to its nal location. Place a level on top
edges of washer. Use side seam as a guide to check levelness
of sides. Check levelness of front using lid, as shown. Rock
washer back and forth to make sure all four feet make solid
contact with oor. If washer is level, skip to step 15, (on
models with metal feet) or step 16 (on models with
plastic feet).
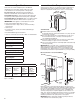
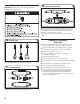
13. Check levelness of washer
Place level here
Place level here
Not Level LEVEL Not Level
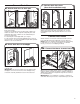
If washer is not level:
On models with metal feet, use a 14 mm or
9
⁄
16
" open-end
or adjustable wrench to turn jam nuts clockwise on feet
until they are about 13 mm ( ½") from the washer cabinet.
Then turn the leveling foot clockwise to lower the washer
or counterclockwise to raise the washer.
On models with plastic feet, use adjustable pliers to turn the
plastic leveling foot counterclockwise to lower the washer
or clockwise to raise the washer. On all models, recheck
levelness of washer and repeat as needed.
NOTE: Do not adjust foot to raise washer more than 38 mm
(1.5") from oor.
HELPFUL TIP: You may want to prop up front of washer
about 102 mm (4") with a wood block or similar object that
will support weight of washer.
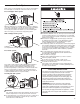
14. Adjust leveling feet
Jam nut
Models with
metal feet
or
Models with
plastic feet
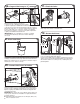
On models with metal feet, when washer is level, use a
14 mm (
9
⁄
16
") or open-end or adjustable wrench to turn
jam nuts counterclockwise on leveling feet tightly against
washer cabinet.
HELPFUL TIP: You may want to prop washer with
wooden block.
15. Tighten leveling feet
Jam nut