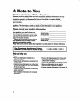
UseAndCare A Note to You ......................... 2 Dishwasher Safety ................. 3 Parts and Features ................. 4 Starting Your Dishwasher .... .6 Loading Your Dishwasher.. ...7 Using the Dispensers .......... 10 Setting the Controls ............. 12 Selecting a wash cycle .... .12 Canceling a cycle.. ............ 13 Selecting cycle options.. .. .13 Changing a cycle setting.. .14 Adding an item during a cycle.. .................. 14 Washing Special ttems ........
A Note to You Thank you for buying a Whirlpool0 appliance. Because your life is getting busier and more complicated, Whirlpool dishwashers are easy to use, save time, and help you manage your home better. To ensure you enjoy years of trotifree operation, we developed this Use and Care Guide. It contains valuable information about how to operate and maintain your appliance properly and safely. Please read it carefully.
Dishwasher Your safety is important Safety to us. This guide contains safety statements under warning symbols. Please pay special attention to these symbols and follow any instructions given. Here is a brief explanation of the us8 of the warning symbol. IMPORTANT SAFETY Read all instructions before using the dishwasher. l Use your dishwasher only for the uses described in this manual. .DISHWASHER MUST BE ELECTRICALLY GROUNDED. Read the Installation Instructions for details.
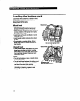
Parts and Features Your dishwasher is illustrated below with the parts and features called out. To help you find information on specific parts or features quickly, page references are included. Third level wash -r I Sorav tower and protector Water inlet opening (P- 9) (P- 9) Y W Model and serial number label (on right side) Silverware ;;;+I$ > Heating element Overfill protector (P. 19) Detergent dispensers (P.
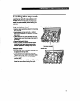
Series 400 models Option selector switch Series 800 models I Option selector switch Series 830 models V Selector button8 Series I Cycle control knob 8 10 models I Series Cycle control knob Option relector rwitch I Cycle control knob I Cycle control knob 840 models v v Cycle 8elector Optlon 8dector button8 button8 I Cycle control knob 5
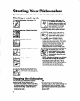
Starting Your Dishwasher This section tells you how to start or stop your dishwasher. Starting a wash 1. Load the dishwasher. Refer to it for quick reference. cycle See pages 7-9. . - y amt. ftshould turn freely. gent. See page 10. agent, if needed. See page 11. 5. Close door firmly until il latches. 7. Select a drying option. (See page 13.) For models with buttons, the er -indicator above the button will show red when the option has been selected.
Loading Your Dishwasher This section tells how to proper& load your dishwasher Preparing l l l l l to load the dishwasher To save water and energy, do not rinse diis before putting them into the dishwasher. Remove large pieces of food, bones, and other hard items. Foods like eggs, rice, pasta, and cooked cereals may be hard to remove if left to dry over a period of time. Run a RINSE 8 HOLD cyde to keep dishes moist if you do not plan to wash them scwx.
Loading the bottom rack Load items with cooked-on or dried-on food in the bottom rack, with soiled surfaces facing inward to the spray. Mixed load Load plates, soup bowls, etc., between prongs and facing inward to the spray. Make sure pot handles and other items do not stop rotation of the spray arm. Spray arm must move freely. Load items so they do not block or cover the spray tower. Load heavily soiled cookware face down in rack. Do not stack or overlap dishes.
Loading the top rack Load the top rack with cups, glasses, and smaller items. Do not cover the third level wash (on some models) when loading the top rack. Cup and glass load Load so open ends face down for cleaning and draining. . Load glasses in top rack onty - bottom rack is not designed for glasses. Damage can occur. l Ptace items in the rows between prongs. Placing them over the prongs may lead to breakage. l Secure lightweight items.
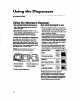
Using the Dispensers For best washing results, review the information below. It is important to use detergents and rinse agents properly. Using the detergent dispenser Uss automatic dishwashing detergent only. Other detergents are too mild and l l l How l much too sudsy. Add detergent just before starting cycle. Store detergent tightlycbsed in a cool, dry place. Fresh automatic dishwasher detergent results in better cleaning.
Using the rinse agent dispenser Keep the rinse agent dispenser filled with a liquid rinse agent. A rinse agent greatly Improves dish drying by helping water fIow off them during the last rinse. A rinse agent also keeps water from forming droplets and drying as spots or streaks. A small amount of rinse agent automatically releases into the rinse water during the final rinse of each cycle. For best drying results, check dispenser periodically see if It needs filling.
Setting the Controls Operating your dishwasher’s controls properly helps you obtain the best possible washing results. This section tells you how to select wash cycles and options. Selecting a wash cycle For Serbs 400,800, and 810 models: Turn Cycle Control Knob to desired cycle. For Series 830 models: Press POTS & PANS button for that cycle. Or press either HEAT DRY or AIR DRY for NORMAL WASH and LIGHT WASH cycles. Press AIR DRY for RINSE 8 HOLD cycle. Turn Cycle Control Knob to desired cycle.
Canceling a cycle You can cancel a cycle at any time. 1. Turn the Cycle Control Knob slowly cbckwii until you hear water draining. Let the dishwasher drain completely. 2. Open the door. 3. Turn the Cycle Control Knob to OFF. Selecting cycle options You can select a drying option after the dishwasher starts as long as the Cycle Control Knob has not reached DRY. HEAT DRY option If the HEAT DRY option is selected, air in the dishwasher is heated during the “dry” part of the cycle.
Changing (on some a cycle setting models) You can change a cycle setting anytime during any cycle. 1. Lii up the door latch to stop the cycle. 2. Turn the Cycle Control Knob cbckwise to the desired cycle. 3. Check the detergent dispensers. They must he filled properly for the new cycle. NOTE: Turning the Cycle Control Knob can cause the covered section of the detergent dispenser to open and release the detergent. Check the covered section if setting NORMAL WASH or POTS 8 PANS cycle. 4.
Washing If you have any do&s it is dishwasher safe. Special Items about washing a particular item, check with the manufacturer to see if MATERIAL DISHWASHER SAFE? EXCEPTIONS/SPECIAL INFORMATION Aluminum Yes High water temperature and detergents can pit finish of anodized aluminum. Bottles and Cans No Wash bottles and cans by hand. Labels attached with glue can loosen in your dishwasher. Loose labels and glue can clog spray arm or the pump and will reduce washing performance.
Connecting Dishwasher a Portable NOTE: A special adapter must be installed on the faucet before the dishwasher can be connected. Complete instructions and the adapter are packed with your dishwasher. When moving your dishwasher make sure the door is latched. Hold the dishwasher at the top front corners. Connecting the dishwasher 1. Run water at faucet until it is hot. Turn water off. 2. Pull hoses out of their storage compartment on the back of the dishwasher.
Disconnecting the dishwasher 1. Turn hot water off. (Thii can be done after the last rinse.) 2. Press the red button on the connector to release the water pressure. 3. Lift slightly on the hose connector while pulling down the looking collar. Pull down on the connector. 4. Empty any remaining water from the oonneotor by turning the connector upside down. 5. Unplug Power supply cord and return to storage compartment. 8. Return hoses to storage compartment.
Caring for Your Dishwasher Your new dishwasher is designed to give you many years of dependable service. There are a few things you can &to maintain your dishwasher properly. This section tells you how to clean and care for your dishwasher. Refer to “Solution chart” on pages 21-23 for special cleaning problems. See Installation Instructions for information on storing your dishwasher and for cleaning the drain air gap.
Overfill Protector The Overfill Protector (in the front right corner of the dishwasher tub) keeps the dishwasher from overfilling. It must be in place for the dishwasher to operate. Check under the float for objects that may keep the protector from moving up or down. Cleaning the filter screen The fitter system requires periodic cleaning as needd. To clean screen: 1. Unbad and slide the bottom rack forward. (Remove bottom rack if necessary to reach filter screen.) 2.
Saving Energy Saving energy is important and helps you save money. This section gives you tips on the best ways to save energy with your dishwasher. Loading tips Wash full toads. Running a half-filled dishwasher uses the same amount of electriiity and hot water as a fully loaded machine. Load correctly for best washing results. Incorrect loading may cause poor washing and the need to rewash all or part of load. Do not prerinse normally soled dishes.
Solving Common Dishwashing Problems A convenient checklist for handling minor performance problems. Go over this fist before caUing for service. If you are unable to solve your dishwasher’s service information. Solution hod soil left bndishes Spotting md filming problem, turn to page 25 for chart CAUSE SOLUTION Improper loading Follow loading instructions Water temperature too bw If needed, turn home water heater up to ensure water entering dishwasher is 120°F (49°C) minimum.
PROBLEM CAUSE SOLUTION Spotting mnd filming Incorrect amount of detergent Follow recommendations on page 10 for amount. Heavy soil and/or hard water generally require extra detergent. Use of ineffective detergents Use fresh detergent. Store detergent tightlyclosed in a cool, dry place. Discard lumpy detergent. Insufficient fill due to bw water pressure Home water pressure should be 20 to 120 psi for proper dishwasher fill. A booster pump on the water supply may be necessary if pressure is too low.
PROBLEM CAUSE SOLUTION Brown stains on dishes and dishwasher interior High iron content in water supply Remove by washing dishes (after food soil has been removed) with 1 teaspoon to 1 tablespoon of citric acid crystals added to covered section of detergent dispenser. Do not use detergent. Follow with a LIGHT WASH cycle and detergent. If treatment is needed more often than every other month, we recommend installation of an iron removal unit.
Troubleshooting Before calling for assistance please check the chart below for problems you can fix. It could save you the cost of a service call. Dishwasher problems PROBLEM CHECK THE FOLLOWING Dishwasher does not run or stops during a cycle Is the door tightly closed and securely latched? Has the cycle been set correctly? See pages 5 and 12-l 3. Has a household fuse blown or circuit breaker tripped? If the motor stopped because of an overload, it will automatically reset itself within a few minutes.
Reauestina Assistance or Before calling for assistance or service, please check “Troubleshooting” on page 24. It may save you the cosf of a service call. lf you still need help, follow the instructions below. 1. If you need assistance* ... Call the Whirlpool Consumer Assistance Center telephone number. Dial toll-free from anywhere In the U.S.A.: w 1-800-253-l 301 El and talk with one of our trained consultants.
Index This index is alphabetical. page number. - Look for the word or phrase you are interested in, then look for the TOPIC PAGE BOTTOM RACK ......................................... CLEANING Exterior.. ................................................ Interior.. ................................................. 8 TOPIC PAGE OPTIONS ................................................. OVERFILL PROTECTOR 18 18 COMMON WASHING PROBLEMS Scfving .............................................
WHIRLPOOL@ Dishwasher Warranty r LENGTH OF WARRANTY WHIRLPOOL WILL PAY FOR FULL ONE-YEAR WARRANTY From Date of Purchase FSP replacement parts and repair labor to correct defects in materials or workmanship. Service must be provided by an authorized Whirlpool service company. FULL TWENTY-YEAR WARRANTY From Date of Purchase FSP replacement parts and repair labor for the DUFtAPERMTM tub and/or inner door should they fail to contain water due to defective materials or workmanship.