
Installation Instructions


- 2 - W10367612A
7. Remove wire harness clip and door switch wires from front
panel.
8. Remove the two (2) internal screws from the upper inside
edge of the front panel flanges. Using gloves, lift front
panel off the lower clips (front of drum will drop slightly).
Set front panel aside. See Figure 1.
FIGURE 1
9. Remove drum belt by lifting idler pulley upward and sliding
belt off of motor pulley. Remove drum from cabinet.
See Figure 2.
FIGURE 2
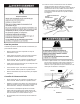
10. Disconnect ignitor connector from the main harness ignitor
connector. See Figure 3.
NOTE: The ignitor is fragile.
FIGURE 3
11. Remove the burner tube from the burner assembly by
removing two (2) screws securing it to the burner base.
See Figure 4.
FIGURE 4
CHANGING THE ORIFICE
12. Remove the burner orifice from the valve and replace it
with the proper orifice furnished in this kit. Orifice number
is stamped on one edge of the hex head of orifice.
Securely tighten. See Figure 4.
Use Orifice No. 54 for Propane gas.
Use Orifice No. 55 for Butane gas.
13. Put the burner tube back on the burner assembly.
Securely tighten the two (2) mounting screws. Reconnect
the ignitor to the harness. See Figure 3 and 4.
14. Before proceeding, you must first determine which gas
valve style is on the unit.
Refer to Figure 5 - Style “A” and “B”.
FIGURE 5 - STYLE “A”
Main
Harness
Ignitor
Connecto
r
Main Harness
Ignitor Connector