Instructions for InstallationandUse FreestandingCompactor 220-240~volt, 50-Hz Models AMB 755 9871413 \-T-l \ .
Contents Page 1 Before Using the Compactor ................................... 2 Important Safety Instructions .................................. 2 Electrical Requirements ......................................... Precautions and general suggestions .................... 2 .......................................... Installation Instructions.. 3 3 Before you start ...................................................... Tools and materials needed for installation ............ 4 Now start ......................
ImDortant SafetvInstructions I I Electrical Requirements 1. A 230 volt 50Hz ac only 15 ampere fused electrical supply is required. 2. A time delay fuse or circuit breaker is recommended. It is also recommended that a separate circuit serving only this appliance be provided. 3. Use a power point which cannot be turned off with a switch or pull chain. Do not use an extension cable. 4. For your personal safety, the compactor must be earthed.
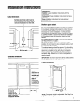
InstallationInstructions Cutoutdimensions Earthed electrical outlet must be 8 cm minimum from either side of wall and recessed 2 cm into wall. IMPORTANT: Installer: Leave installation instructions with the homeowner. Homeowner: Keep installation instructions for future reference. Save installation instructions for local electrical inspector’s use. Beforeyou start 87 cm min. b 38.4 cm min.
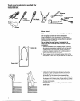
Tools and materials neededfor installation: u 8 mm boxend Pliers Wes Now start - Cable clip .(‘i With compactor in room where it will be installed. Do not grasp console to move compactor. Slide compactor onto cardboard or hardboard before moving compactor across floor to prevent damaging floor covering. Do not allow the rear frame of compactor to touch the floor covering when lifting or moving compactor. 1. Remove compactor from shipping carton.
4. Place the other two corner posts on the floor to the side of the compactor. Grasp the sides of the compactor cabinet and put compactor on its side on top of the corner posts. Remove the shipping base from the bottom of compactor. 5. The rear wheels are preset for a cabinet opening height of 86.4 cm (Position “A”). To adjust for other heights, loosen screw just enough to clear stud from hole in Position “A.” Move the rear wheel and stud to Position “B” or “C” as needed. Position B: 87.
Installation Continued Instructions 9.Grasp sides of compactor drawer and place bottom of drawer into tracks. Lift at the handle so the front of drawer will go over drawer stops. Close drawer. Check if drawer opens freely. If the toe plate rubs against floor, see “Adjusting the toe plate” for further instructions. Adjusting the toe plate If the toe plate rubs the floor covering, the toe plate clearance may be changed as follows: a.
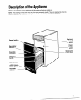
Description oftheAppliance Below is an illustration of your appliance with the parts and features called out. NOTE: The drawings in this book may vary from your compactor model. They are designed to show the different features of all models covered by this book. Your model may not include all features.
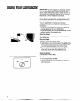
UsingYourCompactor IMPORTANT: Do not compact any container, aerosol cans or cloths which might contain insecticide, hair spray, engine starting fluid, paints, liquids, thinners, or any poisonous or explosive products. If you compact these items, a fire or explosion could result. Broken glass or sharp edges may be present in trash. Do not shove items down into compactor with feet or hands, risking cuts.
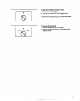
ON . . START OFF . ON . OFF . . START To stop the compactor during a cycle: 1. Turn the Key-knob to OFF. 2. Turn the Key-knob to ON. The compacting ram will rise. 3. When the ram stops rising, you can open the drawer. To remove 1. Turn the 2. Remove children’s the Key-knob: Key-knob to the OFF position. and store Key-knob in a safe place out of reach.
Using Your Compactor Continued Removinga filled bag When the trash is compacted to the top of the drawer, remove the bag. If the bag is too heavy, compact less trash before emptying in the future. IMPORTANT: Sharp objects may protrude through bag after removal from compactor. Handle bag carefully. 1. Pull the drawer completely open. 2. Remove top of bag from bag retainer buttons. Pull up all 4 bag cuffs. 3. Close bag with twist tie provided. 4. Push Side-lock latch down and tilt drawer side open. 5.
Installing a new bag Before installing a new bag, be sure: 1. The drawer side is securely locked. 2. The container is clean and free of sharp debris that may puncture the bag. Do not use any kind of bag other than those designed especially for use in your compactor. Compactor bags may be purchased from your retailer. 1. Fit the bag caddy in the drawer. 2. Place folded bag into the drawer. Open bag and pull top edges over the drawer top. 3.
HowYourCompactor Works The compacting ram does not go to the drawer bottom. You will not see compacting of the first few loadings. Compaction starts after the drawer is about !A full. You may hear a noise when glass breaks. Strong glass bottles may not break at all. The trash in a full compactor bag will be about l/4 the size of its original bulk. Bottles or cans not placed in the centre may become caught between the ram and the drawer.
CaringForYourCompactor As is true of most appliances, proper care is needed to give you continued satisfaction. Before cleaning the compactor, turn the Key-knob to the OFF position and remove. If you will be away for more than a couple of days, remove the compactor bag. Lock the compactor and remove the Key-knob. Store the Key-knob in a safe place. Clean exterior surfaces: 1. Wipe with warm, soapy water and a damp cloth. Rinse. Dry with a soft cloth. 2. Wipe up spills right away.
Caring For Your Compactor Continued Clean inside the cabinet: Wear protective gloves. There may be bits of glass in the cabinet. Pull the drawer out until it stops. Note the tracks in which the drawer rollers move. Lift the front to clear the drawer stops. Grasp the drawer on the sides. Pull it out the rest of the way. Set it down gently. Vacuum inside of cabinet and ram cover. Liquid spills or wet trash should be cleaned up by hand, or use a vacuum designed to pick up liquids.
Changing YourCompactor’s Colour The colour panel on the front of your compactor’s drawer reverses to another colour. To change the colour of your compactor’s front panel, follow the directions below. All you need is a mediumsized screwdriver. 1. Slide drawer out. 2. Remove two screws shown. 3. Remove handle. IMPORTANT: When you are changing front panels, handle carefully to avoid cuts. 4. Remove the colour panel and reverse. Be careful edges may be sharp.
Troubleshooting Guide/Service Before calling for assistance . Performance problems often result from little things you can find and fix yourself without tools of any kind.
Whirlpool is a registered trademark of Whirlpool, U.S.A. Whirlpool ist ein eingetragenes Warenzeichen der Whirlpool, USA. WhIrlpool est une marque dbpos&e de Whirlpool, USA. 9871413 0 1996 Whirlpool Corporation Whirlpool is een geregistreerd handelmerk van Whirlpool, USA. WhIrlpool B un marchio commerciale registrato della Whirlpool, USA. 10196 Printed in U.S.A.