
Specifications


COMPLETE FINISH WALLCOMPLETE FINISH WALL
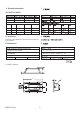
For sunken type installation, construct the ceramic or
marble tiles. Seal the joints between the bath rim and
the tiled wall with silicone sealant.
Finished tiled Wall
Brick or
Concrete Wall
Bath
Silicone Filler
Paste Mortar
Drop-In Models:
CAUTION: Risk of product damage. Do not
support the weight of the bath by the rim.
INSTALL PLUMBING
CAUTION:
NOTE: An access panel will simplify future
maintenance.
Risk of damage to bath bottom and subfloor,
Ensure a watertight seal on the bath drain connections.
. When the bath is securely positioned, connect the
drain to the trap.
. Install the faucet valving and spout tee. When
drilling bathtub for faucet, ensure sufficient clearance to
avoid brick support wall. Open the hot and cold water
valves and check the supply connections for leaks.
. Run water into the bath and check the drain
connections for leaks.
. Fill the whirlpool up to the overflow level and check
overflow unit for leaks.
A
B
C
D
INSTALL PLUMBING
A
B
C
D
.
.
.
.
-9-
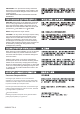
F. Fill bathtub with water to approximately 40 mm above
the jets and trial run pump for 10-15 minutes. Check all
the fittings for leaks and test the control functions. Switch
off the spa pump and leave the unit filled with water (pump
is not running) for at least another two minutes. Check the
pump and pipes union connections for leaks. Hand
tighten union connections if required.
. 40mm
10-15
()2
F
UNION CONNECTIONS
E. 220V/50Hz
10A
220V/50Hz
10A
E. Connect power supply (220V/50Hz, 10A) to motor.
This should be a separato line, direct from the
switchboard.
Connect power supply (220V/50Hz, 10A) to heater.
This should be a separato line, direct from the
switchboard.
The electrical connections must comply with local
authority regulations and must be done by an
authorized electriclan. Please refer to Spa Pump
Installarion & Operation Instructions sheet.
1063633-T01-A