R Portrait 5.5’ Whirlpool Baths: K-1457-AA K-1457-JA-AA K-1457-J1-AA 113312-2-BA (9443) Copyright E1994 Kohler Co.
IMPORTANT SAFETY INSTRUCTIONS ATTENTION INSTALLER: INSTRUCTIONS PERTAINING TO RISK OF FIRE, ELECTRIC SHOCK OR INJURY TO PERSONS READ AND FOLLOW ALL INSTRUCTIONS WARNING: When using this unit, always follow basic precautions, including the following: For -J1 and -JA models only: A green colored terminal (or a wire connector marked “G”, “GR”, “GROUND”, or “Grounding”) is provided within the terminal compartment.
TABLE OF CONTENTS IMPORTANT SAFETY INSTRUCTIONS . . . . . . . . INTRODUCTION . . . . . . . . . . . . . . . . . . . . . . . . . . . . . ROUGHING-IN: K-1457-AA, K-1457-JA-AA, K-1457-J1-AA . . . . . . . . . . . . . . . . . . . . . . . . . . . . . . . Ordering Information . . . . . . . . . . . . . . . . . . . . . . . Required Electrical Service . . . . . . . . . . . . . . . . . . Product Information . . . . . . . . . . . . . . . . . . . . . . . . Installation Notes . . . . . . . . . . . . . . . . . . . . . . .
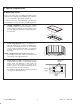
1. ROUGHING-IN: K-1457-AA, K-1457-JA-AA, K-1457-J1-AA A. ORDERING INFORMATION C. PRODUCT INFORMATION Fixture: Factory installed components include pump with integral timer, and air switch transmitter. basin area Bathing well 50” x 29” Accessories/hardware: Jet trim kit K-9698 required Drain K-7161-AF recommended To overflow B.
2. PRODUCT NOTICES A. INSTALLER HAZARD NOTIFICATION B. FACTORY-ASSEMBLED FEATURES DANGER: Risk of fire, electric shock, or injury to persons. Read important safety instructions on inside front cover of these instructions. Factory installed components include pump with integral timer and air switch transmitter. No installation is needed. WARNING: Risk of electrical shock. A licensed electrician should make all electrical connections. The whirlpool pump and piping are factory-assembled.
E. ELECTRICAL REQUIREMENTS K-1457-AA: The installation must have a Class A Ground-Fault Circuit-Interrupter (GFCI). The GFCI protects against line-to-ground shock hazard. Use a 120V, 15A, 60 Hz separate service for the whirlpool. Provide a separate equipment grounding conductor for the inside grounding lug. Ground must not be connected to any current-carrying conductor except at the main service breaker box. K-1457-JA-AA: The installation must have an Earth Leakage Circuit Breaker (ELCB).
5. SITE REQUIREMENTS A. OLD BATH REMOVAL (IF APPLICABLE) Disconnect the drain at the trap. Remove old wall material. Slip boards under old bath feet to protect floor and slide old bath out of recess as illustrated. Old Bath Floor Protection Boards B. SUBFLOOR PREPARATION Check flooring under the bath and repair if necessary. Make sure that the subfloor is level. Seal subfloor to reduce the risk of water damage. C. STUD POCKET PREPARATION Construct a recess designed for your particular installation.
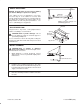
7. INSTALL WHIRLPOOL A. WHIRLPOOL SET-IN Choose one of the three recommended options below that is best for your particular installation as described in 1., 2., or 3. Follow the appropriate instructions. If subfloor is not level, some shimming of the bath and pump will be necessary. See 7.B. for height adjustment. 1. Sunken Installation: Set unit into sunken installation. Make sure the bath/whirlpool is level and is resting on all blocks. Insert the tailpiece into the trap.
B. HEIGHT ADJUSTMENT NOTICE: Steps B. and C. are necessary for making your Kohler Whirlpool operate more quietly. Drainage If the subfloor is level, no adjustment is necessary; proceed to Step C. If the subfloor is not level, shim beneath pump bracket (plywood is recommended). Do not change the elevation of the pump relative to the whirlpool bath since this may affect performance. Use a 5” x 7” (minimum) piece of plywood. ÉÉ ÉÉ Shim if necessary, using 5” x 7” (minimum) plywood Bracket C.
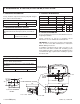
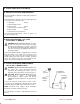
8. FIELD WIRE ELECTRONICS A. IDENTIFY ELECTRICAL REQUIREMENTS The model number is printed on a plate at the pump end of the module. The model number identifies electrical rating. Electrical connections for each model vary. S K-1457-AA: 60 Hz (Follow Step B. below.) S K-1457-J1-AA: 60 Hz (Follow Steps C. and D. below.) S K-1457-JA-AA: 50 Hz (Follow Steps E. and F. below.) See Electrical Requirements section on page 6 of Product Requirements. B.
D. FIELD WIRING DIAGRAM - 120V, 60 HZ (-J1 MODELS ONLY) Green (Ground) White (Neutral) Black (Line) Remove air actuator tubing from pump by gently pulling. Next, remove the screw at the top of the pump near the strain relief bushing. Save screw. Loosen screw at bottom of pump. Remove pump cover to reveal field wiring compartment. To Electrician: Provide enough wire to allow motor removal upon servicing. The factory has prewired the whirlpool control system.
F. CONNECT CONTROL BOX - 230V, 50 HZ Blue (Neutral) Neutral Connect service to the field wiring compartment of the control box. The 50 Hz model control box contains blue and brown wires and earth lug. A 230V, 15A, 50 Hz dedicated circuit is required. Provide an Earth Leakage Circuit Breaker. Earth (Ground) Lug Earth (Ground) Phase (Line) Provide a separate equipment earthing conductor for the inside earth lug. The earthing conductor must not be connected to any current carrying conductor.
11. COMPLETE INSTALLATION A. INSTALL HANDLES AND SPOUT After the deck is finished, attach the handles and spout to complete faucet installation per manufacturer’s instructions. B. INSTALL WHIRLPOOL TRIM KIT Refer to Installation Instructions packed with the trim kit when installing jet trim or suction trim. 12. CLEAN-UP AFTER INSTALLATION When cleaning up after installation, do not use abrasive cleaners as they may scratch and dull the module surface.
13. CONFIRM PROPER OPERATION A. START-UP WHIRLPOOL Refer to Important Safety Instructions on page 2 before operating this whirlpool. Water Line Please perform the following so that the owner may safely receive the benefits of whirlpool bathing. 1. Rotate jets so they are facing down toward basin. 2. Fill the whirlpool bath to a water level at least 2” above the top of the highest jet. Bath Wall 2” Minimum Jet Trim Water temperature in the whirlpool should not exceed 104_F (40_C). B.
C. TROUBLESHOOT WHIRLPOOL SYSTEM This troubleshooting guide is for general aid only. A Kohler Authorized Service Representative or a qualified electrician should correct all electrical problems. For warranty service, contact your dealer or wholesale distributor. SYMPTOMS 1. Whirlpool does not start/stop. PROBABLE CAUSES RECOMMENDED ACTION A. No power to pump/power module. A. Set/Reset GFCI/ELCB breaker; check wiring to power module. B.
R 113312-2-BA (1093) Kohler Co.