
Specifications


3
113312-2-BA (1093)
Kohler Co., Kohler WI
TABLE OF CONTENTS
IMPORTANT SAFETY INSTRUCTIONS 2. . . . . . . .
INTRODUCTION 3. . . . . . . . . . . . . . . . . . . . . . . . . . . . .
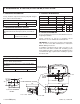
ROUGHING-IN: K-1457-AA, K-1457-JA-AA,
K-1457-J1-AA 4. . . . . . . . . . . . . . . . . . . . . . . . . . . . . . .
Ordering Information 4. . . . . . . . . . . . . . . . . . . . . . .
Required Electrical Service 4. . . . . . . . . . . . . . . . . .
Product Information 4. . . . . . . . . . . . . . . . . . . . . . . .
Installation Notes 4. . . . . . . . . . . . . . . . . . . . . . . . . .
PRODUCT NOTICES 5. . . . . . . . . . . . . . . . . . . . . . . . .
Installer Hazard Notification 5. . . . . . . . . . . . . . . . .
Factory-Assembled Features 5. . . . . . . . . . . . . . . .
PRODUCT REQUIREMENTS 5. . . . . . . . . . . . . . . . .
Summary of Key Requirements 5. . . . . . . . . . . . . .
Plumbing Specifications 5. . . . . . . . . . . . . . . . . . . . .
Product Inspection 5. . . . . . . . . . . . . . . . . . . . . . . . .
Connections and Service Access 5. . . . . . . . . . . . .
Electrical Requirements 6. . . . . . . . . . . . . . . . . . . . .
INSTALLATION REQUIREMENTS 6. . . . . . . . . . . . .
Tools Required 6. . . . . . . . . . . . . . . . . . . . . . . . . . . . .
Materials Required 6. . . . . . . . . . . . . . . . . . . . . . . . .
Clearance Requirements 6. . . . . . . . . . . . . . . . . . . .
New or Replacement Installation Requirements 6
SITE REQUIREMENTS 7. . . . . . . . . . . . . . . . . . . . . . .
Old Bath Removal 7. . . . . . . . . . . . . . . . . . . . . . . . . .
Subfloor Preparation 7. . . . . . . . . . . . . . . . . . . . . . . .
Stud Pocket Preparation 7. . . . . . . . . . . . . . . . . . . .
Plumbing Preparation 7. . . . . . . . . . . . . . . . . . . . . . .
BEFORE INSTALLING UNIT 7. . . . . . . . . . . . . . . . . .
Partially Install Bath Drain 7. . . . . . . . . . . . . . . . . . .
Protect Bath Unit 7. . . . . . . . . . . . . . . . . . . . . . . . . . .
INSTALL WHIRLPOOL 8. . . . . . . . . . . . . . . . . . . . . . .
Whirlpool Set-In 8. . . . . . . . . . . . . . . . . . . . . . . . . . . .
Height Adjustment 9. . . . . . . . . . . . . . . . . . . . . . . . .
Secure Whirlpool 9. . . . . . . . . . . . . . . . . . . . . . . . . . .
Install Plumbing 9. . . . . . . . . . . . . . . . . . . . . . . . . . . .
FIELD WIRE ELECTRONICS 10. . . . . . . . . . . . . . . . . .
Identify Electrical Requirements 10. . . . . . . . . . . . . .
Wiring Information - 120 V, 60 Hz 10. . . . . . . . . . . . .
Locate Field Wiring Compartment - 120 V, 60 Hz 10
Field Wiring Diagram - 120 V, 60 Hz 11. . . . . . . . . .
Field Wiring Control Box
Compartment - 230 V, 50 Hz 11. . . . . . . . . . . . . . . . .
Connect Control Box - 230 V, 50 Hz 12. . . . . . . . . .
WATER TEST WHIRLPOOL & ELECTRONICS 12. .
COMPLETE FINISH WALL 12. . . . . . . . . . . . . . . . . . . .
COMPLETE INSTALLATION 13. . . . . . . . . . . . . . . . . . .
Install Handles and Spout 13. . . . . . . . . . . . . . . . . . .
Install Whirlpool Trim Kit 13. . . . . . . . . . . . . . . . . . . .
CLEAN-UP AFTER INSTALLATION 13. . . . . . . . . . . .
CONFIRM PROPER OPERATION 14. . . . . . . . . . . . .
Start-Up Whirlpool 14. . . . . . . . . . . . . . . . . . . . . . . . .
Operating Sequence 14. . . . . . . . . . . . . . . . . . . . . . . .
Troubleshoot Whirlpool System 15. . . . . . . . . . . . . .
INTRODUCTION
Please read these instructions carefully to familiarize
yourself with the required tools, materials, and
installation sequences. Follow the sections that pertain
to your particular installation. This will aid you in avoiding
the unnecessary expense associated with improper
installation. In addition to proper installation, read all
operating and safety instructions.
The variety of installations possible with this whirlpool
may require framing procedures other than those
described in this manual.
All information in this manual is based on the latest
product information available at the time of publication.
Kohler Co. reserves the right to make changes in
product characteristics, packaging, or availability at any
time without notice.
Identify and record below the model and serial number (found at the pump end of the whirlpool):
Model No. Serial No. Date of Manufacture