
Specifications


9
113312-2-BA (1093)
Kohler Co., Kohler WI
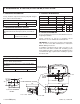
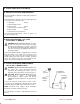
B. HEIGHT ADJUSTMENT
NOTICE: Steps B. and C. are necessary for making
your Kohler Whirlpool operate more quietly.
If the subfloor is level, no adjustment is necessary;
proceed to Step C. If the subfloor is not level, shim
beneath pump bracket (plywood is recommended). Do
not change the elevation of the pump relative to the
whirlpool bath since this may affect performance. Use
a 5” x 7” (minimum) piece of plywood.
Drainage
Shim if necessary, using 5” x 7”
(minimum) plywood
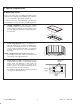
C. SECURE WHIRLPOOL
Using four 1/4” x 1” lag screws, secure pump bracket to
subfloor. Predrilling is recommended.
CAUTION: Risk of product damage. Do not
use the piping or pump for structural support or
positioning of whirlpools.
Use a 1/2” wrench to remove the long bolt securing the
bracket to the bath. Discard the bolt and spacer located
behind bracket.
Bracket
Lag Screw
Plywood
(if required)
Bolt
Spacer
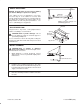
D. INSTALL PLUMBING
CAUTION: Risk of damage to whirlpool
bottom and subfloor. Ensure watertight seal on
bath drain connections.
1. When whirlpool is securely positioned, connect
drain into trap. An access panel will simplify future
maintenance.
Connect Here
2. Install the faucet valving and spout tee. The deck
must be finished before handle trim and spout can
be installed. Open hot and cold valves and check all
supply connections for leaks.
3. Run water in whirlpool and check drain connection
for leaks.