5KHB3583 W10532509A_01_EN_Final4.
Instruções da varinha mágica sem fios Segurança da varinha mágica Instruções de segurança importantes................................................................ 78 Requisitos elétricos ........................................................................................... 79 Eliminação de equipamentos elétricos.............................................................. 79 Eliminação de baterias de iões de lítio (LI-Ion) da KitchenAid..........................
Segurança da varinha mágica S A sua segurança e a dos outros é muito importante. Este manual e o electrodoméstico contêm várias mensagens de segurança importantes. Deve sempre ler e respeitar todas as mensagens de segurança. Este é o símbolo de aviso de segurança. Este aviso alerta-o para perigos potenciais que podem causar a morte ou ferimentos a si e aos outros. Todas as mensagens de segurança são fornecidas a seguir ao símbolo de aviso de segurança e às palavras “PERIGO” OU “AVISO”.
Segurança da varinha mágica Requisitos elétricos Português Tensão da bateria: 12 V Iões de lítio (Li-ion) / 1,5 Ah / 16 Wh Modelo de bateria N.º: 5KCL12IBOB Carregador Entrada: 18 V / 660 mA Saída: 12 V / 550 mA Modelo de carregador n.º: 5KCL12CSOB Adaptador Entrada: 220-240 V / 50/60 Hz / 18 W Saída: 18 V / 660 mA Modelo de adaptador do carregador n.
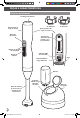
Peças e características F Peças e características Localização da bateria Proteção de utilização Parte frontal do corpo do motor Campânula de proteção Parte posterior do corpo do motor Botão de desencaixe Alavanca de desencaixe da bateria / arco para pendurar Botões de controlo de velocidade Botão de impulso Indicador LED de velocidade Pega Indicador LED de carga da bateria Bateria Indicador LED de carga/ Abertura da tampa Braço de mistura de 20 cm em aço inoxidável com lamina em S Base do carr
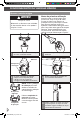
Funcionamento da varinha mágica Português Antes da primeira utilização: Carregar a bateria 1 Ligue o carregador à tomada. 2 Prima o botão de desencaixe da tampa da bateria para a abrir. 3 Deslize a bateria até ao carregador, alinhe o lado plano da bateria com o lado plano da porta do carregador e prima até encaixar. 4 O indicador LED irá piscar lenta e continuamente durante o carregamento. Quando a bateria estiver completamente carregada, o indicador LED irá apresentar uma luz contínua.
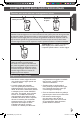
Funcionamento da varinha mágica F Montar a varinha mágica Antes da primeira utilização AVISO Perigo de corte Manuseie as lâminas com cuidado. O desrespeito deste aviso poderá originar cortes. 1 Introduza o braço de mistura no corpo do motor e rode até encaixar. Antes de utilizar a varinha mágica pela primeira vez, limpe o corpo do motor, o braço de mistura com lâmina e as proteções com um pano limpo e húmido para remover quaisquer poeiras ou sujidades. Poderá utilizar detergente suave para a loiça.
Funcionamento da varinha mágica Utilizar o painel de indicadores LED Importante: O botão de desencaixe deve ser premido antes do funcionamento Indicador LED 1 Ao operar os controlos da varinha mágica, certifique-se sempre de que o indicador LED está virado para si. Segure na pega com o polegar na parte de trás da unidade e os dedos nos controlos na frente, como indicado na imagem. Português da varinha mágica.
Funcionamento da varinha mágica S Utilizar o braço de mistura NOTA: A varinha mágica é ideal para misturar, esmagar ou transformar em puré. É adequada para sopas, vegetais cozinhados, molhos, comida para bebé, batidos, coberturas para bolos ou para picar gelo. Botões de controlo de velocidade Botão de desencaixe Indicador LED 1 Indicador de velocidade Prima o botão UNLOCK. O indicador LED irá iluminar-se quando a unidade estiver pronta para funcionamento.
Sugestões para resultados profissionais Técnicas para uma mistura e esmagamento ideais Movimento de pulso Português Puxar para cima Para uma mistura ideal: Pouse a varinha mágica no fundo do recipiente momentaneamente e, inclinando a varinha mágica com um suave movimento circular, puxe-a para cima ao longo dos lado do recipiente. Utilize movimentos do pulso e o peso da varinha mágica para efetuar esta tarefa.
manutenção e limpeza A Limpar a varinha mágica NOTA: Remova a bateria da varinha mágica se não a tencionar utilizar durante um longo período de tempo e antes de a montar, desmontar ou limpar. 1 Desmonte o braço misturador (consulte a secção "Funcionamento da varinha mágica"). 2 Lave o braço misturador e as proteções na prateleira superior da máquina de lavar loiça ou à mão, em água quente com detergente. Seque com um pano macio. NOTA: Não mergulhe o motor em água.
Assistência e garantia Duração da Garantia: A KitchenAid Pagará: A KitchenAid Não Pagará: Europa, Médio Oriente e África: As peças de substituição e os custos de mão de obra relacionados com a reparação de defeitos de materiais ou fabrico. A assistência tem de ser fornecida por um Centro de Assistência Autorizada da KitchenAid. A. Reparações quando a varinha mágica foi utilizada para operações além das normais na preparação de comida em casa. B.
© 2013. All rights reserved. Specifications subject to change without notice. W10532509B W10532509B_18_BackCover.