BOWL-LIFT MIXERS MIXERINSTRUCTIES MIXER INSTRUCTIONS ROBOTS DE CUISINE : MODE D’EMPLOI KÜCHENMASCHINEN-ANWEISUNGEN MIXER - ISTRUZIONI INSTRUCCIONES DE BATIDORA BRUKSANVISNING KÖKSMASKIN BRUKSANVISNING KJOKKENMASKINER YLEISKONEEN KÄYTTÖOHJEET BRUGSANVISNING INSTRUÇÕES KØKKENMASKINE DA BATEDEIRA MULTIFUNÇÕES Ο∆ΗΓΙΕΣ ΧΡΗΣΗΣ O 1 2 4 6 8 1O
Table of Contents Important Safeguards........................................................................................1 Electrical Requirements ......................................................................................1 Bowl-Lift Mixer Features ....................................................................................2 Assembling Your Bowl-Lift Mixer .......................................................................3 Assembling Your Pouring Shield .........................
When using electrical appliances, basic safety precautions should always be followed including the following: 1. Read all instructions. 2. To protect against risk of electrical shock, do not put Stand Mixer in water or other liquid. 3. Close supervision is necessary when any appliance is used by or near children. 4. Unplug Stand Mixer from outlet when not in use, before putting on or taking off parts and before cleaning. 5. Avoid contacting moving parts.
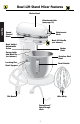
Bowl-Lift Stand Mixer Features Motor Head Attachment Hub (see page 11) English Speed Control Knob O 1 2 4 6 Attachment Knob 8 1O Bowl-Lift Handle (not shown) Bowl Height Adjustment Screw Beater Shaft Spring Latch and Bowl Pin (not shown) Stainless Steel Bowl Locating Pins Bowl Handle Bowl Support Wire Whip Flat Beater PowerKnead™ Spiral Dough Hook 2
Assembling Your Bowl-Lift Mixer To Attach Bowl 1. Turn speed control “O”. 2. Unplug Stand Mixer or disconnect power. 3. Place bowl-lift handle in down position. 4. Fit bowl supports over locating pins. 5. Press down on back of bowl until bowl pin snaps into spring latch. 6. Raise bowl before mixing. 7. Plug into proper electrical outlet. 4. Turn beater to left, hooking beater over the pin on shaft. 5. Plug into proper electrical outlet. To Remove Flat Beater, Wire Whip, or Dough Hook 1.
Assembling Your Pouring Shield* To Attach Wide Mouth Pouring Shield (fits all 6-quart bowl-lift models) To Attach Pouring Shield (fits all 5-quart bowl-lift models) English 1. Turn speed control “O”. 2. Unplug Stand Mixer or disconnect power. 3. Place bowl-lift handle in down position. 4. Attach desired accessory (flat beater, dough hook or wire whip) and bowl. 5. Place bowl-lift handle in up position. 6. Place the back half of the shield (without the chute) on rim of the bowl. 1.
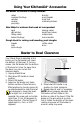
Using Your KitchenAid® Accessories Flat Beater for normal to heavy mixtures: cakes creamed frostings candies cookies pie pastry biscuits quick breads meat loaf mashed potatoes eggs egg whites heavy cream boiled frostings English Wire Whip for mixtures that need air incorporated: sponge cakes angel food cakes mayonnaise some candies Dough Hook for mixing and kneading yeast doughs: breads rolls pizza dough coffee cakes buns Beater to Bowl Clearance Your Stand Mixer is adjusted at the factory so the fla
Care and Cleaning Bowl, white flat beater and white dough hook may be washed in an automatic dishwasher. Or, clean them thoroughly in hot sudsy water and rinse completely before drying. Do not store beaters on shaft. English NOTE: Always be sure to unplug Stand Mixer before cleaning. Wipe Stand Mixer with a soft, damp cloth. Do not use household/commercial cleaners. Do not immerse in water. Wipe off beater shaft frequently, removing any residue that may accumulate.
Speed Control Guide – 10 Speed Mixers All speeds have the Soft Start™ feature which automatically starts the Stand Mixer at a lower speed to help prevent ingredient splash-out and “flour puff” at startup then quickly increases to the selected speed for optimal performance. 1 STIR For slow stirring, combining, mashing, starting all mixing procedures. Use to add flour and dry ingredients to batter, and add liquids to dry ingredients. Do not use Speed 1 (STIR) to mix or knead yeast doughs.
Mixing Tips Cake Mixes Converting Your Recipe for the Stand Mixer When preparing packaged cake mixes, use Speed 4 for medium speed and Speed 6 for high speed. For best results, mix for the time stated on the package directions. English The mixing instructions found in this book can be used to convert your favorite recipes for use with your KitchenAid® Stand Mixer. To help determine a mixing procedure, your own observations and experience will be needed.
Mixing and Kneading Yeast Dough 1. Place all dry ingredients including yeast into bowl, except last 1 to 2 cups (125 to 250 gr) flour. 2. Attach bowl and PowerKnead™ Spiral Dough Hook. Raise mixer bowl. Turn to Speed 2 and mix about 15 seconds, or until ingredients are combined. 3. Continuing on Speed 2, gradually add liquid ingredients to flour mixture and mix 1 to 2 minutes longer.
Egg Whites Place room temperature egg whites in clean, dry bowl. Attach bowl and wire whip. To avoid splashing, gradually turn to designated speed and whip to desired stage. See chart below. Begins to Hold Shape AMOUNT Tips of peaks fall over when wire whip is removed. Air bubbles are fine and compact; product is white. Soft Peak SPEED English 1 egg white .......GRADUALLY to 10 2-4 egg whites ........GRADUALLY to 8 6 or more egg whites ........
Attachments and Accessories General Information Attachment Knob Hinged Hub Cover Attachment Power Shaft‡ Attachment Housing ® Attachment Hub Socket Notch ‡Not part of mixer. Pin Attachment Shaft Housing General Instructions To Attach To Remove 1. Turn speed control “O”. 2. Unplug Stand Mixer or disconnect power. 3. Loosen attachment knob by turning it counterclockwise. 4. Flip up hinged hub cover. 5.
When You Need Service If your Stand Mixer should malfunction or fail to operate, please check the following: WARNING English - Is the Stand Mixer plugged in? - Is the fuse in the circuit to the Stand Mixer in working order? If you have a circuit breaker box, be sure the circuit is closed. - Turn the Stand Mixer off for 10-15 seconds, then turn it back on. If the mixer still does not start, allow it to cool for 30 minutes before turning it back on.
Length of Warranty: Kitchenaid Will Pay For: KitchenAid Will Not Pay For: One year Full Warranty Replacement parts and repair labor costs to correct defects in materials or workmanship. Service must be provided by an Authorized KitchenAid Service Center. A. Repairs when Stand Mixer is used for operations other than normal food preparation. B. Damage resulting from accident, alterations, misuse, abuse, or installation/operation not in accordance with local electrical codes.
English ™ FOR THE WAY IT’S MADE.™ ® Registered Trademark/™ Trademark of KitchenAid, U.S.A. © 2004. All rights reserved. Specifications subject to change without notice.