5KSB1585 W10517477A_ENv6.
W10517477A_ENv6.
English ................................................................................ 5 Deutsch ............................................................................ 00 Français ............................................................................ 00 Italiano.............................................................................. 00 Nederlands ...................................................................... 00 Español .............................................................
W10517477A_ENv6.
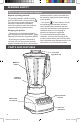
CMD + SHIFT BLENDER INSTRUCTIONS CLICK TO CHANGE COPY BLENDER SAFETY Important safeguards .......................................................................................... 6 Electrical requirements ...................................................................................... 7 Electrical equipment waste disposal ................................................................... 8 English TABLE OF CONTENTS PARTS AND FEATURES..............................................................
BLENDER SAFETY IMPORTANT SAFEGUARDS When using electrical appliances, basic safety precautions should always be followed, including the following: 1. Read all instructions. 2. To protect against risk of electrical shock, do not put Blender in water or other liquid. 3.
. Do not use outdoors. 8. Do not let cord hang over edge of table or counter. 9. Keep hands and utensils out of container while blending to reduce the risk of severe injury to persons or damage to the Blender. A scraper may be used but must be used only when the Blender is not running. 10. Blades are sharp. Handle carefully. 11. Always operate Blender with cover in place. 12. The use of attachments not recommended by KitchenAid may cause a risk of injury to persons. 13.
BLENDER SAFETY C Electrical equipment waste disposal Disposal of packing material The packing material is 100% recyclable and is marked with the recycle symbol . The various parts of the packing must therefore be disposed of responsibly and in full compliance with local authority regulations governing waste disposal. Scrapping the product - This appliance is marked in compliance with European Directive 2002/96/EC, Waste Electrical and Electronic Equipment (WEEE).
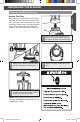
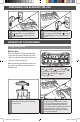
CMD ASSEMBLING + SHIFT CLICK THE BLENDER TO CHANGE COPY Preparing the Blender for use Before using your Blender for the first time, wipe Blender base with a warm damp cloth, then wipe clean with a damp cloth. Dry with a soft cloth. Wash pitcher, lid, and ingredient cup in warm, sudsy water (see “Care and Cleaning” section). Rinse parts and wipe dry. English Before First Use Tab Slot 2 Rotate pitcher clockwise, approximately 1/8 turn until pitcher clicks into place.
PREPARING CMD + SHIFT THE CLICK BLENDER TO CHANGE FOR USE COPY 5 Before using the Blender, plug into a grounded outlet, and press POWER ( ). The Power indicator light will flash when ready. 6 C Before removing the pitcher from the base, always press POWER ( ) to stop the flashing lights and unplug the power cord. OPERATING THE BLENDER Using the Blender Before Use While the Blender Power indicator light or the PULSE mode indicator light is on: - Do not interfere with blade movement.
CMD OPERATING + SHIFTTHE CLICK BLENDER TO CHANGE COPY English NOTE: The Blender will operate only when pressing the POWER ( ) button (Power LED will flash) before selecting the desired speed. 3 When finished, press POWER ( ) to stop the Blender, then press POWER ( ) a second time to turn off. Unplug Blender before removing the pitcher. 4 To remove the lid, first use the loop on the back of the lid to lift the lid and break the seal.
OPERATING CMD + SHIFT THE CLICK BLENDER TO CHANGE COPY 3 Press POWER ( HOT FOODS ( ), then press the ) button. The 4 indicator light above the Hot Foods button will light up. The Hot Foods feature starts at a low speed and slowly ramps up to higher speeds over 90 seconds to avoid splashing of hot liquids. C When the Hot Foods function is finished, the Blender will stop. Press the POWER ( ) button to turn off. Unplug Blender before removing the pitcher.
CMD OPERATING + SHIFTTHE CLICK BLENDER TO CHANGE COPY Using the Pulse function ) function, which allows a “Pulse-at-any-speed” feature. English Your Blender offers a PULSE ( 1 Before operating the Blender, make sure the pitcher is properly positioned on the base. 2 Put ingredients into the pitcher and firmly place lid. NOTE: PULSE mode will not work with the HOT FOODS ( ) or CRUSH ICE ( ) modes. 3 Press POWER ( ), then press PULSE ( ).
OPERATING CMD + SHIFT THE CLICK BLENDER TO CHANGE COPY C Using the Blender pitcher ingredient cup, and Soft Start blending feature • The Blender pitcher ingredient cup can be used to measure and add ingredients. Remove cup and add ingredients at CHOP or MIX speeds. When operating at higher speeds with a full pitcher or with hot contents, stop the Blender and then add ingredients. IMPORTANT: If blending hot foods or liquids, be sure that the lid is securely in place and use only the HOT FOODS ( ) function.
CMD TIPS + FOR SHIFT GREAT CLICK RESULTS TO CHANGE COPY Quick tips • If desired, remove center ingredient cup of pitcher lid to add liquids or ice cubes while the Blender is operating at CHOP ( ), or MIX ( ) speeds. • Stop the Blender before using utensils in the pitcher. Use a rubber spatula to mix ingredients only when the Blender is off. Never use any utensil, including spatulas, in the pitcher while the motor is running.
TIPS CMDFOR + SHIFT GREAT CLICK RESULTS TO CHANGE COPY Prepare pancake or waffle batter from mix: Place mix and other ingredients in pitcher. Cover and blend at MIX ( ) until well-mixed, 10 to 20 seconds. Stop the Blender and scrape sides of the pitcher as needed. Grate cheese: Cut very cold cheese into 1.5 cm cubes. Place up to 1/2 cup (120 mL) cheese in the pitcher. Cover, and blend at LIQUIFY ( ) about 5 to 10 seconds.
TROUBLESHOOTING IMPORTANT: The Blender will not operate at any speed unless the POWER ( pressed first. ) button is Blender does not operate when a setting is selected No indicator lights are lit. All indicator lights are flashing at the same time. One indicator light is flashing alternately. English Check to see if the Blender is plugged into a grounded outlet. If it is, press POWER ( ); then unplug the Blender. Plug it back in to the same outlet, and Press POWER ( ).
WARRANTY AND SERVICE KitchenAid Blender warranty Length of Warranty: KitchenAid Will Pay KitchenAid Will Not For: Pay For: Europe, Middle East and Africa: For model 5KSB1585: Two years full warranty from date of purchase. The replacement parts and repair labor costs to correct defects in materials or workmanship. Service must be provided by an Authorized KitchenAid Service Center. A. Repairs when Blender is used for operations other than normal household food preparation. B.
W10517477A_ENv6.
© 2013. All rights reserved. Specifications subject to change without notice. W10517477A W10517477A_ENv6.