Gold ® APPLIANCES ELECTRONIC ELECTRICANDGAS DRYERS /_ /!_ _ _ _ _ _i/¸ ¸ _ I¸ For questions about features, operation/performance, accessories or service call: 1-800-253-1301 In Canada, for assistance call: 1-800-461-5681 and service call: 1-800-807-6777 parts for installation or visit our website at... www.whirlpool.com www.whirlpool.
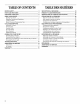
TABLEOF CONTENTS TABLEDES MATIERES SI_CURITI_ DE LA SI_CHEUSE ................................................. 18 5 PII_CES ET CARACTI_RISTIQUES 20 6 VITRIFICATION DRYER SAFETY .......................................................................... 3 PARTS AND FEATURES ............................................................ CHECKING YOUR VENT ............................................................ USING YOUR DRYER .................................................................
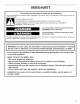
DRYERSAFETY Your safety and the safety of others are very important. We have provided many important safety messages in this manual and on your appliance. Always read and obey all safety messages. This symbol alerts you to potential hazards that can kill or hurt you and others. All follow the safety alert symbol and either the word "DANGER" or Thissafety is themessages safety alertwillsymbol. "WARNING.
IMPORTANT SAFETY INSTRUCTIONS WARNING: To reduce the risk of fire, electric shock, or injury to persons when using the dryer, follow basic precautions, including the following: • • Read all instructions before using the dryer. Do not place items exposed to cooking oils in your dryer. Items contaminated with cooking oils may contribute to a chemical reaction that could cause a load to catch fire.
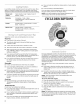
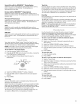
PARTSANDFEATURES o 2. 1. 2. Control panel Model and serial number label 3. 4. Dryer drum Lint screen 5. Exhaust grill 6.
3. The exhaust vent can be routed up, down, left, right, or straight out the back of the dryer. Space requirements are listed in your Installation Instructions. 4. Use the straightest path possible when routing the exhaust vent. Use the fewest number of elbows and turns. Allow room when using elbows or making turns. Bend vent gradually to avoid kinking. CHECKING YOURVENT Your dryer must be properly installed and vented to achieve maximum drying efficiency and shorten drying times.
USING YOURDRYER E×plosion Hazard Before using your dryer, wipe the dryer drum with a damp cloth to remove dust from storing and shipping. The following steps provide an overview for operating your dryer. Specific directions for each step are contained in the following sections. 1. Load clothes loosely into the dryer and close the door. Do not pack the dryer. Allow space for clothes to tumble freely. 2. Select one of the Automatic or Timed Cycles.
• Useanoheat(air)settingforrubber, plasticorheatsensitive fabrics. orlaminated fabrics. Loadclothes loosely intothedryer. Donotpackthedryer. Allow • Linedrybonded space forclothes totumble freely. Thefollowing chartshows Ifyouareunsure ofthetemperature toselectforaload,select examples ofbalanced loadsthatwouldallowforproper tumbling.
Heavy Duty with the SENSEOW M Drying System Select this cycle to thoroughly dry heavyweight items such as, jeans, corduroys or work clothes. The temperature is automatically set at High. Normal with the SENSEON TM Drying System Select this cycle to evenly dry sturdy casual clothes such as, khakis and cotton jerseys. The temperature is automatically set at Medium High. Permanent Press/Casual Select this cycle to dry medium to lightweight synthetic or no-iron items such as, sheets, shirts or dresses.
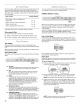
UsetheAirOnlysetting foritemsthatrequire dryingwithout heat suchasrubber, plasticandheatsensitive fabrics.Press the Timed DrycycleandselectAirOnlyonthetemperature selector. Thischartshows examples ofitemsthatcanbedriedusingthe AirOnlysetting. Type of Load You can customize your cycles by selecting different features. If you change your mind, select a different feature.
This chart shows examples of items that can be rack dried. After selecting the Rack Dry cycle, select the temperature setting and drying time across from each item. Rack Dry Temp Time* Low 60 Low 60 To wash 1. Wet both sides of lint screen with hot water. 2. Wet a nylon brush with hot water and liquid detergent. Scrub lint screen with the brush to remove residue buildup. 3. Rinse screen with hot water. 4. Thoroughly dry lint screen with a clean towel. Replace screen in dryer.
If your dryer has a drum light, the dryer light automatically on inside the dryer drum when you open the door. To change the drum light 1. Unplug dryer or disconnect 2. TROUBLESHOOTING turns First try the solutions suggested hers and possibly avoid the cost of a service call... Message Codes power. Open the dryer door. Locate the light bulb cover on the back wall of the dryer. Remove the screw located in the lower right corner of the cover. Remove the cover.
• Was the dryer overloaded? Dry smaller loads that can tumble freely. • Did the load overdry? Check the manufacturer's care label. Match dryer setting to load type. (see "Drying, Cycle and Temperature Tips"). Dryer will not run • Checkthe following: Is the power cord plugged in? Has a fuse blown, or has circuit breaker tripped? Was a regular fuse used? Use a time-delay Odors fuse.
ASSISTANCEOR SERVICE Call the Inglis Customer Interaction Center toll free: Before calling for assistance or service, please check "Troubleshooting." It may save you the cost of a service call, If you still need help, follow the instructions below. 1-800-461-5681 • Features and specifications When calling, please know the purchase date and the complete model and serial number of your appliance. This information will help us to better respond to your request. • Referrals to local dealers.
WHIRLPOOLGOLD®DRYERWARRANTY ONE-YEAR FULL WARRANTY For one year from the date of purchase, when this dryer is operated and maintained according to instructions attached to or furnished with the product, Whirlpool Corporation will pay for FSP ®replacement parts and repair labor to correct defects in materials or workmanship. Service must be provided by a Whirlpool designated service company.