ELECTRIC AND GAS DRYERS Use & Care Guide For questions about features, operation/performance, parts, accessories or service, call: 1-800-253-1301 or visit our website at...www.whirlpool.com Table of Contents.......................................................................
TABLE OF CONTENTS DRYER SAFETY.......................................................................... 3 PARTS AND FEATURES ............................................................ 5 CHECKING YOUR VENT............................................................ 6 USING YOUR DRYER................................................................. 7 Starting Your Dryer.......................................................................7 Stopping and Restarting ..........................................
DRYER SAFETY Your safety and the safety of others are very important. We have provided many important safety messages in this manual and on your appliance. Always read and obey all safety messages. This is the safety alert symbol. This symbol alerts you to potential hazards that can kill or hurt you and others. All safety messages will follow the safety alert symbol and either the word “DANGER” or “WARNING.
IMPORTANT SAFETY INSTRUCTIONS WARNING: To reduce the risk of fire, electric shock, or injury to persons when using the dryer, follow basic precautions, including the following: ■ ■ ■ ■ ■ ■ ■ ■ Read all instructions before using the dryer. Do not place items exposed to cooking oils in your dryer. Items contaminated with cooking oils may contribute to a chemical reaction that could cause a load to catch fire.
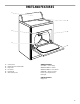
PARTS AND FEATURES 1 4 2 5 3 6 1. 2. 3. 4. 5. 6.
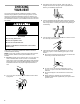
CHECKING YOUR VENT Your dryer must be properly installed and vented to achieve maximum drying efficiency and shorten drying times. Use the minimum recommended installation clearances (found in your Installation Instructions) to avoid blocking the flow of combustion and ventilation air. Refer to your Installation Instructions for more information. Fire Hazard Use a heavy metal vent. 3. The exhaust vent can be routed up, down, left, right, or straight out the back of the dryer.
USING YOUR DRYER Starting Your Dryer Before using your dryer, wipe the dryer drum with a damp cloth to remove dust from storing and shipping. The following steps provide an overview for operating your dryer. Specific directions for each step are provided in the following sections. 1. Load clothes loosely into the dryer and close the door. Do not pack the dryer. Allow space for clothes to tumble freely. Explosion Hazard Keep flammable materials and vapors, such as gasoline, away from dryer.
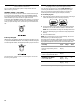
Loading Clothes Load clothes loosely into the dryer. Do not pack the dryer. Allow space for clothes to tumble freely. The following chart shows examples of balanced loads that would allow for proper tumbling.
Timed Drying Cycle Use the Timed Drying cycle to complete drying if items are still damp after the automatic cycle. Timed Drying is also useful for: ■ Heavyweight and bulky items, such as bedspreads and work clothes and large loads that require a long drying time. Set the Temperature selector to a heat setting that matches the care label directions. ■ Lightweight items, such as lingerie, blouses, and knits that require a short drying time. Set the Temperature selector at Ex-Low heat.
Additional Features You can select the following options to help ensure the best fabric care for your load. WRINKLE SHIELD™ Plus setting When you are unable to remove a load of clothes from the dryer as soon as it stops, wrinkles can form. The WRINKLE SHIELD Plus setting periodically tumbles, rearranges and fluffs the load without heat for up to 120 minutes. A signal will sound periodically when WRINKLE SHIELD Plus setting is on, if the End of Cycle Signal is selected.
CARING FOR YOUR DRYER Cleaning the Dryer Interior Cleaning the Lint Screen Every load cleaning The lint screen is located on the top of the dryer. Clean it before each load. A screen blocked by lint can increase drying time. To clean 1. Pull the lint screen towards you. Roll lint off the screen with your fingers. Do not rinse or wash screen to remove lint. Wet lint is hard to remove. Explosion Hazard Use nonflammable cleaner. Failure to do so can result in death, explosion, or fire.
Changing the Drum Light If your dryer has a drum light, the dryer light automatically turns on inside the dryer drum when you open the door. TROUBLESHOOTING First try the solutions suggested here and possibly avoid the cost of a service call... To change the drum light 1. Unplug dryer or disconnect power. 2. Open the dryer door. Locate the light bulb cover on the back wall of the dryer. Remove the screw located in the lower right corner of the cover. Remove the cover.
Lint on load ■ Is the lint screen clogged? Clean lint screen. Check for air movement. ■ Is the load properly sorted? Sort lint givers (towels, chenille) from lint takers (corduroy, synthetics). Also sort by color. ■ Is the load too big or too heavy? Dry smaller loads so lint can be carried to the lint screen. ■ Was the load overdried? Use correct dryer settings for load type. Overdrying can cause lint-attracting static electricity. See “Drying, Cycle, and Temperature Tips.
ASSISTANCE OR SERVICE Before calling for assistance or service, please check “Troubleshooting.” It may save you the cost of a service call. If you still need help, follow the instructions below. When calling, please know the purchase date and the complete model and serial number of your appliance. This information will help us to better respond to your request. If you need replacement parts If you need to order replacement parts, we recommend that you only use FSP® factory specified parts.
WHIRLPOOL GOLD® DRYER WARRANTY ONE-YEAR FULL WARRANTY For one year from the date of purchase, when this dryer is operated and maintained according to instructions attached to or furnished with the product, Whirlpool Corporation will pay for FSP® replacement parts and repair labor to correct defects in materials or workmanship. Service must be provided by a Whirlpool designated service company. Whirlpool Corporation will not pay for: 1.