Installation Instructions Part No. 8316557 IMPORTANT: Read and save these instructions IMPORTANT Installer: Leave Installation Instructions with the owner. Owner: Keep Installation Instructions for future reference. Save Installation Instructions for local electrical inspector’s use. www.whirlpool.
Before you start... IMPORTANT SAFETY INSTRUCTIONS Your safety and the safety of others are very important. We have provided many important safety message in this manual and on your appliance. Always read and obey all safety messages. This is the safety alert symbol. This symbol alerts you to potential hazards that can kill or hurt you and others. All safety messages will follow the safety alert symbol and either the word “DANGER” or “WARNING”.
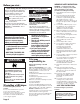
Exhaust requirements WARNING Fire Hazard Use a heavy metal vent. Do not use a plastic vent. Do not use a metal foil vent. Failure to do so can result in death or fire. Do not use non-metal flexible vent, metal vent that is smaller than four inches in diameter or exhaust hoods with magnetic latches. The dryer must be exhausted outdoors. Do not exhaust dryer into a gas vent, chimney, wall, ceiling, or concealed space of a building. Do not install flexible vent in enclosed walls, ceilings or floors.
Four-inch outlet hood is preferred. However, a 2-1/2-inch (6.4 cm) outlet exhaust hood may be used. A 2-1/2-inch (6.4 cm) outlet creates greater back pressure than other hood types. For permanent installation, a stationary exhaust system is required. A main exhaust vent can be used for exhausting a group of dryers. Main exhaust vent should be sized to remove 200 CFM of air per dryer. Large-capacity lint screens of proper design may be used in the main exhaust vent if checked and cleaned frequently.
C. Check that dryer is equipped with the correct burner for the H. If local codes and ordinances permit, it is recommended that new particular type of gas used. Burner information can be found on the serial/rating plate in the door well of the appliance. If this information does not agree with the type of gas available, see your dealer. flexible metal tubing, design-certified by the AGA or CSA, be used for connecting the dryer to the gas supply line.
Now Start... With dryer in laundry area. WARNING Excessive Weight Hazard Use two or more people to move and install dryer. Failure to do so can result in back or other injury. 5. Move dryer close to final position. Remove cardboard or 10. To exhaust dryer, see Exhaust requirements, Pages 3-4. Connect hardboard from under dryer. exhaust vent system to dryer exhaust outlet and exhaust hood using 4" (10.2 cm) clamps. Use caulking to seal exterior wall opening around exhaust hood. 6.
Electric Dryer Electrical requirements If codes permit and a separate ground wire is used, it is recommended that a qualified electrician determine that the ground path is adequate. Important: Observe all governing codes and ordinances. A four-wire or three-wire, singlephase, 120/240-volt, 60-Hz, AC-only electrical supply (or four-wire or threewire, 120/208-volt, if specified on the model/serial rating plate) is required on a separate, 30-ampere circuit, fused on both sides of the line.
6. Make electrical connection. This dryer is manufactured with the cabinet-ground conductor connected to the NEUTRAL (center) of the wiring harness at the terminal block. If local codes do NOT permit this type of connection, use “Fourwire connection” instructions. For a grounded, cord-connected appliance — GROUNDING INSTRUCTIONS: This appliance must be grounded.
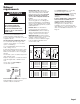
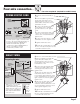
Four-wire connection... Four-wire receptacle (required for mobile homes) POWER SUPPLY CORD 5. Remove appliance ground wire (green with yellow stripes) from external ground connector screw. Fasten under center, silver-colored terminal block screw. spade terminals with upturned ends NEUTRAL 3/4" U.L.-listed strain relief ground prong NEUTRAL (white) ground wire (green) Four-wire power supply cord must have four, No.-10 copper wires and match a four-wire receptacle of NEMA Type 14-30R.
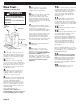
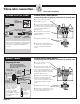
Three-wire connection... Three-wire receptacle POWER SUPPLY CORD Where local codes permit connecting cabinet-ground conductor to neutral wire: 4. Loosen or remove center spade terminals with upturned ends terminal block screw. 5. Connect the neutral wire (white ring terminals This blade connected to this conductor. or center) of power supply cord to the center, silver-colored terminal screw of the terminal block. Tighten screw. 6. Connect the other wires to outer terminal block screws.
Three-wire connection... Three-wire receptacle DIRECT WIRE OR POWER SUPPLY CORD Where local codes Do Not permit connecting cabinet-ground conductor to neutral wire: 9. After reattaching the terminal Three-wire power supply cord must have three, No.-10 copper wires and match a three-wire receptacle of NEMA Type 10-30R. Direct wire power supply cable must be prepared as shown in “Preparing the wire” of the three-wire connection direct-wire steps above.
Recessed area and closet installation instructions Product dimensions 29" (73.7 cm) This dryer may be installed in a recessed area or closet. For recessed area and closet installations, minimum clearances can be found on the serial tag on the dryer. The installation spacing is in inches and is minimum allowable. Additional spacing should be considered for ease of installation, servicing and compliance with local codes and ordinances.