
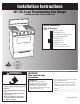
Use & care guide


cardboard
shipping base
5
Now start…
Excessive Weight Hazard
Use two or more people to move
and install range.
Failure to do so can result in back
or other injury.
WARNING
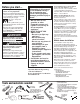
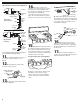
1. Put on safety glasses and gloves.
Do Not use oven door handle to lift or
move the range.
2. Remove oven racks and parts
package from inside oven. Remove
shipping materials, tape and protective
film from range.
3. Keep cardboard shipping base
under range to prevent damage to floor
covering.
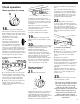
Tip Over Hazard
A child or adult can tip the range
and be killed.
Connect anti-tip bracket to rear
range foot.
Reconnect the anti-tip bracket, if
the range is moved.
Failure to follow these instructions
can result in death or serious
burns to children and adults.
WARNING
Contact a qualified floor covering installer for
the best procedure for drilling mounting
holes through your type floor covering.
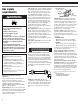
4. Use the anti-tip bracket
template/instruction sheet to
install the anti-tip bracket.
Anti-tip bracket must
be anchored
securely to the
sub floor.
Depending on
the thickness of
your flooring,
longer screws
may be needed to
anchor the bracket to the sub
floor. Longer screws are available from
your local hardware store.
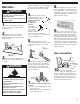
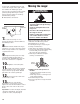
6.Remove cardboard shipping
base from under range. Open broiler
door. Use a 3/8” drive ratchet to lower
rear leveling legs one-half turn. Use
slip-joint pliers to lower front leveling
legs one-half turn.
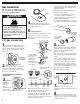
5. Check that range is still on
cardboard shipping base to protect floor
covering. Move range close to final
location.
rear
leveling leg
front
leveling leg
8. If installing the range in a mobile
home, you MUST secure the range to the
floor. Any method of securing the range
is adequate as long as it conforms to the
“Manufactured Home Construction and
Safety Standard,” Page 2.
9.Place rack in oven. Place level on
rack, first side to side; then front to back.
If range is not level, pull range forward
until rear leveling leg is removed from
the anti-tip bracket. Use 3/8" drive ratchet
and channel lock pliers to adjust leveling
legs up or down until range is level. Push
range back into position. Check that rear
leveling leg is engaged in anti-tip bracket.
NOTE: Oven must be level for satisfactory
baking conditions.
7. Making sure the anti-tip bracket is
installed:
• Look for the anti-tip bracket securely
attached to floor.
• Slide range back so rear range foot is
under anti-tip bracket.
anti-tip
bracket
range foot
10. Assemble the flexible
connector to the gas supply pipe to the
pressure regulator connection fitting,
using the adapter fittings provided with
the flexible connector. Use pipe-joint
compound made for use with L.P. gas to
seal all pipe thread connections.
regulator
connection
fitting
Gas connection