Operating Instructions COOKER AND OVEN Contents GB English, 1 PT FR Français, 12 AR Portugues,34 Warning,2 ES Espanol, 23 Installation,3-4 Positioning and levelling Electrical connection Technical data Description of the appliance, 5 Overall view Control panel Start-up and use, 6-7 Starting the oven Cooking modes Practical cooking advice Oven cooking advice table A6ESC2F/EX Using the electric hob, 8 Practical advice on using the electric hotplates Precautions and tips, 9 General safety Disposal
WARNING GB WARNING: The appliance and its accessible parts become hot during use. Care should be taken to avoid touching heating elements. Children less than 8 years of age shall be kept away unless continuously supervised.
Installation ! Before operating your new appliance please read this instruction booklet carefully. It contains important information concerning the safe installation and operation of the appliance. ! Please keep these operating instructions for future reference. Make sure that the instructions are kept with the appliance if it is sold, given away or moved. ! The appliance must be installed by a qualified professional according to the instructions provided.
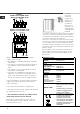
00V 2N~ H05RR-F 4x4 CEI-UNEL 35363 H05VV-F 4x4 CEI-UNEL 35746 N L2 L1 GB 1 3 5 2 4 400V 3N~ H05RR-F 5x2.5 CEI-UNEL 35363 H05VV-F 5x2.5 CEI-UNEL 35746 N L3 L2 L1 1 3 5 2 4 P N L1 L2 L3 Before connecting the appliance to the power supply, make sure that: • The appliance is earthed and the plug is compliant with the law. • The socket can withstand the maximum power of the appliance, which is indicated by the data plate.
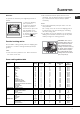
Description of the appliance Overall view GB Glass cover ELECTRIC HOTPLATE Control panel GRILL rack DRIPPING pan Adjustable foot Containment surface for spills GUIDE RAILS for the sliding racks position 5 position 4 position 3 position 2 position 1 Adjustable foot Control panel THERMOSTAT indicator light THERMOSTAT knob TIMER knob SELECTOR knob ACTIVE HOTPLATE indicator light ELECTRIC HOTPLATE control knobs 5
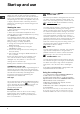
Start-up and use GB ! The first time you use your appliance, heat the empty oven with its door closed at its maximum temperature for at least half an hour. Ensure that the room is well ventilated before switching the oven off and opening the oven door. The appliance may emit a slightly unpleasant odour caused by protective substances used during the manufacturing process burning away. Starting the oven 1. Select the desired cooking mode by turning the SELECTOR knob. 2.
Rotisserie To operate the rotisserie (see diagram) proceed as follows: 1. Place the dripping pan in position 1. 2. Place the rotisserie support in position 4 and insert the spit in the hole provided on the back panel of the oven. 3. Activate the rotisserie by selecting with the SELECTOR knob. • We recommend that the power level is set to maximum. The top heating element is regulated by a thermostat and may not always operate constantly. GB PIZZA • Use a light aluminium pizza pan.
Using the electric hob GB !The position of the corresponding electric hotplate is shown on every knob. Practical advice on using the electric hotplates Electric hotplates To avoid heat loss and damage to the hotplates use pans with a flat base, whose diameter is no less than that of the hotplate itself.
Precautions and tips ! This appliance has been designed and manufactured in compliance with international safety standards. The following warnings are provided for safety reasons and must be read carefully. • If the appliance breaks down, under no circumstances should you attempt to repair the appliance yourself. Repairs carried out by inexperienced persons may cause injury or further malfunctioning of the appliance. Contact Assistance. General safety • Do not rest heavy objects on the open oven door.
Care and maintenance GB Switching the appliance off Disconnect your appliance from the electricity supply before carrying out any work on it. Cleaning the appliance ! Do not use abrasive or corrosive detergents such as stain removers, anti-rust products, powder detergents or sponges with abrasive surfaces: these may scratch the surface beyond repair. Inspecting the oven seals Check the door seals around the oven regularly. If the seals are damaged, please contact your nearest After-sales Service Centre.
Removing and fitting the oven door: 1.Open the door 2.Make the hinge clamps of the oven door rotate backwards completely (see photo) 6.Replace the glass. GB WARNING! Oven must not be operated with inner door glass removed! WARNING! When reassembling the inner door glass insert the glass panel correctly so that the inscription written on the panel is not reversed and can be easily legible. 7.Replace the profile, a click will indicate that the part is positioned correctly. 8.Open the door completely. 9.
Mode d’emploi CUISINIERE ET FOUR Sommaire GB English, 1 FR Français, 12 PT Portugues,34 AR ES Espanol, 23 ATTENTION,13 Installation, 14 Positionnement et nivellement Raccordement électrique Caractéristiques techniques Description de l’appareil, 16 Vue d’ensemble Tableau de bord Mise en marche et utilisation, 17 Mise en marche du four Programmes de cuisson Conseils de cuisson Tableau de cuisson au four A6ESC2F/EX Utilisation du plan de cuisson électrique, 19 Conseils pratiques pour l’utilisation de
ATTENTION: cet appareil ainsi que ses parties accessibles deviennent très chauds pendant leur fonctionnement. Il faut faire attention de ne pas toucher les éléments chauffants. Ne laisser s’approcher les enfants de moins de 8 ans à moins qu’ils ne soient sous surveillance constante.
Installation FR Montage des pieds* fournis avec l’appareil par encastrement sous la base. ! Conserver ce mode d’emploi pour pouvoir le consulter tout moment. En cas de vente, de cession ou de déménagement, veiller à ce qu’il suive l’appareil.
400V 2N~ H05RR-F 4x4 CEI-UNEL 35363 H05VV-F 4x4 CEI-UNEL 35746 N L2 L1 1 3 5 2 4 400V 3N~ H05RR-F 5x2.5 CEI-UNEL 35363 H05VV-F 5x2.5 CEI-UNEL 35746 N L3 L2 L1 1 3 5 2 4 Branchement du câble d’alimentation au réseau électrique Monter sur le câble une fiche normalisée adaptée à la charge indiquée sur l’étiquette des caractéristiques collée sur l’appareil.
Description de l’appareil Vue d’ensemble FR Couvercle en verre Plateau du plan de cuisson PLAQUE ELECTRIQUE GLISSIERES de coulissement niveau 5 niveau 4 niveau 3 niveau 2 niveau 1 Tableau de bord Support GRILLE Support LECHEFRITE Pied de réglage Pied de réglage Tableau de bord THERMOSTAT Voyant THERMOSTAT Bouton PROGRAMMES 16 Bouton MINUTEUR* Bouton Voyant FONCTIONNEMENT PLAQUES Boutons PLAQUES ELECTRIQUES
Mise en marche et utilisation ! Lors de son premier allumage, faire fonctionner le four à vide, porte fermée, pendant au moins une heure en réglant la température à son maximum. Puis éteindre le four, ouvrir la porte et aérer la pièce. L’odeur qui se dégage est due à l’évaporation des produits utilisés pour protéger le four. Programme FOUR STATIQUE Mise en marche des résistances de voûte et de sole.
Pour actionner le tournebroche, procédez comme suit : 1. placez la lèchefrite au gradin 1; 2. placez le berceau au gradin 4 et encastrez le bout arrière de la broche dans le trou situé au fond de l’enceinte (voir figure); 3. pour actionner le tournebroche, sélectionnez à l’aide du bouton PROGRAMMES. Tournebroche* FR ATTENTION ! Le four est équipé d’un système d’arrêts de grilles qui permet de les retirer sans que ces dernières sortent entièrement du four.
Utilisation du plan de cuisson électrique ! La position de la plaque électrique correspondante est indiquée sur chaque manette. Conseils pratiques pour l’utilisation des plaques électriques Plaques électriques Pour éviter toute déperdition de chaleur et ne pas endommager la plaque, il est conseillé d’utiliser des casseroles à fond plat n’ayant pas un plus petit diamètre que celui de la plaque.
Précautions et conseils ! Cet appareil a été conçu et fabriqué conformément aux normes internationales de sécurité. Ces conseils sont fournis pour des raisons de sécurité et doivent être lus attentivement. FR Sécurité générale • Les instructions fournies ne sont applicables qu’aux pays dont les symboles sont reportés dans la notice et sur la plaque signalétique. • Cet appareil a été conçu pour un usage familial, de type non professionnel.
Démontage et remontage de la porte du four : 6.Remonter la vitre. 1.Ouvrir la porte 2.Faire pivoter à l'arrière les crochets des charnières de la porte du four (voir photo) AVERTISSEMENT: Le four ne doit pas etre utilisé avec la porte du four en verre enlevé. FR AVERTISSEMENT: Réassembler le verre correctement afin que le signe sur le verre est correctement lisible. 7.Remonter le profil, un clic signale si la pièce est positionnée comme il faut. 8.Ouvrir la porte complètement. 9.
Nettoyage et entretien FR Mise hors tension Avant toute opération de nettoyage ou d’entretien couper l’alimentation électrique de l’appareil. Nettoyage de l’appareil ! Ne pas utiliser de détergents abrasifs ou corrosifs, tels que détacheurs et dérouilleurs, poudres à récurer et éponges à surface abrasive : ils risquent de rayer irrémédiablement la surface. !Ne jamais nettoyer l’appareil avec des nettoyeurs vapeur ou haute pression.
Manual de instrucciones COCINA Y HORNO Sumario ES ATENCIÓN,24 GB English, 1 PT FR Français, 12 AR Portugues,34 ES ~ 23 Espanol, Instalación, 25 Colocación y nivelación Conexión eléctrica Datos técnicos Descripción del aparato, 27 Vista de conjunto Panel de control Puesta en funcionamiento y uso, 28 Poner en funcionamiento el horno Programas de cocción Consejos prácticos para cocinar Tabla de cocción en el horno A6ESC2F/EX Uso de la encimera eléctrica, 30 Consejos prácticos para el uso de las
ATENCIÓN ES ATENCIÓN: Este aparato y sus partes accesibles se calientan mucho durante el uso. Por lo tanto, es importante evitar tocar los elementos calentadores. Mantenga alejados a los ni os menores de 8 a os si no son continuamente vigilados.
Instalación ! Es importante conservar este manual para poder consultarlo en todo momento. En caso de venta, cesión o traslado, controle que permanezca junto al aparato. ! Lea atentamente las instrucciones: contienen información importante sobre la instalación, el uso y la seguridad. ! La instalación del aparato se debe realizar siguiendo estas instrucciones y por personal calificado. ! Cualquier intervención de regulación o mantenimiento se debe efectuar con la cocina desconectada de la red eléctrica.
400V 3N~ H05RR-F 5x2.5 CEI-UNEL 35363 H05VV-F 5x2.5 CEI-UNEL 35746 N L3 L2 L1 ES La cadena de seguridad 1 3 5 2 4 ! Para impedir la inclinación accidental del aparato, por ejemplo en caso de que un niño intente trepar la puerta del horno, es NECESARIO instalar la ca- • fije el cable de alimentación en el correspondiente sujetacable y cierre la tapa.
Descripción del aparato Vista de conjunto ES Tapa de vidrio Superficie de retención de posibles desbordes PLACA ELÉCTRICA GUÍAS de deslizamiento de las bandejas posición 5 posición 4 posición 3 posición 2 posición 1 Panel de control Bandeja PARRILLA Bandeja GRASERA Pata de regulación Pata de regulación Panel de control Piloto TERMOSTATO Mando de PROGRAMAS Mando TERMOSTATO Mando TEMPORIZADOR* Piloto de funcionamiento PLACAS Mandos de las PLACAS ELÉCTRICAS 27
Puesta en funcionamiento y uso ES ! La primera vez que encienda el horno, hágalo funcionar vacío, durante una hora aproximadamente, con el termostato al máximo y con la puerta cerrada. Luego apáguelo, abra la puerta y airee el ambiente en el que se encuentra. El olor que se advierte es debido a la evaporación de las sustancias utilizadas para proteger el horno.
Asador automático Consejos prácticos para cocinar Para accionar el asador automático (ver la figura) proceda del siguiente modo: 1. coloque la grasera en la posición 1; 2. coloque el sostén del asador automático en la posición 4 e introduzca el espetón en el orificio correspondiente ubicado en la pared posterior del horno; 3. accione el asador automático seleccionando con el mando PROGRAMAS .
ES Utilice el temporizador de fin de la cocción 1. Antes que nada es necesario cargar el timbre girando el mando TEMPORIZADOR DE FIN DE COCCIÓN un giro casi completo en sentido horario. 2. Volviendo hacia atrás en sentido antihorario, fije el tiempo deseado haciendo coincidir los minutos indicados en el mando TEMPORIZADOR DE FIN DE COCCIÓN con la referencia fija que se encuentra en el panel de control. 3. Una vez cumplido el tiempo, se emitirá una señal sonora y el horno se apagará. 4.
Precauciones y consejos ! El aparato ha sido proyectado y fabricado en conformidad con las normas internacionales sobre seguridad. Estas advertencias se suministran por razones de seguridad y deben ser leídas atentamente. Seguridad general • Las instrucciones son válidas sólo para los países de destino, cuyos símbolos figuran en el manual y en la placa de características. • El aparato ha sido fabricado para un uso de tipo no profesional en el interior de una vivienda.
Mantenimiento y cuidados ES Interrumpir la corriente eléctrica Antes de realizar cualquier operación, desconecte el aparato de la red de alimentación eléctrica. Limpiar el aparato ! Evite el uso de detergentes abrasivos o corrosivos como los quitamanchas y productos anticorrosivos, jabones en polvo y esponjas con superficie abrasiva: pueden rayar irremediablemente la superficie. Controlar las juntas del horno Controle periódicamente el estado de la junta que rodea la puerta del horno.
Desmontaje y montaje de la puerta del horno: 1.Abrir la puerta. 2.Girar totalmente hacia atrás los ganchos de las bisagras de la puerta del horno (ver foto) 5.Sacar la placa de vidrio y realizar la limpieza como se indica en el capítulo: "Mantenimiento y cuidados". ES 6.Volver a colocar el vidrio. 3.Cerrar la puerta hasta el tope del gancho (la puerta queda abierta a aproximadamente 40°) (ver foto).
Instruções para a utilização FOGÃO PT GB English,1 FR Français, 11 ES Espanol, 21 Índice ATENÇAO,35 Instalaçao, 36 PT Portugues,34 AR Posizionamento e nivelamento Ligação eléctrica Dados técnicos Descriçao do aparelho, 38 Vista de conjunto Painel de comandos Visor Início e utilizaçao, 39 A6ESC2F/EX Utilização do forno Programas de cozedura Tabela de cozedura no forno Utilização do plano de cozedura eléctrica, 41 Ligar e desligar as zonas de cozedura As zonas de cozedura Precauçoes e conselhos,
ATENÇÃO ATENÇÃO: Este aparelho e as suas partes acessíveis aquecem muito durante a utilização. É preciso ter atenção e evitar tocar os elementos que aquecem. Não utilizar produtos abrasivos nem espátulas de metal cortantes para limpar a porta em vidro do forno, uma vez que pode riscar a superfície, provocando a ruptura do vidro. Manter afastadas as crianças com menos de 8 anos, caso não estejam a ser vigiadas. As superfícies internas da gaveta (se presentes) podem ficar muito quentes.
Instalação As pernas* fornecidas com o aparelho, devem ser encaixadas na base do fogão. ! Antes de colocar em funcionamento o novo aparelho, leia atentamente este livrete de instruções, pois contém informações importantes sobre a instalação e o funcionamento seguro do aparelho. PT ! Guarde as instruções de funcionamento do aparelho para consultas posteriores: Certifique-se de que as instruções sejam conservadas junto com o aparelho em caso de venda, cessão ou mudança.
400V 3N~ H05RR-F 5x2.5 CEI-UNEL 35363 H05VV-F 5x2.5 CEI-UNEL 35746 N L3 L2 L1 1 3 5 2 4 • fixe o cabo de alimentação na apropriada braçadeira e feche a tampa da caixa de bornes. Ligação do cabo de fornecimento à rede eléctrica Monte no cabo uma ficha em conformidade com as normas para a carga indicada na placa de identificação aplicada no aparelho.
Descrição do aparelho Vista de conjunto PT Tampa em vidro* Plano eléctrico Painel de comandos Prateleira GRADE BANDEJA PINGADEIRA Pé regulável Painel de comandos 38 GUIAS de deslizamento das prateleiras posição 5 posição 4 posição 3 posição 2 posição 1 Pé regulável
Início e utilização ! Quando o acender pela primeira vez, aconselhamos de fazer funcionar o forno vazio pelo menos durante uma hora, com o termóstato posto à temperatura máxima e a porta fechada. Em seguida, pode apagar, abrir a porta do forno e ventilar a sala. O odor que se sente é por causa da evaporação das substâncias empregadas para proteger o forno. Programas de cozedura Início do forno Programa de FORNO TRADIÇÃO (ESTATICO) 1.
1. coloque a bandeja pingadeira na posição 1; 2. coloque o suporte do espeto rotativo na posição 3 e enfie o espeto no respectivo furo, situado na parede traseira do forno; 3. para ligar o espeto rotativo coloque o Conselhos práticos para cozedura ! Nas cozeduras de GRILL, coloque a bandeja pingadeira na posição 1 para recolher os resíduos de cozedura (molhos e/ou gordura). PT GRILL • Coloque a grade na posição 3 ou 4, disponha os alimentos no centro da grade.
Utilização do plano de cozedura de eletrico ! A cola aplicada nas guarnições deixa alguns traços de graxa no vidro. Antes de utilizar o aparelho, é recomendável eliminá-la com um produto não abrasivo específico para a manutenção. Durante as primeiras horas de funcionamento, pode ser que note odor de borracha, que em todo o caso logo desaparecerá. ATENCIÓN! L a tapa de vidrio se puede romper, si se calienta. Apagar todos los quemadores o, si existen, las placas eléctricas antes de cerrarla.
Precauções e conselhos ! Este aparelho foi projectado e fabricado em conformidade com as normas internacionais de segurança. Estas advertências são fornecidas por razões de segurança e devem ser lidas com atenção. PT Segurança geral • Este aparelho foi concebido para utilização de tipo não profissional no âmbito de moradas. • Este aparelho não deve ser instalado ao ar livre, mesmo num sítio protegido, porque é muito perigoso deixá-lo exposto a chuva e temporais.
Manutenção e cuidados Desligar a corrente eléctrica Antes de realizar qualquer operação, desligue o aparelho da alimentação eléctrica. Limpeza do aparelho ! Não utilizar jacto de vapor para a limpeza. • As partes externas esmaltadas ou inoxidáveis e as guarnições de borracha podem ser limpas com uma esponja molhada com água morna e sabão neutro. Se for difícil remover as manchas, empregue produtos específicos. Enxaguar com água abundante e enxugar depois da limpeza.
PT Desmontagem e montagem da porta do forno: 1.Abrir a porta 2.Rode completamente para trás os ganchos das dobradiças da porta do forno (veja a foto) 5.Remova a placa de vidro e execute a limpeza tal como indicado no capítulo: "Manutençao e cuidados". 6.Volte a montar o vidro. 3.
فك وإعادة تركيب باب الفرن: PT .1أفتح الباب .2قم بإدارة وحدات تثبيت مفصالت باب الفرن بالكامل إلى ال وراء )انظ ر الص ورة( الصورة الموجودة بالفعل )في فصل فك الباب( .5فك اللوح الزجاجي ،ثم ابدأ في عملية التنظيف كما ھو ُمشار إليه في فصل "الصيانة والعناية بالجھاز" .6ضع الزجاج ثانيًة. .3أقفل باب الفرن حتى تسمع صوت تعشيق وح دة التثبي ت )س وف يظ ل الب اب مفتو ًح ا ح والي 40درج ة( )انظر الصورة( 40 ° .
اﻧﺘﺒﻪ :ﻳﺼﺒﺢ هﺬا اﻟﺠﻬﺎز وﺟﻤﻴﻊ أﺟﺰاءﻩ اﻟﻤﻠﻤﻮﺳﺔ ﺳﺎﺧﻨﺔ ﺟﺪًا أﺛﻨﺎء اﻻﺳﺘﺨﺪام. ﻳﺠﺐ ﺗﻮﺧﻰ اﻟﺤﺬر وﺗﺠﻨﺐ ﻣﻼﻣﺴﺔ ﻋﻨﺎﺻﺮ اﻟﺘﺴﺨﻴﻦ. AR ﻗﻢ ﺑﺈﺑﻌﺎد اﻷﻃﻔﺎل اﻷﻗﻞ ﻣﻦ ﺳﻦ 8ﺳﻨﻮات ﻋﻦ اﻟﺠﻬﺎز إﻻ ﻓﻲ ﺣﺎﻟﺔ ﻣﺮاﻗﺒﺘﻬﻢ اﻟﻤﺴﺘﻤﺮة.
ﺍﻟﻌﻨﺎﻳﺔ ﻭﺍﻟﺼﻴﺎﻧﺔ ﺇﻳﻘﺎﻑ ﺗﺸﻐﻴﻞ ﺍﻟﺠﻬﺎﺯ AR ﺍﻓﺼﻞ ﺟﻬﺎﺯﻙ ﻋﻦ ﺗﺰﻭﻳﺪ ﺍﻟﻄﺎﻗﺔ ﻗﺒﻞ ﺇﻧﺠﺎﺯ ﺃﻱ ﻋﻤﻞ ﻟﻪ. ﺗﻨﻈﻴﻒ ﺍﻟﺠﻬﺎﺯ ! ﻻ ﺗﺴﺘﺨﺪﻡ ﻣﻮﺍﺩ ﺍﻟﺘﻨﻈﻴﻒ ﺍﻟﻜﺎﺷﻄﺔ ﺃﻭ ﺍﻵﻛﻠﺔ ﻣﺜﻞ ﻣﺰﻳﻼﺕ ﺍﻟﺒﻘﻊ ،ﺍﻟﻤﻨﺘﺠﺎﺕ ﺍﻟﻤﻘﺎﻭﻣﺔ ﻟﻠﺼﺪﺃ ،ﻣﺴﺎﺣﻴﻖ ﺍﻟﺘﻨﻈﻴﻒ ﺃﻭ ﺇﺳﻔﻨﺠﺎﺕ ﺧﺸﻨﺔ ﺍﻟﻤﻠﻤﺲ :ﻳﻤﻜﻦ ﻟﺬﻟﻚ ﺃﻥ ﻳﺨﺪﺵ ﺍﻟﺴﻄﺢ ﺑﺸﻜﻞ ﻻ ﻳﻤﻜﻦ ﺗﺼﻠﻴﺤﻪ. ﻓﺤﺺ ﻣﻄﺎﻁ ﺍﻟﻔﺮﻥ ﺍﻓﺤﺺ ﻣﻄﺎﻁ ﺍﻟﺒﺎﺏ ﺣﻮﻝ ﺍﻟﻔﺮﻥ ﺑﺸﻜﻞ ﻣﻨﺘﻈﻢ .ﺇﺫﺍ ﺗﻠﻒ ﺍﻟﻤﻄﺎﻁ ،ﺍﻟﺮﺟﺎء ﺍﺗﺼﻞ ﺑﺄﻗﺮﺏ ﻣﺮﻛﺰ ﺧﺪﻣﺔ ﻣﺎ ﺑﻌﺪ ﺍﻟﺒﻴﻊ .ﻧﻮﺻﻲ ﺑﻌﺪﻡ ﺍﺳﺘﺨﺪﺍﻡ ﺍﻟﻔﺮﻥ ﺇﻟﻰ ﺃﻥ ﻳﺘﻢ ﺍﺳﺘﺒﺪﺍﻝ ﺍﻟﻤﻄﺎﻁ. ﺗﺒﺪﻳﻞ ﻣﺼﺒﺎﺡ ﺇﻧﺎﺭﺓ ﺍﻟﻔﺮﻥ .
ﻭﺳﺎﺋﻞ ﺣﺬﺭ ﻭﻧﺼﺎﺋﺢ ! ﺗﻢ ﺗﺼﻤﻴﻢ ﻫﺬﺍ ﺍﻟﺠﻬﺎﺯ ﻭﺗﺼﻨﻴﻌﻪ ﻃﺒﻘﺎ ﻟﻤﻮﺍﺻﻔﺎﺕ ﺍﻷﻣﺎﻥ ﺍﻟﻌﺎﻟﻤﻴﺔ. ﻳﺘﻢ ﺗﺰﻳﻮﺩ ﺍﻟﺘﺤﺬﻳﺮﺍﺕ ﺍﻟﺘﺎﻟﻴﺔ ﻷﺳﺒﺎﺏ ﻭﻗﺎﺋﻴﺔ ﻭﻳﺠﺐ ﻗﺮﺍءﺗﻬﺎ ﺑﻌﻨﺎﻳﺔ. • ﻻ ﺗﻀﻊ ﺃﻏﺮﺍﺿﺎ ﺛﻘﻴﻠﺔ ﻋﻠﻰ ﺑﺎﺏ ﺍﻟﻔﺮﻥ ﻭﻫﻮ ﻣﻔﺘﻮﺡ. AR ﺍﻟﺘﺨﻠﺺ ﺍﻟﻮﻗﺎﻳﺔ ﺍﻟﻌﺎﻣﺔ • ﻫﺬﻩ ﺍﻟﺘﻌﻠﻴﻤﺎﺕ ﺗﻨﻄﺒﻖ ﻓﻘﻂ ﻋﻠﻰ ﺍﻟﺪﻭﻝ ﺍﻟﺘﻲ ﺗﻈﻬﺮ ﺭﻣﻮﺯﻫﺎ ﻓﻲ ﺍﻟﺪﻟﻴﻞ ﻭﻋﻠﻰ ﻟﻮﺣﺔ ﺍﻟﺮﻗﻢ ﺍﻟﺘﺴﻠﺴﻠﻲ. • ﺗﻢ ﺗﺼﻤﻴﻢ ﺍﻟﺠﻬﺎﺯ ﻟﻼﺳﺘﻌﻤﺎﻝ ﺍﻟﺒﻴﺘﻲ ﺩﺍﺧﻞ ﺍﻟﻤﻨﺰﻝ ﻭﻫﻮ ﻏﻴﺮ ﻣﻌ ّﺪ ﻟﻼﺳﺘﻌﻤﺎﻝ ﺍﻟﺘﺠﺎﺭﻱ ﺃﻭ ﺍﻟﺼﻨﺎﻋﻲ. • ﻳﺠﺐ ﻋﺪﻡ ﺗﺮﻛﻴﺐ ﺍﻟﺠﻬﺎﺯ ﺧﺎﺭﺝ ﺍﻟﻤﻨﺰﻝ ،ﺣﺘﻰ ﻭﺇﻥ ﻛﺎﻥ ﺫﻟﻚ ﻓﻲ ﻣﻨﺎﻃﻖ ﻣﻐﻄﺎﺓ .
ﺍﺳﺘﺨﺪﺍﻡ ﺍﻟﺮﻑ ﺍﻟﻜﻬﺮﺑﺎﺋﻲ AR ! ﺍﻟﻮﺿﻊ ﺍﻟﻤﻼﺋﻢ ﻟﻠﺼﻔﺎﺋﺢ ﺍﻟﻜﻬﺮﺑﺎﺋﻴﺔ ﻳﻈﻬﺮ ﻋﻠﻰ ﻛﻞ ﻣﻔﺘﺎﺡ. ﻧﺼﻴﺤﺔ ﻋﻤﻠﻴﺔ ﻻﺳﺘﺨﺪﺍﻡ ﺻﻔﺎﺋﺢ ﺍﻟﺘﺴﺨﻴﻦ ﺍﻟﻜﻬﺮﺑﺎﺋﻴﺔ ﺻﻔﺎﺋﺢ ﺍﻟﺘﺴﺨﻴﻦ ﺍﻟﻜﻬﺮﺑﺎﺋﻴﺔ ﻟﺘﺤﺎﺷﻲ ﻓﻘﺪﺍﻥ ﺍﻟﺤﺮﺍﺭﺓ ﻭﺗﻠﻒ ﺻﻔﺎﺋﺢ ﺍﻟﺘﺴﺨﻴﻦ ،ﺍﺳﺘﺨﺪﻡ ﺃﻭﺍﻧﻲ ﻣﺰﻭﺩﺓ ﺑﻘﺎﻋﺪﺓ ﻣﺴﺘﻮﻳﺔ ﻻ ﻳﻘﻞ ﻗﻄﺮﻫﺎ ﻋﻦ ﻗﻄﺮ ﺻﻔﻴﺤﺔ ﺍﻟﺘﺴﺨﻴﻦ ﺫﺍﺗﻬﺎ.
ﺟﺪﻭﻝ ﻧﺼﺎﺋﺢ ﺍﻟﻄﻬﻲ ﻓﻲ ﺍﻟﻔﺮﻥ AR ﺃﺳﺎﻟﻴﺐ ﺍﻟﻄﻬﻲ ﺍﻷﻃﻌﻤﺔ ﺍﻟﻮﺯﻥ )ﻛﻐﻢ( ﻭﺿﻊ ﺍﻟﺤﺎﻣﻞ ﺍﻹﺣﻤﺎء ﺍﻟﻤﺴﺒﻖ )ﺩﻗﻴﻘﺔ( ﺩﺭﺟﺔ ﺍﻟﺤﺮﺍﺭﺓ ﺍﻟﻤﻮﺻﻰ ﺑﻬﺎ )ﻣﺌﻮﻱ( ﻭﻗﺖ ﺍﻟﻄﻬﻲ )ﺩﻗﺎﺋﻖ( ﺳﺎﻛﻦ ﻻﺯﺍﻧﻴﺎ ﻛﻮﻧﻴﻠﻮﻧﻲ ﺑﺎﺳﺘﺎ ﻣﺨﺒﻮﺯﺓ ﻟﺤﻢ ﺍﻟﻌﺠﻞ ﻟﺤﻢ ﺍﻟﺪﺟﺎﺝ ﺑﻂ ﻟﺤﻢ ﺍﻷﺭﻧﺐ ﻟﺤﻢ ﺍﻟﺨﻨﺰﻳﺮ ﻟﺤﻢ ﺍﻟﺨﺮﻭﻑ ﺳﻤﻚ ﺍﻟﻤﻜﺎﺭﻳﻞ ﺳﻤﻚ ﺍﻟﻤﻜﺎﺭﻳﻞ ﺳﻤﻚ ﺳﻠﻤﻮﻥ ﻣﺨﺒﻮﺯ ﺑﺎﻟﺘﻐﻠﻴﻒ ﺑﻴﺘﺰﺍ ﻧﺎﺑﻮﻟﻲ ﺍﻟﺒﺴﻜﻮﺕ ﻭﺍﻟﻜﻌﻜﺎﺕ ﺍﻟﺼﻐﻴﺮﺓ ﺍﻟﻔﻄﺎﺋﺮ ﺍﻟﺤﻠﻮﺓ ،ﺍﻟﻔﻼﻥ ﻭﺍﻟﺤﻠﻮﻯ ﺍﻟﻔﻄﺎﺋﺮ ﺍﻟﻠﺬﻳﺬﺓ ﻛﻌﻜﺎﺕ ﺍﻟﺨﻤﻴﺮﺓ ﻛﻌﻜﺎﺕ ﺍﻟﻔﻮﺍﻛﻪ 2.5 2.5 2.0 1.7 1.
AR ﺃﺳﺎﻟﻴﺐ ﺍﻟﻄﻬﻲ ﺍﳌﺸﻮﺍﺓ ! ﻳﻤﻜﻦ ﺿﺒﻂ ﻣﺴﺘﻮﻯ ﺩﺭﺟﺔ ﺍﻟﺤﺮﺍﺭﺓ ﻟﻜﻞ ﺃﺳﺎﻟﻴﺐ ﺍﻟﻄﻬﻲ ﺑﻴﻦ 50ﺩﺭﺟﺔ ﻣﺌﻮﻳﺔ ﻭﺍﻟﺤﺪ ﺍﻷﻗﺼﻰ ،ﻓﻴﻤﺎ ﻋﺪﺍ ﺑﺮﻧﺎﻣﺞ ﺍﻟﺸﻮﺍء ،ﺣﻴﺚ ﻳﻮﺻﻰ ﺑﺎﺳﺘﺨﺪﺍﻡ ﻣﺴﺘﻮﻯ ﺍﻟﻄﺎﻗﺔ ﺍﻷﻗﺼﻰ ﻟﻪ. ﻟﺘﺸﻐﻴﻞ ﺍﻟﻤﺸﻮﺍﺓ )ﺍﻧﻈﺮ ﺍﻟﺮﺳﻢ( ﺍﺗﺒﻊ ﻣﺎ ﻳﻠﻲ: X .1ﺿﻊ ﺻﻴﻨﻴﺔ ﺍﻟﺘﻨﻘﻴﻂ ﺑﺎﻟﻮﺿﻊ .1 .2ﺿﻊ ﺩﺍﻋﻢ ﺍﻟﻤﺸﻮﺍﺓ ﺑﺎﻟﻮﺿﻊ 4 ﻭﺃﺩﺧﻞ ﺍﻟﺴﻴﺦ ﻓﻲ ﺍﻟﺸﻖ ﺍﻟﻤﺰﻭﺩ ﻓﻲ ﺍﻟﻠﻮﺣﺔ ﺍﻟﺨﻠﻔﻴﺔ ﻣﻦ ﺍﻟﻔﺮﻥ. .3ﺷﻐﻞ ﺍﻟﻤﺸﻮﺍﺓ ﺑﻮﺍﺳﻄﺔ ﺍﺧﺘﻴﺎﺭ ﻣﻦ ﻣﻔﺘﺎﺡ ﺍﻻﺧﺘﻴﺎﺭ. ﻧﻤﻂ ﺍﻟﻔﺮﻥ ﺍﻟﺴﺎﻛﻦ ﺳﻴﺘﻢ ﺗﺸﻐﻴﻞ ﻛﻞ ﻣﻦ ﻋﻨﺎﺻﺮ ﺍﻟﺘﺴﺨﻴﻦ ﺍﻟﻌﻠﻴﺎ ﻭﺍﻟﺴﻔﻠﻰ .
ﺍﻟﺘﺸﻐﻴﻞ ﻭﺍﻻﺳﺘﺨﺪﺍﻡ ! ﻋﻨﺪ ﺍﺳﺘﺨﺪﺍﻣﻚ ﻟﺠﻬﺎﺯﻙ ﻷﻭﻝ ﻣﺮﺓ ،ﻗﻢ ﺑﺈﺣﻤﺎء ﺍﻟﻔﺮﻥ ﺍﻟﻔﺎﺭﻍ ﺑﻴﻨﻤﺎ ﻳﻜﻮﻥ ﺑﺎﺑﻪ ﻣﻐﻠﻘﺎ ،ﺑﺪﺭﺟﺔ ﺍﻟﺤﺮﺍﺭﺓ ﺍﻟﻘﺼﻮﻯ ﻭﻟﻨﺼﻒ ﺳﺎﻋﺔ ﻋﻠﻰ ﺍﻷﻗﻞ .ﺗﺄﻛﺪ ﻣﻦ ﺃﻥ ﺍﻟﻐﺮﻓﺔ ﻣﻬﻮءﺓ ﺟﻴﺪﺍ ﻗﺒﻞ ﺇﻃﻔﺎء ﺍﻟﻔﺮﻥ ﻭﻓﺘﺢ ﺑﺎﺏ ﺍﻟﻔﺮﻥ .ﻳﻤﻜﻦ ﻟﻠﺠﻬﺎﺯ ﺃﻥ ﻳﻄﻠﻖ ﺭﺍﺋﺤﺔ ﻛﺮﻳﻬﺔ ﻗﻠﻴﻼ ﺑﺴﺒﺐ ﺍﻟﻤﻮﺍﺩ ﺍﻟﻮﺍﻗﻴﺔ ﺍﻟﻤﺴﺘﺨﺪﻣﺔ ﺧﻼﻝ ﻋﻤﻠﻴﺔ ﺍﻟﺘﺼﻨﻴﻊ ﺑﺴﺒﺐ ﺍﻟﺤﺮﻕ. ﺗﺸﻐﻴﻞ ﺍﻟﻔﺮﻥ .1ﺍﺧﺘﺮ ﺃﺳﻠﻮﺏ ﺍﻟﻄﻬﻲ ﺍﻟﻤﺮﻏﻮﺏ ﻓﻴﻪ ﺑﻮﺍﺳﻄﺔ ﺇﺩﺍﺭﺓ ﻣﻔﺘﺎﺡ ﺍﻻﺧﺘﻴﺎﺭ.. .2ﺍﺧﺘﺮ ﺩﺭﺟﺔ ﺍﻟﺤﺮﺍﺭﺓ ﺍﻟﻤﻮﺻﻰ ﺑﻬﺎ ﻷﺳﻠﻮﺏ ﺍﻟﻄﻬﻲ ﺃﻭ ﺩﺭﺟﺔ ﺍﻟﺤﺮﺍﺭﺓ ﺍﻟﻤﺮﻏﻮﺏ ﺑﻬﺎ ﺑﻮﺍﺳﻄﺔ ﺇﺩﺍﺭﺓ ﻣﻔﺘﺎﺡ ﺍﻟﺜﺮﻣﻮﺳﺘﺎﺕ.
ﻭﺻﻒ ﺍﻟﺠﻬﺎﺯ ﻧﻈﺮﺓ ﻋﺎﻣﺔ AR ﻏﻄﺎء زﺟﺎﺟﻲ ﻣﺴﻄﺢ ﺍﺣﺘﻮﺍء ﺍﻻﻧﺴﻜﺎﺏ ﺻﻔﻴﺤﺔ ﺗﺴﺨﻴﻦ ﻛﻬﺮﺑﺎﺋﻴﺔ ﻣﺴﺎﺭﺍﺕ ﺍﻟﺘﻮﺟﻴﻪ ﻹﺩﺧﺎﻝ ﺍﻟﺮﻓﻮﻑ ﻟﻮﺣﺔ ﺍﻟﺘﺤﻜﻢ ﺭﻑ ﺍﻟﺸﻮﺍء ﺍﻟﻮﺿﻊ 5 ﺍﻟﻮﺿﻊ 4 ﺍﻟﻮﺿﻊ 3 ﺍﻟﻮﺿﻊ 2 ﺍﻟﻮﺿﻊ 1 ﺻﻴﻨﻴﺔ ﺍﻟﺘﻨﻘﻴﻂ ﺭﺟﻞ ﻗﺎﺑﻠﺔ ﻟﻠﻤﻌﺎﻳﺮﺓ ﺭﺟﻞ ﻗﺎﺑﻠﺔ ﻟﻠﻤﻌﺎﻳﺮﺓ ﻟﻮﺣﺔ ﺍﻟﺘﺤﻜﻢ ﺿﻮء ﻣﺆﺷﺮ ﺻﻔﻴﺤﺔ ﺍﻟﺘﺴﺨﻴﻦ ﺍﻟﻨﺸﻄﺔ ﻣﻔﺎﺗﻴﺢ ﺍﻟﺘﺤﻜﻢ ﺑﺼﻔﺎﺋﺢ ﺍﻟﺘﺴﺨﻴﻦ 53 ﻣﻔﺘﺎﺡ ﺳﺎﻋﺔ ﺍﻟﺘﻮﻗﻴﺖ* ﻣﻔﺘﺎﺡ ﺍﻟﺜﺮﻣﻮﺳﺘﺎﺕ ﺿﻮء ﻣﺆﺷﺮ ﺍﻟﺜﺮﻣﻮﺳﺘﺎﺕ ﻣﻔﺘﺎﺡ ﺍﻻﺧﺘﻴﺎﺭ
~400V 3N H05RR-F 5x2.5 CEI-UNEL 35363 H05VV-F 5x2.5 CEI-UNEL 35746 1 2 4 3 L3 L2 L1 5 N • ﺛﺒﺖ ﻛﺒﻞ ﺍﻟﺘﺰﻭﻳﺪ ﻓﻲ ﻣﻜﺎﻧﻪ ﺑﻮﺍﺳﻄﺔ ﺍﻟﻜﺒﺸﺔ ﻭﺍﻏﻠﻖ ﻏﻄﺎء ﺍﻟﻠﻮﺣﺔ ﺍﻟﻨﻬﺎﺋﻴﺔ. ﺗﻮﺻﻴﻞ ﻛﺒﻞ ﺗﺰﻭﻳﺪ ﺍﻟﻜﻬﺮﺑﺎء ﺑﺎﻟﺸﺒﻜﺔ ﺍﻟﻜﻬﺮﺑﺎﺋﻴﺔ ﺍﻟﺮﺋﻴﺴﻴﺔ ﺭﻛّﺐ ﺷﻤﻌﺔ ﺇﺷﻌﺎﻝ ﻣﻌﻴﺎﺭﻳﺔ ﺑﻤﺎ ﻳﺘﻼءﻡ ﻣﻊ ﺍﻟﺠﻬﺪ ﺍﻟﻤﺸﺎﺭ ﺇﻟﻴﻪ ﻋﻠﻰ ﺍﻟﻠﻮﺣﺔ ﺍﻟﻤﻮﺟﻮﺩﺓ ﻋﻠﻰ ﺍﻟﺠﻬﺎﺯ.
ﺍﻟﺘﺮﻛﻴﺐ ! ﻗﺒﻞ ﺗﺸﻐﻴﻞ ﺟﻬﺎﺯﻙ ﺍﻟﺠﺪﻳﺪ ،ﻳﺮﺟﻰ ﻗﺮﺍءﺓ ﻧﺸﺮﺓ ﺍﻟﻤﻌﻠﻮﻣﺎﺕ ﻫﺬﻩ ﺑﻌﻨﺎﻳﺔ .ﺇﻧﻬﺎ ﺗﺤﺘﻮﻱ ﻋﻠﻰ ﻣﻌﻠﻮﻣﺎﺕ ﻫﺎﻣﺔ ﻓﻴﻤﺎ ﻳﺘﻌﻠﻖ ﺑﺎﻟﺘﺮﻛﻴﺐ ﺍﻵﻣﻦ ﻭﺗﺸﻐﻴﻞ ﺍﻟﺠﻬﺎﺯ. AR ! ﺍﻟﺮﺟﺎء ﺍﻻﺣﺘﻔﺎﻅ ﺑﻤﻌﻠﻮﻣﺎﺕ ﺍﻟﺘﺸﻐﻴﻞ ﻫﺬﻩ ﻟﻤﺮﺍﺟﻌﺘﻬﺎ ﻓﻲ ﺍﻟﻤﺴﺘﻘﺒﻞ .ﺗﺄﻛﺪ ﻣﻦ ﺇﺭﻓﺎﻕ ﻫﺬﻩ ﺍﻟﺘﻌﻠﻴﻤﺎﺕ ﻋﻨﺪ ﺑﻴﻊ ﺍﻟﺠﻬﺎﺯ ،ﻣﻨﺤﻪ ﻵﺧﺮﻳﻦ ﺃﻭ ﻧﻘﻠﻪ. ! ﻳﺠﺐ ﺗﺮﻛﻴﺐ ﺍﻟﺠﻬﺎﺯ ﻣﻦ ﻗﺒﻞ ﺧﺒﻴﺮ ﻣﺆﻫﻞ ﺑﻤﻮﺟﺐ ﺍﻟﺘﻌﻠﻴﻤﺎﺕ ﺍﻟﻤﺰﻭﺩﺓ.
ﺗﻌﻠﻴﻤﺎﺕ ﺍﻟﺘﺸﻐﻴﻞ 05/2013 - 195111729.