Dear Customer, Our goal is to offer you products with high quality that exceed your expectations. Your appliance is produced in modern facilities carefully and particularly tested for quality. This manual is prepared in order to help you use your appliance that is manufactured by the most recent technology, with confidence and maximum efficiency. Before using your appliance, carefully read this guide that includes the basic information for right and safe installation, maintenance and use.
CONTENTS: 1. SAFETY WARNINGS 2. INSTALLATION AND PREPARATIONS FOR USE 2.1 Environment where the appliance to be installed 2.2 Installation of product 2.3 Gas connection 2.4 Gas conversion 2.5 Electric connection and safety 2.6 Adjustment of feet 3. CLEANING AND MAINTENANCE 4.1 Cleaning 4.2 Maintenance 4. SERVICE AND TRANSPORT 5.1 Basic troubleshooting before contacting service 5.
1. SAFETY WARNINGS READ THESE INSTRUCTIONS CAREFULLY AND COMPLETELY BEFORE USING YOUR APPLIANCE, AND KEEP IT IN A CONVENIENT PLACE FOR REFERENCE WHEN NECESSARY. THIS MANUAL IS PREPARED FOR MORE THAN ONE MODEL IN COMMON. YOUR APPLIANCE MAY NOT HAVE SOME OF THE FEATURES THAT ARE EXPLAINED IN THIS MANUAL. PAY ATTENTION TO THE EXPRESSIONS THAT HAVE FIGURES, WHILE YOU ARE READING THE OPERATING MANUAL.
1. SAFETY WARNINGS - WARNING: If the surface is cracked, switch off the appliance to avoid the possibility of electric shock. - For hobs incorporating a lid, any spillage should be removed from the lid before opening. And also the hob surface should be allowed to cool before closing the lid. - The appliance is not intended to be operated by means of an external timer or separate remotecontrol system. - WARNING: In order to prevent tipping of the appliance, the stabilizing brackets must be installed.
1. SAFETY WARNINGS - WARNING: Ensure that the appliance is switched off before replacing the lamp to avoid the possibility of electric shock. - CAUTION: Accessible parts may be hot when the cooking or grilling is in use. Young children should be kept away. - Your appliance is produced in accordance with all applicable local and international standards and regulations. - Maintenance and repair work must be made only by authorized service technicians.
1. SAFETY WARNINGS - When you unpack the appliance, make sure that it is not damaged during transportation. In case of any defect; do not use the appliance and contact a qualified service agent immediately. As the materials used for packaging (nylon, staplers, styrofoam...etc) may cause harmful effects to children, they should be collected and removed immediately. - Protect your appliance against atmospheric effects. Do not expose it to effects such as sun, rain, snow etc.
1. SAFETY WARNINGS During cleaning and maintenance - Always turn the appliance off before operations such as cleaning or maintenance. You can do it after plugging the appliance off or turning the main switches off.- Do not remove the control knobs to clean the control panel. TO MAINTAIN THE EFFICIENCY AND SAFETY OF YOUR APPLIANCE, WE RECOMMEND YOU ALWAYS USE ORIGINAL SPARE PARTS AND TO CALL ONLY OUR AUTHORIZED SERVICE AGENTS IN CASE OF NEED.
2. INSTALLATION AND PREPARATIONS FOR USE This modern, functional and practical cooker, that was manufactured with the parts and materials of highest quality, will meet your cooking needs in every aspect. You must surely read this manual so that you don't have any problem in future and to be able to have satisfactory results. The following information are the required rules for right installation and service processes. It must be read especially by the technician who will install the appliance.
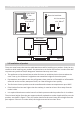
2. INSTALLATION AND PREPARATIONS FOR USE Cooker hood flue Electrical ventilator Air inlet section 2 min. 100cm Air inlet section 2 min. 100cm Figure 3 Figure 4 Min. 60cm Min. 42cm Min. 70cm(without hood) Min. 65cm(with hood) Min. 42cm COOKER HOOD Figure 5 2.2 Installation of product There are some factors that must be paid attention to while installing your product. Surely be very careful to while installing your product.
2. INSTALLATION AND PREPARATIONS FOR USE 2.3 Gas connection Assembly of gas supply and leakage check The connection of the appliance should be performed in accordance with local and international standards and regulations applicable. First check what type of gas is installed on the cooker. This information is given by a sticker on the back of the cooker. You can find the information related to appropriate gas types and appropriate gas injectors on technical data table.
2. INSTALLATION AND PREPARATIONS FOR USE Remember that this appliance is ready to be connected to gas supply in the country for which it has been produced. The main country of destination is marked on the rear cover of the appliance. If you need to use it in another country, any of the connections in the figure below can be required. In such a case, contact local authorities to learn the correct gas connection.
2. INSTALLATION AND PREPARATIONS FOR USE Spanner Injector Figure 8 Figure 7 Adjusting the reduced flame position: The flame length in the minimum position is adjusted with a flat screw located on the valve. For valves with flame failure device, the screw is located on the side of the valve spindle(Figure 12). For valves without flame failure device, the screw is located inside the valve spindle(Figure 13).
2. INSTALLATION AND PREPARATIONS FOR USE 2.5 Electric connection and safety During the electric connection, follow the instructions stated in the user manual. • The earthing cable must be connected to the earth terminal. • You have to ensure the power cord with suitable insulation to be connected to the power source during the connection. If there is no appropriate earthed electric outlet in accordance with regulations in the place where the appliance to be installed, contact to our authorized service.
3. CLEANING AND MAINTENANCE 3.1 Cleaning Be sure that all control switches are off and your appliance cooled before cleaning your oven. Plug off the appliance. Check whether they are appropriate and recommended by the manufacturer before using the cleaning materials on your oven. As they may damage the surfaces, do not use caustic creams, abrasive cleaning powders, thick wire wool or hard tools. In case the liquids that overflow around your oven burn, the enameled parts may be damaged.
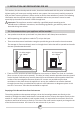
3. CLEANING AND MAINTENANCE Removal of oven door To remove the oven door; • Open the oven door(1). • Open the saddle bracket (with aid of screwdriver, tongs etc.) up to end position(2). 1 • Close the door till it almost reaches to the full closed position as shown in 3rd figure and remove the door by pulling it towards yourself. Saddle bracket Recessed form 2 NOTE: To re-assemble the door follow the opposite rules of removal.
3. CLEANING AND MAINTENANCE Burner Caps: Periodically, enameled pan support, enameled covers, burner heads must be washed with soapy warm water rinsed and dried. After drying them thoroughly, replace them correctly. Hob Surface Enamelled Parts: In order to keep them a new, it is necessary to clean them frequently with mild warm soapy water and then dry with cloth. Do not wash them while hot and never use abrasive powders or abrasive cleaning materials.
4. SERVICE AND TRANSPORT 4.1 Basic troubleshooting before contacting service If the oven does not operate : • The oven may be plugged off, there has been a black out. If the oven does not heat : • The heat may be not adjusted with oven's heater control switch. If the interior lighting lamp does not light : • The electricity must be controlled. It must be controlled whether the lamps are defective. If they are defective, you can change them as following the guide.
AFTER-SALES SERVICE Before calling the After-Sales Service 1. See if you can eliminate the problem on your own (see “Troubleshooting Guide”). 2. Switch the appliance off and on again to see if the problem persists. If the fault persists after the above checks, contact your nearest After-Sales Service. Specify: the type of fault; exact type and model of oven; the After-Sales Service number (the number given after the word “Service” on the dataplate) located inside the storage compartment flap.
Manuel d’utilisation
TABLE DES MATIÈRES Chère cliente, cher client, Notre objectif est de vous offrir des produits de qualité supérieure qui vont au-delà de vos attentes. C’est pourquoi nous les fabriquons dans des infrastructures modernes soigneusement et particulièrement testées pour leur qualité. Ce manuel contient toutes les informations nécessaires à l’utilisation de cet appareil conçu avec une technologie de pointe, en toute confiance et efficacité.
1. AVERTISSEMENTS EN MATIÈRE DE SÉCURITÉ LIRE ATTENTIVEMENT ET INTÉGRALEMENT CES INSTRUCTIONS AVANT L’UTILISATION DE VOTRE APPAREIL.CONSERVER LE MANUEL DANS UN ENDROIT SÛR POUR INFORMATION EN CAS DE BESOIN. CE MANUEL A ÉTÉ CONÇU EN COMMUN POUR PLUS D’UN MODÈLE. IL EST POSSIBLE QUE VOTRE APPAREIL NE DISPOSE PAS DE TOUTES LES FONCTIONS MENTIONNÉES DANS CE MANUEL. VEUILLEZ PRÊTER ATTENTION AUX PARAGRAPHES COMPORTANT DES IMAGES DANS LE MANUEL.
1. AVERTISSEMENTS EN MATIÈRE DE SÉCURITÉ 1. AVERTISSEMENTS EN MATIÈRE DE SÉCURITÉ AVERTISSEMENT : Veillez à ce que l’appareil soit éteint avant de procéder au remplacement de la lampe, afin d’éviter un éventuel choc électrique. - ATTENTION : Les parties accessibles peuvent s’avérer chaudes pendant le fonctionnement de la cuisinière ou du gril. Tenir les petits enfants hors de portée. - Après avoir déballé l’appareil, vérifiez si celui-ci n’a pas été endommagé pendant le transport.
1. AVERTISSEMENTS EN MATIÈRE DE SÉCURITÉ Au cours du nettoyage et de l’entretien - Débranchez toujours la cuisinière avant le nettoyage ou l’entretien. Vous pouvez le faire après avoir débranché l’appareil ou arrêté les principaux commutateurs. - Évitez de retirer les boutons de contrôle pendant le nettoyage du panneau de commande. POUR L’EFFICACITÉ ET LA SÉCURITÉ DE L’APPAREIL, NOUS VOUS RECOMMANDONS D’UTILISER LES PIÈCES DE RÉSERVE ORIGINALES ET DE NE FAIRE APPEL QU’À NOS SERVICES AGRÉÉS EN CAS DE BESOIN.
2. INSTALLATION ET PRÉPARATION À L’UTILISATION 2. INSTALLATION ET PRÉPARATION À L’UTILISATION 2.3 Raccordement au gaz Carneau de hotte Ventilateur électrique Section d’entrée d’air min. 100cm2 Section d’entrée d’air min. 100cm2 Min. 65cm (avec hotte) Min. 70cm (sans hotte) HOTTE DE CUISINIÈRE 2.2: Installation de l’appareil Il existe quelques facteurs auxquels vous devez prêter attention lors de l’installation de l’appareil. Soyez très attentif lors de l’installation de l’appareil.
2. INSTALLATION ET PRÉPARATION À L’UTILISATION 2. INSTALLATION ET PRÉPARATION À L’UTILISATION N’oubliez pas que la connexion de cet appareil au gaz a été prévue dans le pays pour lequel il a été fabriqué. Le principal pays de destination figure sur le couvercle arrière de l’appareil. Si vous avez à vous en servir dans un autre pays, n’importe quelle connexion présentée dans l’illustration ci-dessous peut être requise.
2. INSTALLATION ET PRÉPARATION À L’UTILISATION 3. NETTOYAGE ET ENTRETIEN 2.5 Branchement électrique et sécurité 3.1 Nettoyage BLEU JAUNE+VERT MARRON Pendant le branchement électrique, respectez les consignes prescrites dans le manuel d’utilisation. • Le conducteur de terre doit être connecté à la borne de terre. • Vous devez sécuriser le cordon d’alimentation avec une isolation appropriée à raccorder à la source d’alimentation pendant le branchement.
3. NETTOYAGE ET ENTRETIEN 3. NETTOYAGE ET ENTRETIEN Pour enlever la porte du four Bouchons du brûleur: Périodiquement, lavez les supports de casserole émaillés, les couvercles émaillés, les têtes de brûleur avec de l’eau chaude savonneuse, puis rincez et séchez bien. Après les avoir soigneusement séché, remplacez-les correctement. Gaine cylindrique Forme encastrée Pour enlever la porte en four Pour enlever la porte en four • Ouvrez la porte du four (1).
4. RÉPARATION ET TRANSPORT 4.1 Dépannage de base à effectuer avant de contacter le service de réparation Si le four ne fonctionne pas; • Le four peut être débranché, il peut y avoir une coupure de courant. Le four ne chauffe pas; • La chaleur peut être réglée avec le bouton de contrôle de chauffage du four. La lampe du four ne s’allume pas; • Vérifiez le courant électrique. Vérifiez l’état de la lampe. Si tel est le cas, changez-les en suivant les indications du guide.
0
عميلنا العزيز، هدفنا هو منحكم منتجات بجودة عالية تفوق توقعاتكم .تم إنتاج جهازك في مرافق حديثة تخضع لفحوصات دقيقة وحذرة تخص الجودة. تم إعداد هذا الدليل لمساعدتك على استخدام جهازك المصنع وفق أحدث ما توصلت إليه التكنولوجيا بثقة وفعالية قصوى. قبل استخدام الجهاز ،اقرأ هذا الدليل بعناية فهو يتضمن معلومات أساسية للتركيب الصحيح واآلمن والصيانة واالستخدام .يرجى االتصال بأقرب مركز خدمة معتمد فيما يتعلق بتركيب الجهاز.
المحتويات: .1تحذيرات السالمة .2التركيب والتجهيز لالستخدام بيئة تركيب الجهاز 2.1 تركيب الجهاز 2.2 توصيل الغاز 2.2 تحويل الغاز 2.2 التوصيل الكهربائي والسالمة 2.2 2.2ضبط األقدام .2التنظيف والصيانة التنظيف 2.1 الصيانة 2.2 .2الخدمة والنقل العثور على الخلل قبل االتصال بالخدمة 2.1 المعلومات المتعلقة بالنقل 2.
1.تحذيرات السالمة يرجى قراءة هذه التعليمات بعناية وبشكل كامل قبل استخدام جهازك ،واحتفظ بها في مكان مالئم كمرجع عند الضرورة. تم إعداد هذا الدليل ألكثر من موديل متشابه .قد ال يشتمل جهازك على بعض الميزات الموضحة في هذا الدليل .انتبه للتعبيرات المشتملة على أرقام أثناء قراءة دليل التشغيل.
1.تحذيرات السالمة تحذير :إذا تصدع السطح ،أوقف الجهاز لتجنب احتماليةحدوث صدمة كهربائية. بالنسبة لعيون الغاز التي تحتوي على غطاء ،يجب إزالةأي بقع عن الغطاء قبل فتحه .ويجب ترك سطح عين الغاز يبرد قبل إغالق الغطاء. الجهاز غير مصمم للعمل بواسطة مؤقت خارجي أونظام منفصل للتحكم عن بعد. تحذير :لمنع انقالب الجهاز ،يجب تركيب الدعاماتالمثبتة( .لمعلومات مفصلة ،يرجى قراءة دليل طقم منع االنقالب). يصبح الجهاز ساخنا أثناء االستخدام .
1.تحذيرات السالمة تحذير :تأكد أن الجهاز مطفأ قبل استبدال المصباح لتجنباحتمالية حدوث صدمة كهربائية. تنبيه :ربما تصبح األجزاء المستعملة ساخنة عند الطهي أوالشوي .يجب إبعاد األطفال الصغار. تم إنتاج جهازك طبقا لكافة المعايير واألنظمة المحلية والدولية. − يجب إجراء الصيانة والتصليح بواسطة فنيي الخدمة المعتمدين .إن التركيب وأعمال التصليح التي − تتم بواسطة فنيين غير معتمدين قد تعرضك للخطر .يعتبر تغيير أو تعديل مواصفات الجهاز بأي صورة كانت أمر خطير.
1.تحذيرات السالمة عند إخراج الجهاز من غالفه ،تأكد أنه لم يتضرر أثناء النقل .إذا كان هناك أي عيب ،ال تستخدم الجهاز واتصلبمركز الصيانة المعتمد فورا .نظرا ألن المواد المستخدمة للتغليف (النايلون ،المشابك ،الفلين...الخ) قد تسبب تأثيرات ضارة لألطفال ،يجب جمعها وإزالتها على الفور. احم جهازك من أي تأثيرات جوية .ال تعرضه لتأثيرات مثل الشمس ،المطر ،الثلج ،المسحوق ،الخ. يجب أن تكون المواد المحيطة بالجهاز (الكابينة) قادرة على تحمل درجة حرارة 511مئوية كحد أدنى.
1.تحذيرات السالمة أثناء التنظيف والصيانة أوقف الجهاز قبل عمليات التنظيف والصيانة دائما .يمكنك القيام بذلك بعد نزعه عن الكهرباء أو إيقاف المفتاحالرئيسي .ال تنزع مقابض التحكم لتنظيف لوحة التحكم. للمحافظة على كفاءة الجهاز وأمانه ،نوصي أن تستخدم قطع الغيار األصلية دائما واالتصال بمركز الخدمة المعتمد فقط إن لزم األمر.
2.التركيب والتجهيز لالستخدام تم تصنيع هذا الفرن الحديث والعملي بأجود القطع والمواد وسوف يفي بجميع احتياجاتك .يتعين عليك قراءة هذا الدليل لتجنب أي مشاكل في المستقبل وحتى تحصل على نتائج جيدة .المعلومات التالية هي القواعد المطلوبة لعمليات الصيانة وللتركيب الصحيحة .بشكل خاص ،يجب قراءته بواسطة الفني الكهربائي الذي سيركب الجهاز. هام :يجب تركيب هذا الجهاز وفق تعليمات المصنع وأنظمة البناء المحلية وقواعد هيئة الغاز واألسالك الكهربائية. 1.
2.التركيب والتجهيز لالستخدام أنبوب شفاط الفرن مروحة التهوية الكهربائية الحد األدنى لقسم مدخل الهواء 511سم1 الحد األدنى لقسم مدخل الهواء 511سم1 شكل 3 شكل 5 01سم كحد أدنى شفاط فرن الغاز 51سم كحد أدنى 01سم كحد أدنى (بدون الشفاط) 01سم كحد أدنى (مع الشفاط) 51سم كحد أدنى شكل 1 .1.1تركيب الجهاز هناك بعض العوامل التي يجب االنتباه لها أثناء تركيب الفرن .تنبه لها عند تركيب جهازك .
2.التركيب والتجهيز لالستخدام 3.2توصيل الغاز توصيل مزود الغاز وفحص التسرب يجب أن يتم توصيل الجهاز طبقا لكافة المعايير واألنظمة المحلية والدولية .افحص أوال نوع الغاز المثبت على الموقد .تزود هذه المعلومات بواسطة ملصق على ظهر الموقد .يمكنك العثور على المعلومات المتعلقة بأنواع الغاز المالئمة ومحاقن الغاز المناسبة في جدول البيانات الفنية .تأكد أن ضغط تغذية الغاز متوافق مع القيم المذكورة في جدول البيانات الفنية ،حتى تحصل على أعلى فاعلية ممكنة وضمان أقل استهالك .
2.التركيب والتجهيز لالستخدام تذكر أن هذا الجهاز جاهز للتوصيل مع إمداد الغاز في البلد الذي تم تصنيعه له .بلد الوجهة األساسي مذكور على الغطاء الخلفي للجهاز .إذا أردت استخدامه في بلد آخر ،قد تكون هناك حاجة ألي من التوصيالت في الشكل أدناه .في هذه الحالة ،اتصل بالسلطات المحلية لمعرفة التوصيل الصحيح للغاز.
2.التركيب والتجهيز لالستخدام محقن مفتاح ربط شكل 0 شكل 8 تعديل وضع اللهب المخفض: يتم تعديل طول لسان اللهب في الوضع األدنى بواسطة برغي مسطح على الصمام .بالنسبة للصمامات المزودة بجهاز عطل لسان اللهب ،فإن البرغي موجود على جانب عمود الصمام (شكل .)51بالنسبة للصمامات غير المزودة بجهاز عطل لسان اللهب ،فإن البرغي موجود داخل عمود الصمام (شكل .)53لتعديل أسهل للسان اللهب المنخفض ،ينصح بإزالة لوحة التحكم (والمفتاح الصغير إن وجد) أثناء التعديل.
2.التركيب والتجهيز لالستخدام 3.2التوصيل الكهربائي والسالمة بني أثناء التوصيل الكهربائي ،اتبع التعليمات المذكورة في دليل المستخدم: • يجب توصيل كابل التأريض بالطرف األرضي. • يجب أن تتأكد من توصيل سلك الطاقة ذو العازل المناسب بمصدر الطاقة أثناء التوصيل .إن لم يكن هناك منفذ كهربائي مؤرض بشكل صحيح طبقا لألنظمة في المكان الذي سيركب فيه الجهاز ،اتصل بمركز الخدمة المعتمد على الفور .يجب أن يكون المنفذ الكهربائي المؤرض قريب من الجهاز. • ال تستخدم سلك التطويل.
.2 التنظيف والصيانة 2.3التنظيف تأكد أن جميع مفاتيح التحكم موقفة وأن جهازك قد برد قبل تنظيف الفرن .انزع الجهاز عن الكهرباء .تأكد أن مواد التنظيف مناسبة وموصى بها من قبل المصنع قبل استخدامها لتنظيف الفرن .نظرا ألنها قد تسبب الضرر لألسطح ،ال تستخدم المواد الكاوية أو مساحيق التنظيف الكاشطة أو الصوف الحديدي السميك أو األدوات الخشنة. في حال احتراق السوائل المنسكبة حول فرنك ،قد تتعرض المناطق المطلية للتلف. نظف السوائل المنسكبة فورا.
.2التنظيف والصيانة فك باب الفرن لفك باب الفرن؛ * افتح باب الفرن (.)5 افتح اإلبزيم (بمفك براغي ،كماشة ،الخ) حتى وضع النهاية (.)1 * أغلق الباب حتى يصل إلى كامل الوضع المغلق كما هو موضح في الشكل الثالث وفك الباب بسحبه باتجاهك. قالب مجوف مالحظة :لتركيب الباب مرة أخرى اتبع القواعد العكسية للفك. إبزيم انتبه إلى ضرورة وضع القوالب المجوفة بشكل صحيح على المفاصل المقابلة كما هو موضح في الشكل الثاني.
.3التنظيف والصيانة أغطية الحارقات: يجب غسل دعامات األواني المطلية واألغطية المطلية ورؤوس الحارقات بماء صابوني دافئ ثم شطفها وتجفيفها .بعد تجفيفها تماما ،أعدها بشكل صحيح. سطح الموقد األجزاء المطلية: إلبقائها بحالة جديدة ،يجب غسل الدعامات باستمرار بماء صابوني دافئ ثم جفها بقماشة ناعمة .ال تغسلها إذا كانت ساخنة وال تستخدم مساحيق كاشطة أو مواد تنظيف كاشطة .ال تدع الخل ،القهوة ،الحليب ،الماء ،الليمون أو عصير الطماطم يتالمس مع األجزاء المطلية لفترات طويلة.
.5الخدمة والنقل 5.5العثور على الخلل قبل االتصال بالخدمة إذا كان الفرن ال يعمل؛ • ربما يكون مفصوال عن الكهرباء أو حدث انقطاع للتيار الكهربائي. إذا كان الفرن ال يسخن: • ال يمكن تعديل الحرارة بواسطة مفتاح التحكم بسخان الفرن. إذا كان مصباح اإلضاءة الداخلي ال يضيء: • يجب تفقد الكهرباء .يجبب التحقق ما إذا كان المصباح معطوبا .إذا كان معطوبا ،يمكنك تغييره باتباع الدليل.
خدمة ما بعد البيع قبل االتصال بخدمة ما بعد البيع 1.تأكد إن كنت تستطيع حل المشكلة بمفردك (انظر "دليل العثور على الخلل"). 2.أطفئ الجهاز وشغله ثانية لمعرفة إن كانت المشكلة مستمرة. إن استمر العطل بعد الفحوصات أعاله ،اتصل بأقرب مركز لخدمة ما بعد البيع. حدد: نوع العطل؛ نوع وموديل الفرن بدقة؛ رقم خدمة ما بعد البيع (الرقم المذكور بعد كلمة "خدمة" على لوحة البيانات) موجود داخل جناح حجرة التخزين .وهو مذكور كذلك في كتيب الكفالة؛ عنوانك الكامل؛ رقم هاتفك.