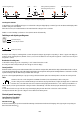
210 mm 145 mm 145 mm 210 mm 210 mm 145 mm 210 mm 280/180 mm 145 mm 210 mm 180 mm 145 mm 280/180 mm 210 mm 145 mm
R = Min. 6,5 mm Max. 8 mm 0 560 +2 mm 580 650 700 mm Min. 50 mm 0 490 +2 mm 510 mm mm 52 mm A 0 +1 0 583 +2 mm 30 483 mm 553 mm R = 11,5 mm 0 0 560+2 0 490+2 mm mm 513 +2 mm R = 11,5 mm 6 mm R = Min. 6,5 mm Max. 8 mm B R = Min. 6,5 mm Max. 8 mm 0 750 +2 mm Min. 50 mm 510 mm mm +1 0 30 mm 52 mm 770 mm 0 490 +2 742 mm 483 mm 0 773 +2 mm R = 11,5 mm Min. 50 mm 0 490+2 mm 0 0 513 +2 750+2 mm mm R = 11,5 mm 6 mm R = Min. 6,5 mm Max.
Min. 10 cm Min. 5 mm Min. 5 mm Min. 3 cm Max.
ENGLISH Installation Page 4 Instructions for use Page These instructions shall also be available on website: www.whirlpool.eu IMPORTANT SAFETY INSTRUCTIONS YOUR SAFETY AND THAT OF OTHERS IS VERY IMPORTANT This manual and the appliance itself provide important safety messages, to be read and always observed. This is the danger symbol, regarding safety, warning of potential risks to users and others.
- Do not touch the appliance heating elements during and after use. Do not allow the appliance to come into contact with cloths or other flammable materials until all the components have cooled down completely. - Do not place flammable materials on or near the appliance. - Overheated oils and fats catch fire easily. Pay attention when cooking food products rich in fat and oil. - A separator panel (not supplied) must be installed in the compartment under the appliance.
EXISTING POTS AND PANS OK NO Use a magnet to check if the pot is suitable for the induction hob: pots and pans are unsuitable if not magnetically detectable. - Make sure pots have a smooth bottom, otherwise they could scratch the hob. Check dishes. - Never place hot pots or pans on the surface of the hob’s control panel. This could result in damage. RECOMMENDED POT BOTTOM WIDTHS Ø Ø XL 28 cm L 21 cm 17 cm min. 28 cm max. Ø Ø 15 cm min. 21 cm max. Flexi cook 18 cm 12 cm min. 14.
Connection to the terminal block For the electrical connection, use an H05RR-F or H05V2V2-F cable as specified in the table below. 220-240 V 3 ~ + 4 x 1.5 mm2 380-415 V 3N ~ + 5 x 1.5 mm2 380-415 V 2N ~ + 4 x 1.
Power management step 1 On/Off Timer Control panel lock/Special function/ Power management step 2 and 4 Power management step 1 Cooking zone controls and corresponding display Switching the hob ON/OFF To switch the hob on, press the button for approx. 2 seconds until the cooking zone displays light up. To switch off, press the same button until the displays switch off.
Simmering (If available) After bringing to the boil, press the key and the hob will automatically set the correct power level to keep the pot simmering. “A” appears on the display: the indicator light lights up. To deactivate the function, simply press button. Melting (If available) This function maintains a permanently low temperature in the cooking zone. After positioning the pot/accessory on the chosen cooking zone, switch on the hob and select the cooking zone.
Activation/deactivation of the acoustic signal After switching the hob on, press and hold the “-” of the first cooking zone and the external button on the right simultaneously for at least five seconds (“as shown below”). . 5 Sec Flexi cook Where present, this function allows the cooking zone to be used as two separate zones or as a single extra large zone. It is perfect for oval, rectangular and elongated pans (with maximum base dimensions of 38x23 cm) or more than one standard pan in the same time.
CLEANING WARNING - Do not use steam cleaners. Before cleaning, make sure the cooking zones are switched off and that the residual heat indicator (“H”) is not displayed. If your glass has the iXeliumTM logo, your hob is equipped with iXeliumTM treatment. iXeliumTM is the exclusive Whirlpool finishing that guarantees a perfect clean and a long-lasting brilliance.
POWER LEVEL TABLE Power level Type of cooking Boost Fast heating 8-9 Frying - boiling Max.