DEUTSCH ENGLISH FRANÇAIS ITALIANO Gebrauchsanweisung Instructions for use Mode d’emploi Istruzioni per l’uso 3 Seite 4 Page 13 Page 22 Pagina 31
BEDIENUNGSANLEITUNG INSTALLATIONSANWEISUNGEN VOR DER ERSTEN BENUTZUNG DES GERÄTES HINWEISE UND ALLGEMEINE RATSCHLÄGE ENERGIESPARTIPPS BACKOFENZUBEHÖR REINIGUNG UND PFLEGE ERST EINMAL SELBST PRÜFEN KUNDENDIENST Um den Herd optimal nutzen zu können, lesen Sie bitte die Bedienungsanleitung aufmerksam durch und bewahren sie zur späteren Verwendung gut auf.
INSTALLATIONSANWEISUNGEN Anschluss an das Stromnetz Bitte stellen Sie vor dem Anschluss des Geräts sicher, dass: 1. die auf dem Typenschild des Gerätes angegebene Spannung mit der Spannung des Stromnetzes in Ihrem Haus übereinstimmt; 2. das elektrische System für die maximale Stromaufnahme des Geräts ausgelegt ist, wie sie auf dem Typenschild angegeben ist; 3.
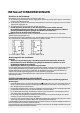
Elektrischer Anschluss des Gerätes an die Netzversorgung Öffnen Sie die Klemmenleiste (siehe Abb. 1), und schrauben Sie die Kabelklemmenschraube los. • Entfernen Sie ca. 70 mm der Kabelummantelung des Netzkabels. • Entfernen Sie ca.
VOR DER ERSTEN BENUTZUNG DES GERÄTES • Nehmen Sie die Zubehörteile aus dem Backofen und heizen Sie den Backofen auf 200 °C auf; lassen Sie ihn ca. zwei Stunden eingeschaltet, um den Geruch von Schutzfetten und Isoliermaterial zu beseitigen. Bitte lassen Sie während dieser Zeit das Fenster geöffnet.
HINWEISE UND ALLGEMEINE RATSCHLÄGE • Dieses Gerät darf ohne Aufsicht weder von Kindern noch von Personen mit herabgesetzten körperlichen, sensuellen oder mentalen Fähigkeiten oder ohne die erforderliche Erfahrung und Kenntnis benutzt werden, es sei denn, sie wurden durch für ihre Sicherheit verantwortliche Personen entsprechend eingewiesen.
ENERGIESPARTIPPS • Das Kochfeld ist mit Kochplatten/Kochzonen unterschiedlicher Durchmesser ausgestattet (je nach Modell). Verwenden Sie nur Töpfe und Pfannen, deren Bodendurchmesser dem der Kochzone/ Kochplatte entspricht oder etwas größer ist. • Verwenden Sie nur Töpfe und Pfannen mit flachem Boden. • Das Kochgeschirr darf nicht über das Bedienfeld hinausragen. • Decken Sie die Töpfe nach Möglichkeit beim Kochen ab. • Kochen Sie Gemüse, Kartoffeln usw. mit wenig Wasser, um die Garzeit zu verkürzen.
REINIGUNG UND PFLEGE Trennen Sie vor jeder Reinigung das Gerät von der Stromversorgung. • Reinigen Sie es mit einem in warmem Wasser angefeuchteten Tuch und mit Seife oder verdünntem Flüssigreiniger. • Verwenden Sie keine scheuernden oder ätzenden Mittel, Bleichlauge oder Stahlwolle/Metallschwämmchen. • Verwenden Sie keinesfalls Wasserdruckreinigungsgeräte. • Keine brennbaren Produkte benutzen. • Lassen Sie keine säurehaltigen oder alkalischen Substanzen wie Essig, Salz, Zitronensaft usw.
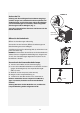
DETAIL A Ausbau der Tür Achtung: Für die nachfolgend beschriebenen Vorgänge wird das Tragen von Schutzhandschuhen empfohlen. Um die Backofentür und die Scharniere nicht zu beschädigen und um Verletzungen zu vermeiden, sind die folgenden Anweisungen strikt zu befolgen. (Fig.
ERST EINMAL SELBST PRÜFEN 1. Das Gerät funktioniert nicht. • Prüfen Sie, ob das Stromnetz Strom führt und ob das Gerät an das Stromnetz angeschlossen ist. • Schalten Sie das Gerät aus und wieder ein, um festzustellen, ob die Störung behoben ist. WICHTIG: • Der Backofenwahlschalter darf nicht auf “0” oder auf dem Symbol “Lampe” stehen.
INSTRUCTIONS FOR USE INSTALLATION INSTRUCTIONS BEFORE USING THE APPLIANCE PRECAUTIONS AND GENERAL ADVICE ENERGY SAVING TIPS OVEN ACCESSORIES CLEANING AND MAINTENANCE TROUBLESHOOTING GUIDE AFTER-SALES SERVICE For best use of the oven, carefully read the operating instructions and keep them for future consultation.
INSTALLATION INSTRUCTIONS Electrical connection Before connecting the appliance, make sure: 1. the mains voltage in your home matches that specified on the appliance dataplate; 2. the electrical system adequate for appliance max. power absorption specified on the dataplate; 3. the house electrical system is suitably earthed. • Connect the appliance to the power supply by means of a suitable disconnecting switch with min.
Connecting the appliance to the power supply Open the terminal board (see Fig. 1), unscrew the cable clamp screw. • Strip approx. 70 mm. of the cable sheath from the power supply cable • Strip approx. 10 mm. of sheath from the conductors • Insert the cable into the cable clamp and connect the conductors to the terminal block as indicated in the diagram printed on the label close to the main box • Secure the power cable by means of the cable clamp • Close and refit the main box plastic cover Fig.
BEFORE USING THE APPLIANCE 1. Packing The packing material is completely recyclable, and is marked with the recycling symbol , which identifies it as a type of material that must be sent to local waste-disposal centres. • Remove the accessories from the oven and heat it at 200°C for about two hours to eliminate the smell of protective grease and insulating materials. Keep the window open during this operation.
PRECAUTIONS AND GENERAL ADVICE • The appliance is not intended for use by children or persons with limited physical, sensory or mental abilities or without experience and knowledge of it, unless they are under the supervision of or instructed in its use by a person responsible for their safety. • Make sure the electrical cables of any other appliances used near the oven do not touch hot parts or get caught in the oven door.
ENERGY SAVING TIPS • The cooking hob is equipped with cooking zones and hotplates of different diameters (depending on the model). Use pots and pans whose bottom diameter is equal to that of the hotplate/cooking zone, or slightly larger. • Only use flat-bottomed pots and pans. • Pots and pans must not protrude over the control panel. • If possible, keep pans covered when cooking. • Cook vegetables, potatoes, etc. with a small amount of water in order to reduce cooking time.
CLEANING AND MAINTENANCE Disconnect the appliance from the power supply before carrying out any cleaning operation. • Clean using a cloth moistened with warm soapy water or diluted liquid detergent. • Do not use abrasive, corrosive or chlorine products, or steel wool. • Do not use steam cleaners. • Do not use flammable products. • Do not leave acid or alkaline substances such as vinegar, salt, lemon juice, etc., on the hob.
DETAIL A Removing the door Caution: When carrying out the following operations it is advisable to wear protective gloves. Carefully follow these instructions to prevent injury and/or damage to the oven door and hinges. (Fig. 1) Pay attention to the oven door hinges: risk of injuring hands! saddle bracket saddle bracket (see detail A) Fig. 1 Open the oven door Fully open the saddle brackets While opening the saddle brackets, use a metal tool such as handle side of a spoon for easy opening.
TROUBLESHOOTING GUIDE 1. The appliance does not work: • Check the mains power supply and that the appliance is electrically connected. • Switch the appliance off and on to see if the problem persists. IMPORTANT: • Check that the oven selector is not turned to “0” or to the “lamp” symbol . • If the oven does not switch on, check that the cooking time programmer (depending on the model) is set to manual mode (see instructions on Product Description Sheet).
NOTICE D’EMPLOI INSTRUCTIONS D’INSTALLATION AVANT D’UTILISER L’APPAREIL POUR LA PREMIÈRE FOIS MESURES DE PRÉCAUTION ET CONSEILS D’ORDRE GÉNÉRAL CONSEILS RELATIFS À L’ÉCONOMIE D’ÉNERGIE ACCESSOIRES DU FOUR NETTOYAGE ET MAINTENANCE GUIDE DE DÉPANNAGE SERVICE APRÈS-VENTE Pour tirer le meilleur profit de votre four, nous vous conseillons de lire attentivement la Notice d’emploi et de la conserver précieusement pour toute consultation future.
INSTRUCTIONS D’INSTALLATION Branchements électriques Avant de brancher l’appareil, assurez-vous que : 1. la tension nominale desservant votre habitation correspond à celle figurant sur la plaque signalétique de l’appareil ; 2. le système électrique est adapté à la puissance maximum absorbée par l’appareil indiquée sur la plaque signalétique ; 3. le circuit d’alimentation électrique domestique est correctement relié à la terre.
Branchement de l’appareil au secteur Ouvrez le bornier (voir fig. 1) et dévissez la vis de fixation du serre-câble. • Dénudez la gaine du cordon d’alimentation sur 70 mm environ • Dénudez la gaine des conducteurs sur 10 mm environ • Faites passer le cordon dans le serre-câble et branchez les conducteurs au bornier comme indiqué sur le schéma imprimé sur l’étiquette apposée à proximité du boîtier principal • Fixez le cordon d’alimentation avec le serre-câble.
AVANT D’UTILISER L’APPAREIL POUR LA PREMIÈRE FOIS 1. Emballage L’emballage est composé de matériaux entièrement recyclables et porte le symbole de recyclage . Ceci signifie qu’il doit être confié au centre de tri des déchets le plus proche. • Retirez tous les accessoires du four et faites-le chauffer à 200 °C pendant environ deux heures, afin d’éliminer les odeurs dégagées par les graisses de protection et les matériaux isolants. Maintenez la fenêtre ouverte pendant toute la durée de cette opération.
MESURES DE PRÉCAUTION ET CONSEILS D’ORDRE GÉNÉRAL • L’appareil ne doit en aucun cas être utilisé par des enfants ou des personnes souffrant d’un handicap physique, sensoriel ou mental, ou non familiarisées avec son utilisation, excepté sous la supervision de ou après avoir été formées à son utilisation par une personne responsable de leur sécurité.
CONSEILS RELATIFS À L’ÉCONOMIE D’ÉNERGIE • La table de cuisson est équipée de foyers et de plaques chauffantes de divers diamètres (selon le modèle). Utilisez des ustensiles de cuisson d’un diamètre identique ou légèrement supérieur à celui de la plaque chauffante/du foyer. • Utilisez exclusivement des ustensiles de cuisson à fond plat. • Les cocottes et les casseroles ne doivent pas dépasser du bandeau de commande. • Dans la mesure du possible, laissez le couvercle sur les casseroles pendant la cuisson.
NETTOYAGE ET MAINTENANCE Avant de procéder au nettoyage ou à l’entretien, débranchez l’appareil de l’alimentation. • Nettoyez avec un chiffon imbibé d’eau chaude savonneuse ou d’un détergent liquide dilué. • N’utilisez en aucun cas des produits abrasifs ou corrosifs, des produits chlorés ou des tampons métalliques. • N’utilisez jamais d’appareil à vapeur. • N’utilisez pas de produits inflammables. • Essuyez immédiatement les substances acides ou alcalines, telles que vinaigre, sel, jus de citron, etc.
DÉTAIL A Démontage de la porte Mise en garde : Lorsque vous procédez aux opérations suivantes, il est conseillé de porter des gants de protection. Suivez attentivement ces instructions pour éviter d’éventuelles lésions, et ne pas endommager la porte du four et les charnières. (Fig.
GUIDE DE DÉPANNAGE 1. L’appareil ne fonctionne pas : • Vérifiez l’alimentation électrique et assurezvous que l’appareil est branché au secteur. • Mettez l’appareil hors tension, puis de nouveau sous tension pour voir si le problème est résolu. Important : • Vérifiez que le sélecteur du four n’est ni sur “0”, ni sur le symbole “ampoule” . • Si le four ne s’allume pas, vérifiez que le programmateur de cuisson (selon le modèle) n’est pas sur le mode manuel (voir instructions sur la Fiche produit).
ISTRUZIONI PER L’USO ISTRUZIONI PER L’INSTALLAZIONE PRIMA DI USARE L’APPARECCHIO PRECAUZIONI E RACCOMANDAZIONI GENERALI CONSIGLI PER IL RISPARMIO ENERGETICO ACCESSORI DEL FORNO PULIZIA E MANUTENZIONE GUIDA ALLA RICERCA DEI GUASTI SERVIZIO ASSISTENZA Per utilizzare al meglio il forno, vi invitiamo a leggere attentamente le istruzioni per l’uso e a conservarle in caso di necessità.
ISTRUZIONI PER L’INSTALLAZIONE Connessione alla rete elettrica Prima di collegare l’apparecchio, verificare che: 1. la tensione di rete della vostra abitazione corrisponda a quella specificata sulla targhetta matricola dell’apparecchio; 2. l’impianto elettrico sia adeguato alla potenza massima di assorbimento dell’apparecchio, indicata sulla targhetta matricola; 3. l’impianto elettrico dell’abitazione presenti una messa a terra corretta. • Collegare l’apparecchio alla rete elettrica mediante.
Collegamento dell’apparecchio all’alimentazione elettrica Aprire la morsettiera (vedere Fig. 1), svitare la vite del morsetto serracavo. • Rimuovere ca. 70 mm. di guaina dal cavo di alimentazione. • Rimuovere ca. 10 mm. di guaina dai conduttori. • Inserire il cavo nel morsetto serracavo e collegare i conduttori alla morsettiera come indicato nello schema stampato sull’etichetta posta accanto alla scatola principale. • Fissare il cavo di alimentazione mediante il morsetto serracavo.
PRIMA DI USARE L’APPARECCHIO 1. Imballo Il materiale di imballaggio è completamente riciclabile ed è contrassegnato dal simbolo del riciclaggio , che lo identifica come un tipo di materiale che deve essere consegnato ai locali centri di smaltimento dei rifiuti. • Togliere gli accessori dal forno e riscaldarlo a 200°C per due ore circa per eliminare gli odori del materiale isolante e dei grassi di protezione. È consigliabile tenere aperta la finestra durante questa operazione.
PRECAUZIONI E RACCOMANDAZIONI GENERALI • L’apparecchio è destinato esclusivamente ad uso domestico per la cottura di alimenti. Non sono consentiti altri usi. Il Fabbricante declina ogni responsabilità per usi non appropriati o per errate impostazioni dei comandi. • Eventuali riparazioni o interventi devono essere eseguiti esclusivamente da un Tecnico qualificato. • Evitare l’esposizione del forno agli agenti atmosferici.
CONSIGLI PER IL RISPARMIO ENERGETICO • Il piano cottura della cucina é provvisto di zone di cottura e piastre di diametro diverso (a seconda del modello). Utilizzare pentole e tegami con un diametro del fondo uguale o lievemente maggiore rispetto a quello della piastra/zona di cottura. • Utilizzare soltanto pentole e tegami con fondo piatto. • Le pentole e i tegami non devono sovrapporsi alla mascherina comandi. • Se possibile, tenere i tegami coperti durante la cottura. • Cuocere verdure, patate, ecc.
PULIZIA E MANUTENZIONE Prima di eseguire qualsiasi operazione di pulizia, scollegare l’apparecchio dall’alimentazione di rete. • Effettuare la pulizia utilizzando un panno inumidito in acqua calda e sapone o detergente liquido diluito. • Non utilizzare prodotti abrasivi o corrosivi, prodotti contenenti cloro o pagliette metalliche. • Non usare pulitrici a getto di vapore. • Non utilizzare prodotti infiammabili.
DETTAGLIO A Rimozione della porta Attenzione: per le seguenti operazioni si raccomanda l’utilizzo di guanti protettivi. Sia per evitare eventuali lesioni sia per non danneggiare la porta del forno e le cerniere, occorre attenersi scrupolosamente a queste istruzioni. (Fig. 1) Fare attenzione alle cerniere della porta forno: esiste il pericolo di ferirsi le mani! Aprire la porta del forno staffa di supporto staffa di supporto (vedere dettaglio A) Fig.
GUIDA ALLA RICERCA DEI GUASTI 1. L’apparecchio non funziona: • Verificare che ci sia tensione in rete e che l’apparecchio sia connesso elettricamente. • Spegnere e riaccendere l’apparecchio per accertarsi che l’inconveniente sia stato ovviato. IMPORTANTE: • Verificare che il selettore del forno non sia ruotato sul simbolo rappresentante “0” o “lampada” .
5019 310 66142 DE GB FR IT 06/10 Whirlpool is a registered trademark of Whirlpool, USA 52034222 07/10 R001 © Copyright Whirlpool Europe s.r.l. 2010. All rights reserved - http://www.whirlpool.