10 mm 145 mm 145 mm 210 mm 210 mm 210 mm 280/180 mm 145 mm 210 mm 180 mm 145 mm 280/180 mm 145 mm 210 mm 145 mm 1
ENGLISH Installation Page 14 Instructions for use Page 17 SVENSKA Installation Sidan 84 Bruksanvisning Sidan 86 NORSK Installasjon Side 94 Bruksanvisning Side 96 DANSK Installation Side 103 Brugervejledning Side 106 SUOMI Asennus Sivu 114 Käyttöohje Sivu 116 2
R = Min. 6,5 mm Max. 8 mm 0 560 +2 mm 580 650 700 mm Min. 50 mm 0 490 +2 mm 510 mm mm 52 mm A 0 +1 0 583 +2 mm 30 483 mm 553 mm R = 11,5 mm 0 0 560+2 0 490+2 mm mm 513 +2 mm R = 11,5 mm 6 mm R = Min. 6,5 mm Max. 8 mm B R = Min. 6,5 mm Max. 8 mm 0 750 +2 mm Min. 50 mm 510 mm mm +1 0 30 mm 52 mm 770 mm 0 490 +2 742 mm 483 mm 0 773 +2 mm R = 11,5 mm Min. 50 mm 0 490+2 mm 0 0 513 +2 750+2 mm mm R = 11,5 mm 6 mm R = Min. 6,5 mm Max.
Min. 10 cm Min. 5 mm Min. 5 mm Min. 3 cm Max.
IMPORTANT SAFETY INSTRUCTIONS These instructions shall also be available on website: www.whirlpool.eu YOUR SAFETY AND THAT OF OTHERS IS VERY IMPORTANT This manual and the appliance itself provide important safety messages, to be read and always observed. This is the danger symbol, regarding safety, warning of potential risks to users and others.
- Metallic objects such as knives, forks, spoons and lids should not be placed on the hob surface since they can get hot. - After use, switch off the hob element by its control and do not rely on the pan detector (only for induction appliances). SAFEGUARDING THE ENVIRONMENT Disposal of packing The packing material is 100% recyclable and marked with the recycling symbol ( disposed of in compliance with local regulations. ).
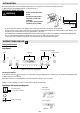
INSTALLATION After unpacking the product, check for any damage during transport. In case of problems, contact the dealer or the After-Sales Service. For built-in dimensions and installation instruction, see the pictures in page 2. PREPARING THE CABINET FOR FITTING - - • • • • • • Install a separator panel under the hob. The lower part of the product must not be accessible after installation. Do not fit the separator panel if an undertop oven is installed. min. 5 mm - WARNING min. 20 mm min.
After switching the hob on, activate the required cooking zone by pressing the corresponding circular button and place the pot on the zone. With the Slider control it is possible to select the required power level, from min. 0 to max. 9, or booster “P” if available. To increase the power level, slide your finger on the slider from left to right several times; to decrease it, slide in the opposite direction. Alternatively the “+” and “-” quick access buttons can be used.
TROUBLESHOOTING GUIDE • • • • • Read and follow the instructions given in the section “Instructions for use”. Check that the electricity supply has not been shut off. Dry the hob thoroughly after cleaning it. If, when the hob is switched on, alphanumeric codes appear on the display, consult the following table for instructions. If the hob cannot be switched off after using it, disconnect it from the power supply.
POWER LEVEL TABLE Power level Type of cooking Boost Fast heating 8-9 Frying - boiling Max.
400010759477 GB SE NO DK FI Whirlpool® Registered trademark/TM Trademark of Whirlpool, USA © Copyright Whirlpool Europe s.r.l. 2014. All rights reserved - http://www.whirlpool.