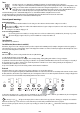
10 mm 145 mm 145 mm 210 mm 210 mm 280/180 mm 145 mm 210 mm 280/180 mm 145 mm DEUTSCH Installation Seite 6 Bedienungsanleitung Seite 8 ENGLISH Installation Page 16 Instructions for use Page 17 FRANÇAIS Installation Page 25 Mode d’emploi Page 27 NEDERLANDS Installatie Pagina 35 Gebruiksaanwijzing Pagina 37 Instalación Página 45 Instrucciones de uso Página 47 Instalação Página 55 Instruções de utilização Página 57 ITALIANO Installazione Pagina 65 Istruzioni per l
A R = Min. 6,5 mm Max. 8 mm 0 560 +2 mm 0 490 +2 510 mm mm mm 52 mm Min. 50 mm 580 mm 0 +1 0 583 +2 mm 30 483 mm 553 mm R = 11,5 mm 0 490+2 mm 0 560+2 mm 0 513 +2 mm R = 11,5 mm 6 mm R = Min. 6,5 mm Max. 8 mm B R = Min. 6,5 mm Max. 8 mm 0 750 +2 mm Min. 50 mm 0 490 +2 510 mm mm +1 0 30 mm 52 mm 770 mm 483 mm 742 mm 0 773 +2 mm R = 11,5 mm Min. 50 mm 0 490+2 mm 0 0 513 +2 750+2 mm mm R = 11,5 mm 6 mm R = Min. 6,5 mm Max.
Min. 10 cm Min. 5 mm Min. 5 mm Min. 3 cm Max.
ENGLISH IMPORTANT SAFETY INSTRUCTIONS These instructions shall also be available on website: www.whirlpool.eu YOUR SAFETY AND THAT OF OTHERS IS VERY IMPORTANT This manual and the appliance itself provide important safety messages, to be read and always observed. This is the danger symbol, regarding safety, warning of potential risks to users and others.
SAFEGUARDING THE ENVIRONMENT Disposal of packing The packing material is 100% recyclable and marked with the recycling symbol ( disposed of in compliance with local regulations. ). The various parts of the packing must not be dispersed in the environment, but Disposal This appliance is marked in conformity with European Directive 2012/19/EU on Waste Electrical and Electronic Equipment (WEEE).
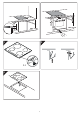
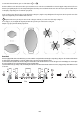
INSTALLATION After unpacking the product, check for any damage during transport. In case of problems, contact the dealer or the After-Sales Service. For built-in dimensions and installation instruction, see the pictures in page 2. PREPARING THE CABINET FOR FITTING Install a separator panel under the hob. The lower part of the product must not be accessible after installation. Do not fit the separator panel if an undertop oven is installed. - - • • • • • • min. 5 mm - WARNING min.
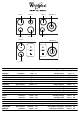
Connect the yellow/green earth wire to the terminal with the symbol . This wire must be longer than the other wires. 1. Remove the terminal block cover (A), undoing the screw and inserting the cover in the terminal block hinge (B). 2. Insert the power cable in the cable clamp and connect the wires to the terminal block as indicated in the connection diagram located near it. 3. Secure the power cable with the cable clamp. 4.
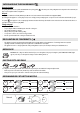
Timer The timer can be used to set cooking time for a maximum of 99 minutes (1 hour and 39 minutes) for all cooking zones. Select the cooking zone to be used with the timer (an illuminated dot appears to the bottom right hand side of the heat setting indicator on the display), press the button with the clock symbol then set the desired cooking time using the buttons “+” and “-” of the timer function (see figure).
To reactivate the Flexicook function, press one of the 2 buttons The Flexi cook function is also able to detect when a pot is moved from one zone to the other one within the flexi cook area keeping the same power level of the zone where the pan originally was placed (see the example in the figure below: if the pot is moved from the front heater to the rear heater, the power level will be shown on the display corresponding to the zone where the pot is placed).
“Power management” (Function where it is available) Thanks to the “Power management” function, the user can set the maximum power the hob can reach, as required. This setting is possible at any time and is maintained until the next change. By setting the required maximum power, the hob automatically adjusts distribution in the various cooking zones, ensuring that this limit is never exceeded; with the advantage of also being able to manage all the zones simultaneously, but without overload problems.
CLEANING WARNING - Do not use steam cleaners. Before cleaning, make sure the cooking zones are switched off and that the residual heat indicator (“H”) is not displayed. IMPORTANT: Do not use abrasive sponges or scouring pads. Their use could eventually ruin the glass. • After each use, clean the hob (when it is cool) to remove any deposits and stains due to food residuals. • Sugar or foods with a high sugar content damage the hob and must be immediately removed.
POWER LEVEL TABLE Power level Type of cooking Boost Fast heating 8-9 Frying - boiling Max.
DE GB 400010764712 DK FR FI NL PL ES CZ PT IT GR SE NO SK HU RU BG RO 05/12 Whirlpool® Registered trademark/TM Trademark of Whirlpool, USA © Copyright Whirlpool Europe s.r.l. 2012. All rights reserved - http://www.whirlpool.eu Завод: Виерлпул Юроп с.р.л. Адрес: (21024) Бьяндронно Лок. Кассинетта (ВА)Италия Для России и стран Таможенного союза: ООО «Виерлпул Си-Ай-Эс» 117105, г. Москва, Варшавское шоссе, дом 9, стр.1Б, 3 эт. Телефон горячей линии в РФ: 8-800-100-57-31 Виерлпул Юроп с.р.л.