DEHUMIDIFIER For questions about features, operation/perlormance, accessories or service call: 1-800-253-1301 parts, or visit our website at... www.whirlpooLcom DESHUlVHDIFICADOR Si tiene preguntas respeoto alas caracterfsticas, funcionamiento, rendimiento, pares, accesorios o servicio teonico, Ilame al: 1-800-253-1301 o visite nuestro sito web en... www.whirlpooLcom Table of Contents/Jndice 1188421 .....................................
TABLEOF CONTENTS DEHUMIDIFIER SAFETY ............................................................... INSTALLATION REQUIREMENTS ................................................ Electrical Requirements ............................................................... Location Requirements ................................................................ DEHUMIDIFIER USE ...................................................................... Setting the Controls (Control types 1 and 2 only) .......................
INSTALLATION REQUIREMENTS Electrical Shock Hazard Plug into a grounded 3 prong outlet. Do not remove ground prong. Do not use an adapter. Do not use an extension cord. A. Allow at least 12" to 18" (30.5 to 45.7 crn) of air space. Failure to follow these instructions can result in death, fire, or electrical shock. You will need a level surface strong enough to support the dehumidifier when its bucket is full of water. Specific electrical requirements are listed in the chart below.
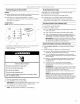
DEHUMIDIFIER USE _'_ , ,_ ,_ "! _ _i _-_*_ _'__os .................... _-_ ................. _'YP<_ ¸_¸¸ _ _£_2 o__ _ /¸ Starting/Stopping the Dehumidifier NOTE: Before turning on the dehumidifier, be sure that the bucket is empty and fits all the way into the dehumidifier. Control Type 1 NOTE: Minimum operating temperature is 65°F (18°C). A B Electrical Plug into a grounded Shock Hazard 3 prong outlet. Do not remove ground prong. / Do not use an adapter, / / Do not use an extension cord.
_! Starting/Stopping _!, '9 .,_ _,/ -_ _! _ ._,_ ,i_ the Dehumidifier • Before turning on the dehumidifier, be sure that the bucket is empty and fits all the way into the dehumidifier. Each time you unplug the dehumidifier or power is interrupted, the control will return to your previous settings when power is restored. _J _ _ _, Bucket Light If this light is on, the dehumidifier is not running.
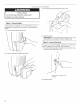
3. Pour water through opening into a sink or tub. 4. Reinstall bucket. Sickness Hazard Do not drink water collected in water bucket. Doing so can result in sickness. Option 1 -- Remove Bucket If a floor drain is not available, or you do not plan to run your dehumidifier continuously, you may want to simply empty the bucket. 1. Use front handle to slide bucket out. IMPORTANT: If the Empty/Adjust Bucket light comes on, the dehumidifier will not operate. Empty or adjust bucket.
3. Attach agarden hosetodrainhoseconnector ontheinsideof thedehumidifier. Handtighten. 5. Reinstall bucket. B j,sj i't NJ----..... NOTES: A. Garden hose B. Drain hose connector 4. To use the bucket without the garden hose, remove the garden hose. Then reinstall bucket. • The bucket must be installed and properly aligned for the dehumidifier to operate with or without a garden hose connected.
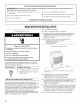
NOTE: Be sure float is snapped in place. Exterior NOTE: Have an authorized service technician clean and service the interior coils of your product annually, 1. Turn off dehumidifier. 2. Dust front grille and side panels with a soft brush or the dusting attachment of your vacuum cleaner. Water Bucket Every few weeks, rinse the inside of the water bucket with a mild detergent to avoid growth of mold, mildew and bacteria. Water Level Float \ The dehumidifier has an Empty/Adjust Bucket light and a water le
ASSISTANCEORSERVICE Before calling for assistance or service, please check "Troubleshooting." It may save you the cost of a service call. If you still need help, follow the instructions below. When calling, please know the purchase date and the complete model and serial number of your appliance. This information will help us to better respond to your request. If you need replacement parts If you need to order replacement parts, we recommend that you use only FSP® replacement parts.
INSTRUCCIONES ADVERTENOIA: deshumidificador, • IMPORTANTES DE SEGURIDAD Para reducir el riesgo de incendio, choque el6ctrico, siga estas Conecte a un contacto 3 terminales. precauciones de pared No quite el terminal de conexi6n lesiones personales o enfermedad al usar su b_sicas: de conexi6n a tierra de • No use un cable electrico de extensi6n. • Desconecte • No beba el agua acumulada el deshumidificador antes de darle servicio. a tierra. en el balde de agua. No use un adaptador.
# COMOUSARELDESHUMIDIFICADOR Encender/Apagar el deshumidiflcador NOTA: Antes de encender el deshumidificador, asegOrese de que el balde este vacio y debidamente insertado en el deshumidificador. Control tipo 1 NOTA: Temperatura mfnima de funcionamiento 65°F (18°C). A Peligro de Choque Electrico B Conecte a un contacto 3 terminales. No quite la terminal de pared de conexion a tierra de de conexi6n a tierra. No use un adaptador. Normal No use un cable electrico Max Dry de extenei6n.
Dryness Control (Control de sequedad) El Dryness Control (Control de sequedad) controla la cantidad de humedad en la habitaci6n. Gire la perilla de control en la direcci6n de las manecillas del reloj para mayor sequedad. Gire la perilla de control en direcci6n contraria a las manecillas del reloj para menor sequedad. Gire la perilla de control hasta "Dry" (Seco) para mantener condiciones de humedad media.
Continuous Run - El deshumidificador funcionara continuamente a la velocidad de ventilaci6n seleccionada independientemente del nivel de humedad. El deshumidificador se apagara solamente si el balde esta Ileno o se quit6. NOTA: El deshelador apagara el compresor si existe un estado de baja temperatura. Si presiona la fecha de Desired Humidity, la cantidad de humedad eliminada no aumentara ni bajara. El compresor volvera a funcionar cuando se termine el estado de temperatura baja.
2, 3. Quite el balde. 4. Conecte una manguera de jardfn al conector de la manguera de desagQe en la parte interior del deshumidificador. Apriete con la mano. 5. Haga pasar el otro extremo de la manguera de jardin por un desagQe de piso. Verifique que la manguera este plana yen el desag(_e. Vuelva a colocar el balde. B \ NOTAS: A. Manguera de jardin B.
NOTA: AsegOrese de que el fiotador este trabado en su lugar. Exterior NOTA: Solicite a un tecnico de servicio autorizado que limpie y de servicio a los serpentines interiores de su producto una vez al al]o. 1. Apague el deshumidificador. 2. Limpie la rejilla delantera y los paneles laterales con un cepillo suave o con el accesorio para quitar el polvo de su aspiradora.
AYUDA0 SERVICIOTECNICO Antes de solicitar ayuda o servicio tecnico, por favor consulte la secci6n "Soluci6n de Problemas". Esto le podrfa ahorrar el costo de una visita de servicio t_cnico. Si considera que aQn necesita ayuda, siga las instrucciones que aparecen a continuaci6n. Cuando Ilame, tenga a mane la fecha de compra y el nQmero completo del modelo y de la serie de su electrodomestico. Esta informaci6n nos ayudara a atender mejor a su pedido.