
Instruction for Use


20
5
4
6
2
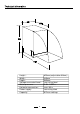
RUBBER
SCREW
COVER
7
SCREW
CONE GEAR
5B
5A
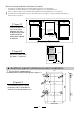
【Figure
7】
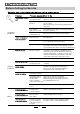
Dishwasher installation steps
●
.
.
.
.
6
7
8
1 Install the furniture door to the outer door of the dishwasher using the brackets provided. Refer
to the template for positioning of the brackets.
2 Adjust the tension of the door springs by using an Allen key turning in a clockwise motion to
ti ghte n the lef t an d righ t door spr ing s. Fai lu re to do t hi s co ul d caus e dama ge t o your dis hwas her
(Illustration 2)
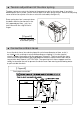
3 Connect the inlet hose to the cold water supply
4 Connect the drain hose. Refer to diagram (Figure 6)
5 Connect the power cord
Affix the condensation strip under the work surface of cabinet. Please ensure the condensation
strip is flush with edge of work surface.
Place the dishwasher into position.
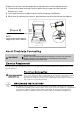
Lev el t he d ish wash er. Th e r ear fee t ca n be a djust ed fro m t he fr ont o f the dis hwa sher b y tu rning
the sc rews on the le ft an d r i ght hand si de o f t he cab in et (Il lust rat ion 5 A). To a dj ust th e fr ont fe et,
use a wrench and turn the front feet until the dishwasher is level (Illustration 5B).
9The dishwasher must be secured in place. There are two ways to do this:
A. Normal work surface-secure to the work surface by using two woodscrews ensuring the
dishwasher weight is not being hit by the surface (Illustration 6).
B. Marb le or gr anite wo rk top -s e cure t he bra cke t to the side pa nel o f the d is hwas her a nd se cure
the dishwasher to the furniture housing. Put the rubber cap over the screw (Illustration 7).